Manuals
/
Whirlpool
/
Kitchen Appliance
/
Dishwasher
Whirlpool
W10282559A Prepare Dishwasher, Option 2, No waste disposer - with air gap
Models:
W10282559A
1
9
36
36
Download
36 pages
23.69 Kb
6
7
8
9
10
11
12
13
Install
If direct wiring dishwasher
Dimension
To change access panel color
Préparation de l’emplacement
Power supply cord method
Page 9
Image 9
Page 8
Page 10
Page 9
Image 9
Page 8
Page 10
Contents
INSTRUCTIONS DINSTALLATION
W10282559A
INSTALLATION INSTRUCTIONS UNDERCOUNTER DISHWASHER
LAVE-VAISSELLESOUS PLAN DE TRAVAIL
TABLE OF CONTENTS
DISHWASHER SAFETY
DISHWASHER SAFETY
INSTALLATION REQUIREMENTS
All installations
INSTALLATION REQUIREMENTS
In addition, for new installations
Tools and Parts
Product dimensions
Cutout dimensions
SIDE VIEW REAR VIEW
If connecting dishwasher with a power supply cord
If direct wiring dishwasher
Drain Requirements
Water Supply Requirements
Prepare cabinet opening using existing
INSTALLATION INSTRUCTIONS
Install the drain hose
utility hookups
Option 1, Direct wire method
Prepare cabinet opening where there are
no existing utility hookups
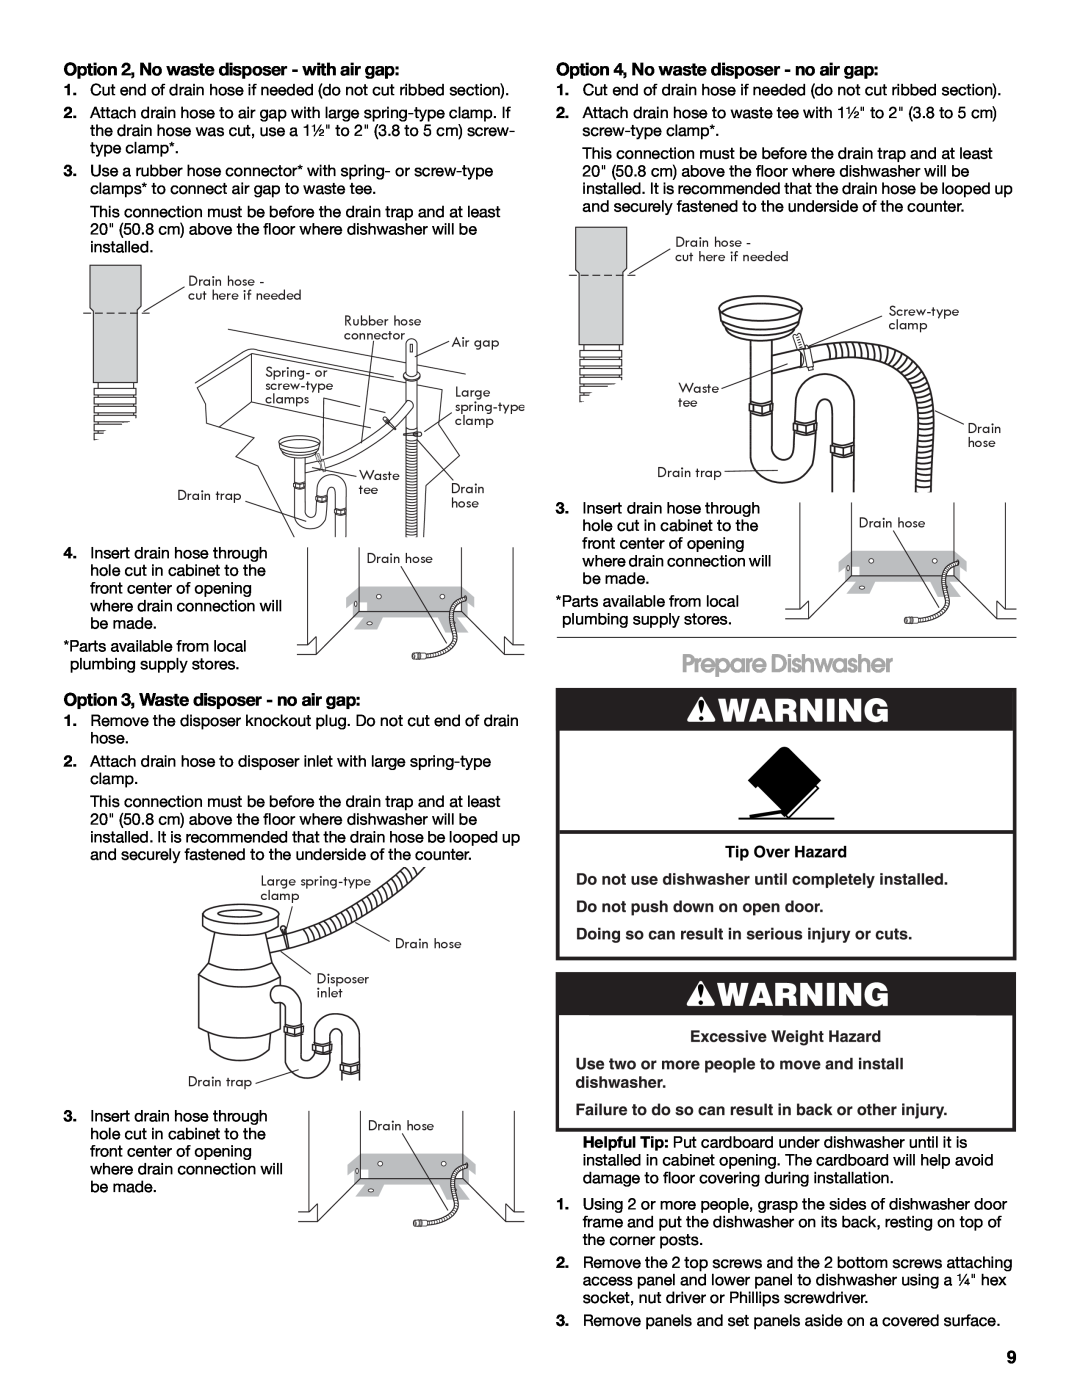
Option 2, No waste disposer - with air gap
Option 2, Power supply cord method
Install the water line
of the following methods
Prepare Dishwasher
5.Slide nut and ferrule onto tubing Nut Ferrule
Check door spring tension
Move dishwasher into cabinet opening
Level the dishwasher
Helpful Tip
Make Electrical Connection
Connect to drain
Connect to water supply
Complete installation
Direct wire method
Power supply cord method
Secure dishwasher in cabinet opening
To change door panel color
Custom door and access panels
To change access panel color
Routing custom panels
Custom panel dimensions
If dishwasher does not operate
Check operation
INSTRUCTIONS D’INSTALLATION
EXIGENCES D’INSTALLATION
SÉCURITÉ DU LAVE-VAISSELLE
Tenir compte de ceci
Emplacement d’installation
EXIGENCES D’INSTALLATION
Pour toutes les configurations d’installation
Outillage et pièces
Dimensions de l’espace d’installation
Dimensions du produit
Spécifications de l’alimentation en eau
Spécifications de la canalisation d’évacuation
Spécifications électriques
Pour le raccordement direct du lave-vaisselle
INSTRUCTIONS D’INSTALLATION
Installation du tuyau d’évacuation
Option 1 - broyeur à déchets - avec brise-siphon
d’installation entre les placards lorsque les
Préparation de l’emplacement
canalisations et câbles n’ont pas été installés
Option 3 - broyeur à déchets - sans brise-siphon
Option 2 - raccordement par cordon d’alimentation
Installation de la canalisation d’eau
Préparation du lave-vaisselle
5.Enfiler l’écrou et la virole sur la canalisation
Établissement de l’aplomb du lave-vaisselle
Contrôle de la tension des ressorts de la porte
Option 1 - Câblage direct
Raccordement électrique
Conseil utile
Option 2, Raccordement par cordon d’alimentation
Raccordement à la canalisation d’évacuation
Raccordement à la canalisation d’eau
l’espace d’installation
Dernières opérations de l’installation
Immobilisation du lave-vaisselledans
Changement de la couleur du panneau de la porte
Alimentation de l’appareil par câblage direct
Panneaux de porte et d’accès personnalisés
Changement de la couleur du panneau d’accès
Usinage des panneaux personnalisés
Dimensions du panneau personnalisé
Spring 8.Panneau d’accès
Contrôle du fonctionnement
Si le lave-vaisellene fonctionne pas
W10282559A
Top
Page
Image
Contents