Manuals
/
Whirlpool
/
Kitchen Appliance
/
Refrigerator
Whirlpool
W10315410A Refrigerator Doors, Complete the Installation, Reverse Doors optional
Models:
W10315410A
1
5
36
36
Download
36 pages
8.45 Kb
1
2
3
4
5
6
7
8
Troubleshooting
Install
Warranty
Solución De Problemas
onsomemodels- Accessory
Utilisation des commandes
Cleaning
Door Removal & Replacement
Page 5
Image 5
Page 4
Page 6
Page 5
Image 5
Page 4
Page 6
Contents
Table ofContents / Índice / Table des matières
REFRIGERATOR SAFETY
DANGER
W10315410A
IMPORTANT SAFETY INSTRUCTIONS
INSTALLATION INSTRUCTIONS
Unpack the Refrigerator
SAVE THESE INSTRUCTIONS
Electrical Requirements
LocationRequirements
Water Supply Requirements
Explosion Hazard
on somemodels
Connect the Water Supply
Water Pressure
Connect to Water Line
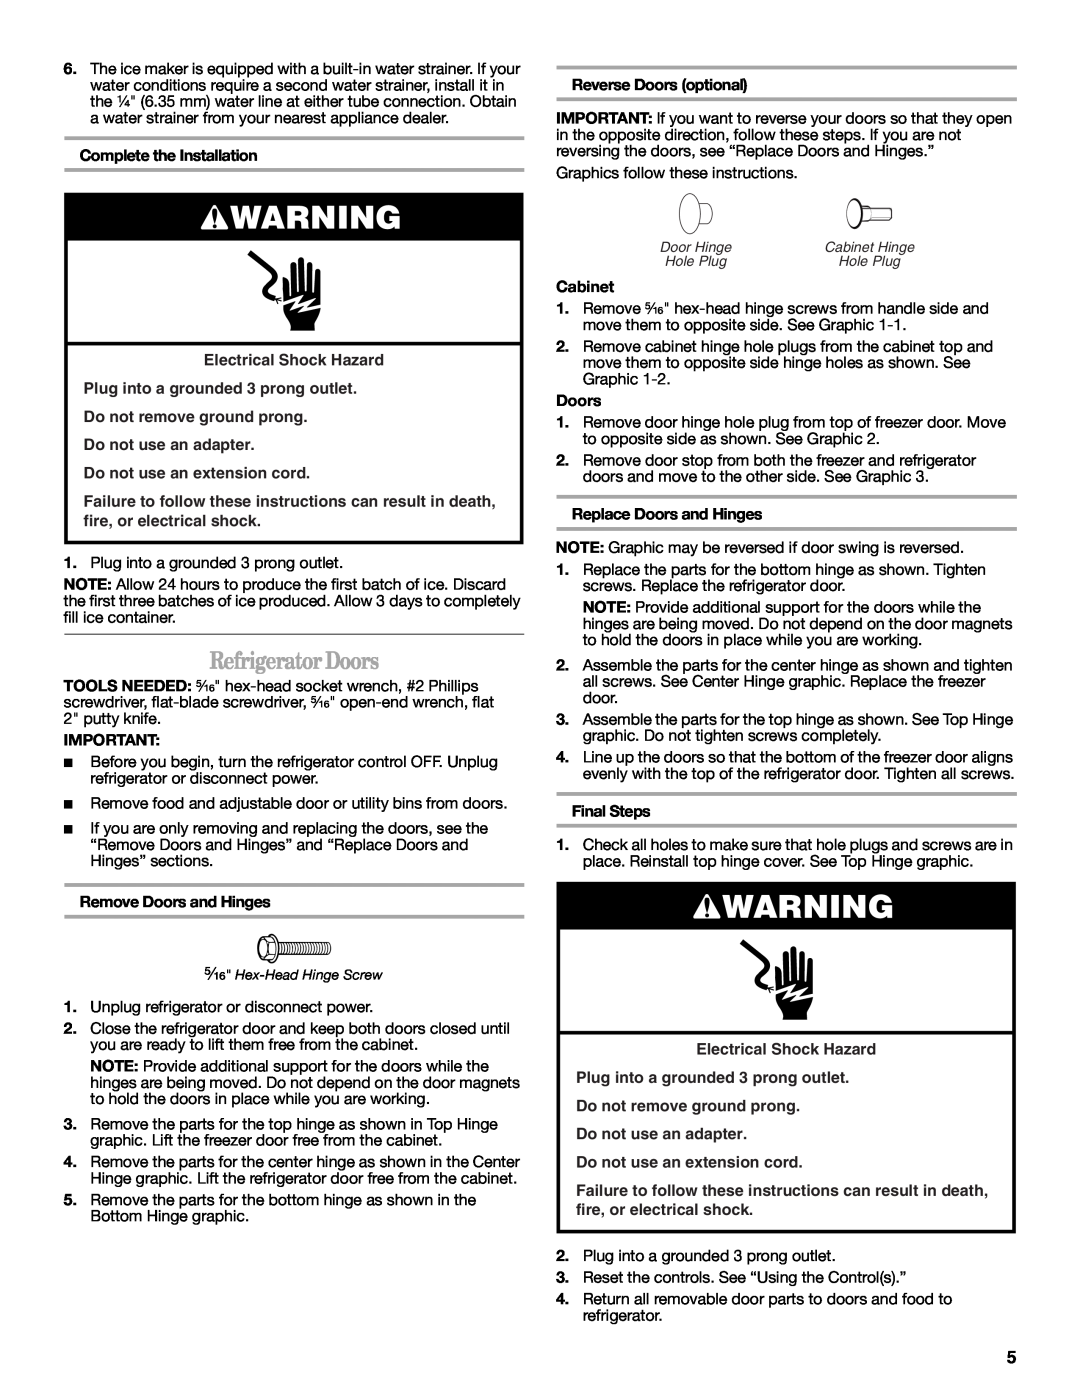
Complete the Installation
Refrigerator Doors
Reverse Doors optional
Electrical Shock Hazard
Door Swing Reversal optional
Door Removal & Replacement
4 Reinstallation of Door Stops
Top Hinge
onsomemodels- Accessory
Using theControl
REFRIGERATOR USE
Door Closing and Alignment
REFRIGERATOR CARE
Cleaning
Changing the Light Bulbs
Explosion Hazard Use nonflammable cleaner
Refrigerator Operation
TROUBLESHOOTING
Iceand Water
Temperature and Moisture
Temperature is too warm
There is interior moisture buildup
LIMITED WARRANTY
WHIRLPOOL CORPORATION MAJOR APPLIANCE WARRANTY
ITEMS EXCLUDED FROM WARRANTY
This limited warranty does not cover
INSTRUCCIONES PARA
SEGURIDAD DEL REFRIGERADOR
EL USUARIO DEL REFRIGERADOR
PELIGRO ADVERTENCIA
ADVERTENCIA
INSTRUCCIONES DE INSTALACIÓN
Cómo deshacerse adecuadamente de su
refrigerador viejo
Requisitos del suministro de agua
Requisitos eléctricos
ADVERTENCIA
Peligro de Choque Eléctrico
Conexión a la tubería de agua
Conexión del suministro deagua en algunos modelos
IMPORTANTE
A G B C F E D
ADVERTENCIA
Puertas del refrigerador
A B C
Cómo terminar la instalación
Carcasa
ADVERTENCIA
Puertas
Pasos finales
Bisagra central
Bisagra superior
Bisagra inferior
las puertas
Uso del control
Cierre y alineamiento de la puerta
USO DE SU REFRIGERADOR
Cierre de la puerta
Fábrica de hielo
CUIDADO DE SU REFRIGERADOR
Limpieza
en algunos modelos - accesorio
Cómo cambiar los focos
SOLUCIÓN DE PROBLEMAS
Funcionamiento delrefrigerador
ADVERTENCIA
Hielo y agua
Temperatura y humedad
ADVERTENCIA
Es difícil abrir la puerta
GARANTÍA DE LOS ELECTRODOMÉSTICOS PRINCIPALES DE
WHIRLPOOL CORPORATION
GARANTÍA LIMITADA
EXCLUSIONES DE LA GARANTÍA
DANGER AVERTISSEMENT
SÉCURITÉ DU RÉFRIGÉRATEUR
INSTRUCTIONS DUTILISATION DU
RÉFRIGÉRATEUR
AVERTISSEMENT
INSTRUCTIONS DINSTALLATION
Mise au rebutde votre vieux réfrigérateur
Déballage duréfrigérateur
Spécifications électriques
Exigences demplacement
AVERTISSEMENT
AVERTISSEMENT
Raccordement de la canalisation d’eau
Spécifications de l’alimentationen eau
surcertainsmodèles
Pression de leau
AVERTISSEMENT
Achever l’installation
Raccordement au réfrigérateur
A B C
Réinstallation - Portes et charnières
Portes du réfrigérateur
AVERTISSEMENT
Démontage - Portes et charnières
Inversion douverture de la porte option
Démontage et réinstallation de la porte
4Réinstallation des butées de porte
Charnière supérieure
UTILISATION DU RÉFRIGÉRATEUR
Utilisation des commandes
Fermeture et alignement des portes
Ajustement des commandes
ENTRETIEN DU RÉFRIGÉRATEUR
sur certains modèles- accessoire
Machine à glaçons
Nettoyage
DÉPANNAGE
Remplacement des ampoules d’éclairage
Fonctionnement du réfrigérateur
AVERTISSEMENT
Glaçons et eau
Température et humidité
AVERTISSEMENT
La porte est difficile à ouvrir
WHIRLPOOL CORPORATION
GARANTIE DE GROS APPAREIL MÉNAGER
GARANTIE LIMITÉE
ÉLÉMENTS EXCLUS DE LA GARANTIE
2010 Whirlpool Corporation
W10315410A EN/FR PN W10315409A
5/10
All rights reserved
Top
Page
Image
Contents