UsingtheControls
![]() WARNING
WARNING
Electrical Shock Hazard
Plug into a grounded 3 prong outlet.
Do not remove ground prong.
Do not use an adapter.
Do not use an extension cord.
Failure to follow these instructions can result in death, fire, or electrical shock.
1.Plug into a grounded 3 prong outlet.
2.Press POWER to start the air purifier. An indicator light will turn on.
3.Press POWER to stop the air purifier. The indicator light will turn off.
Fan Speed
Press FAN SPEED until the indicator light comes on for the desired speed.
FAN SPEED | RESULT |
Low | Best product sound |
Medium | Slower cleaning power |
High | Moderate cleaning power |
Turbo | Maximum cleaning power |
Sleep Mode
Press SLEEP MODE to set. Sleep mode runs on Low fan speed for 8 hours and then returns to previously selected setting. To exit before 8 hours, press SLEEP MODE, FAN SPEED, or POWER.
Control Lock
The Control Lock locks the controls to prevent unintended changing of the settings when the air purifier is on or off.
1.Press and hold SLEEP MODE for 5 seconds to lock. The Control Lock indicator light will turn on. (No selection can be made.)
2.Press SLEEP MODE for 5 seconds to unlock. The Control Lock indicator light will turn off. Now selections can be made and the unit can be turned on or off.
Filter Status Lights
The
AIR PURIFIER CARE
Cleaning
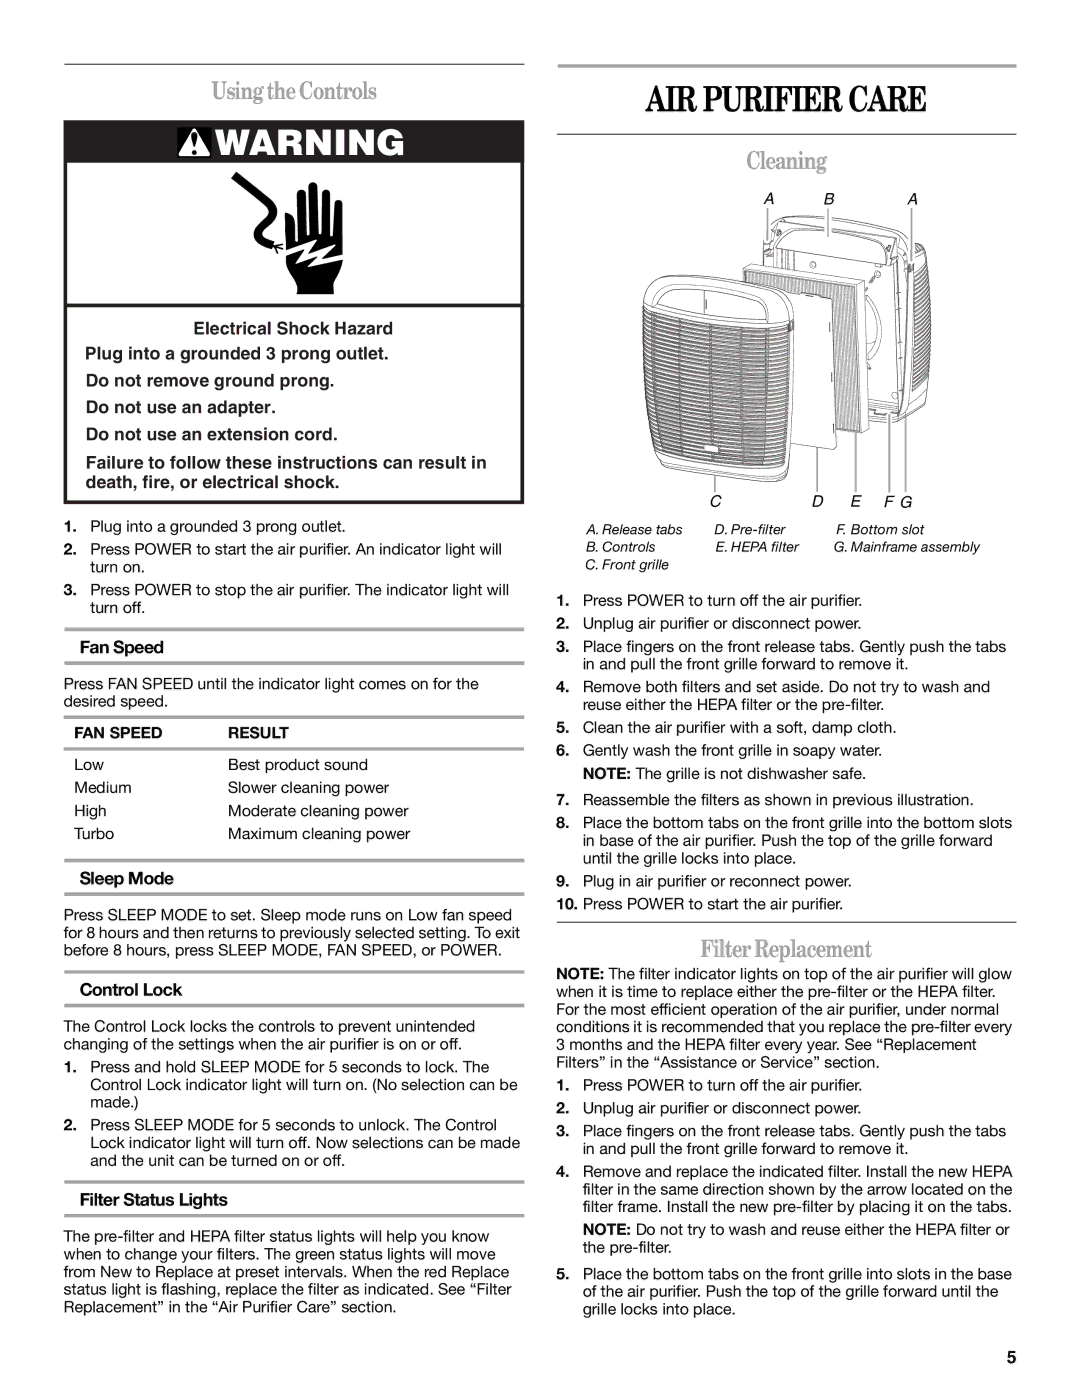
A B A
| C | D | E F G |
A. Release tabs | D. |
| F. Bottom slot |
B. Controls | E. HEPA filter |
| G. Mainframe assembly |
C. Front grille |
|
|
|
1.Press POWER to turn off the air purifier.
2.Unplug air purifier or disconnect power.
3.Place fingers on the front release tabs. Gently push the tabs in and pull the front grille forward to remove it.
4.Remove both filters and set aside. Do not try to wash and reuse either the HEPA filter or the
5.Clean the air purifier with a soft, damp cloth.
6.Gently wash the front grille in soapy water. NOTE: The grille is not dishwasher safe.
7.Reassemble the filters as shown in previous illustration.
8.Place the bottom tabs on the front grille into the bottom slots in base of the air purifier. Push the top of the grille forward until the grille locks into place.
9.Plug in air purifier or reconnect power.
10.Press POWER to start the air purifier.
Filter Replacement
NOTE: The filter indicator lights on top of the air purifier will glow when it is time to replace either the
1.Press POWER to turn off the air purifier.
2.Unplug air purifier or disconnect power.
3.Place fingers on the front release tabs. Gently push the tabs in and pull the front grille forward to remove it.
4.Remove and replace the indicated filter. Install the new HEPA filter in the same direction shown by the arrow located on the filter frame. Install the new
NOTE: Do not try to wash and reuse either the HEPA filter or the
5.Place the bottom tabs on the front grille into slots in the base of the air purifier. Push the top of the grille forward until the grille locks into place.
5
