Drain the gasoline from the snow thrower, or place a piece of plastic film under the gas cap.

Tip the snow thrower up and forward so that it rests on its auger housing.

Remove the six self-tapping screws from the frame cover underneath the snow thrower.

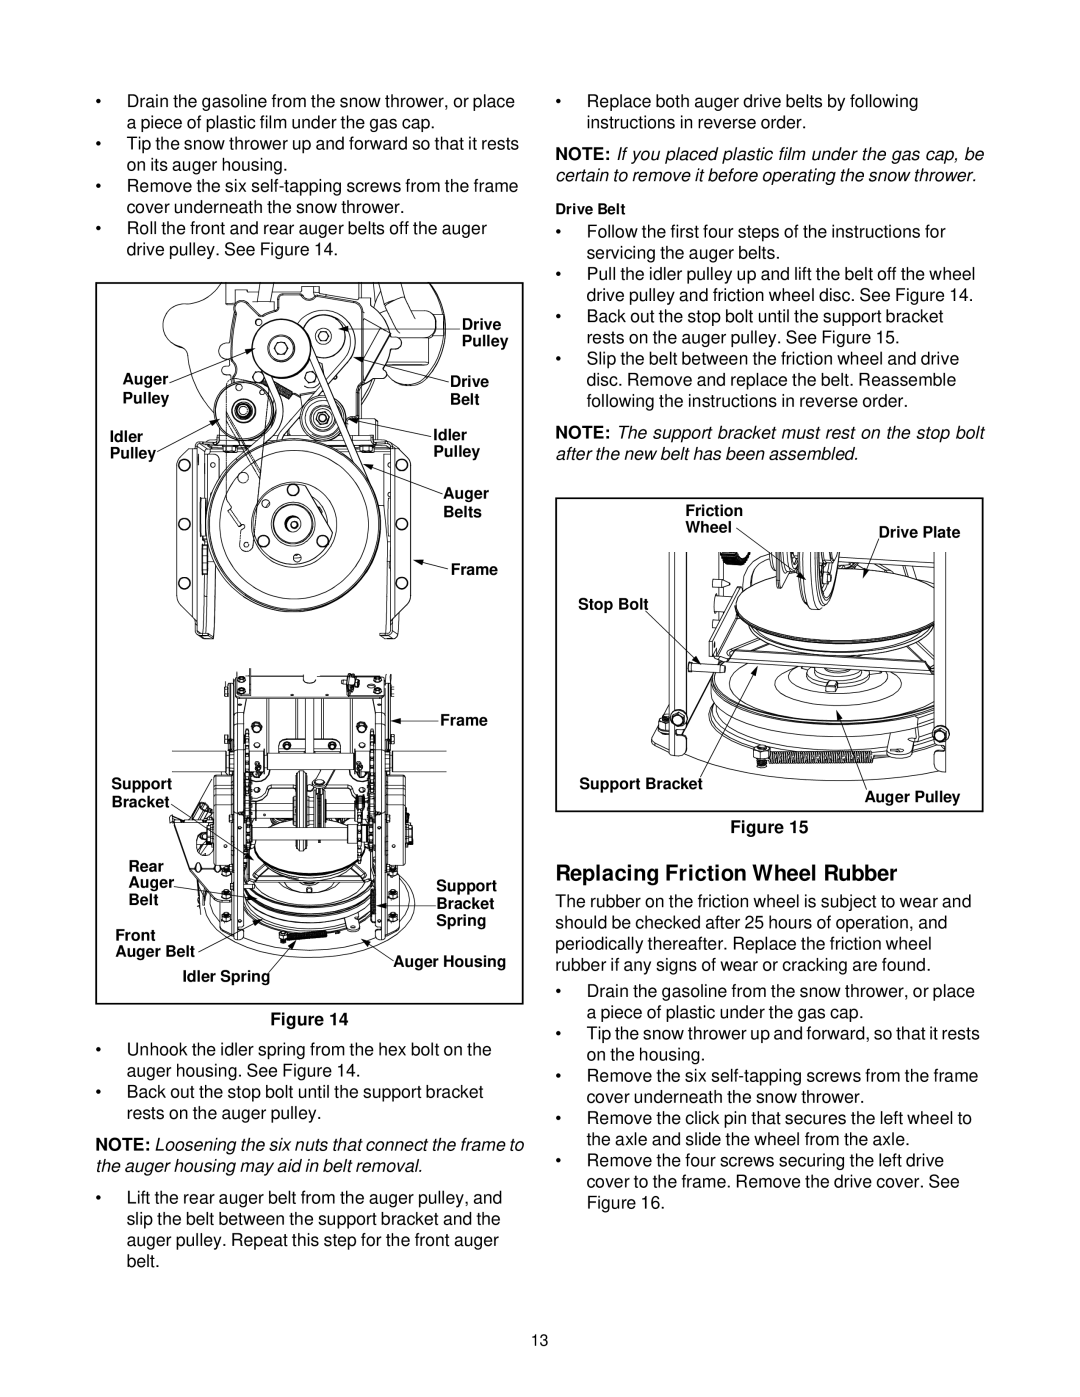
Roll the front and rear auger belts off the auger drive pulley. See Figure 14.


Drive


Pulley

Auger

Drive

Pulley

Belt

Idler

Idler

Pulley

Pulley


Auger


Belts


Frame


Frame

Support


Bracket


Rear


Auger

Support

Belt

Bracket

Front

Spring


Auger Belt

Auger Housing

Idler Spring


Figure 14

Unhook the idler spring from the hex bolt on the auger housing. See Figure 14.

Back out the stop bolt until the support bracket rests on the auger pulley.

NOTE: Loosening the six nuts that connect the frame to the auger housing may aid in belt removal.

Lift the rear auger belt from the auger pulley, and slip the belt between the support bracket and the auger pulley. Repeat this step for the front auger belt.

Replace both auger drive belts by following instructions in reverse order.

NOTE: If you placed plastic film under the gas cap, be certain to remove it before operating the snow thrower.

Drive Belt

Follow the first four steps of the instructions for servicing the auger belts.

Pull the idler pulley up and lift the belt off the wheel drive pulley and friction wheel disc. See Figure 14.

Back out the stop bolt until the support bracket rests on the auger pulley. See Figure 15.

Slip the belt between the friction wheel and drive disc. Remove and replace the belt. Reassemble following the instructions in reverse order.

NOTE: The support bracket must rest on the stop bolt after the new belt has been assembled.

Friction


Wheel

Drive Plate


Stop Bolt


Support Bracket

Auger Pulley


Figure 15

Replacing Friction Wheel Rubber

The rubber on the friction wheel is subject to wear and should be checked after 25 hours of operation, and periodically thereafter. Replace the friction wheel rubber if any signs of wear or cracking are found.

Drain the gasoline from the snow thrower, or place a piece of plastic under the gas cap.

Tip the snow thrower up and forward, so that it rests on the housing.

Remove the six self-tapping screws from the frame cover underneath the snow thrower.

Remove the click pin that secures the left wheel to the axle and slide the wheel from the axle.

Remove the four screws securing the left drive cover to the frame. Remove the drive cover. See Figure 16.

13

Page 13
Image 13
White Outdoor 1150W, 850W manual Replacing Friction Wheel Rubber, Drive Belt

850W, 1150W specifications

The White Outdoor 1150W and 850W models represent a line of powerful and reliable outdoor equipment tailored for both professional and residential use. Renowned for their exceptional performance, these machines are equipped with advanced technologies that make them suitable for various outdoor tasks, including snow removal, leaf blowing, and lawn care.

One of the standout features of the White Outdoor 1150W is its robust 1150-watt motor. This motor provides ample power to tackle heavy-duty tasks without compromising efficiency. The design of the motor allows for optimal airflow, ensuring that the machine operates smoothly even under demanding conditions. Similarly, the 850W model, while slightly less powerful, is still equipped with an efficient 850-watt motor that delivers strong performance for everyday outdoor chores.

Both models boast user-friendly designs, emphasizing comfort and ease of use. The ergonomic handles are designed to reduce fatigue during extended use, making them ideal for those who may spend long hours working outdoors. The lightweight structure of both units enhances maneuverability, allowing users to navigate tight spaces and carry the machines effortlessly.

Another significant characteristic of the White Outdoor series is their versatile functionality. The 1150W model often features multiple speed settings, enabling users to adjust the power output according to the task at hand. This adaptability makes it perfect for various applications, from gentle blowing for delicate flowers to powerful blasts for clearing heavy debris. The 850W model, while simpler, still offers dependable performance for standard clean-up jobs.

Safety is a paramount consideration in these designs. Both models include features such as thermal overload protection, which prevents the motors from overheating during prolonged use. Additionally, the machines are built with durable materials that withstand harsh weather conditions, ensuring longevity and reliability.

In terms of technology, both the 1150W and 850W benefit from energy-efficient engineering that not only saves power but also minimizes environmental impact. This is linked to an emphasis on creating machines that balance performance with sustainability.

In conclusion, the White Outdoor 1150W and 850W models are excellent choices for anyone looking to enhance their outdoor maintenance capabilities. With powerful motors, user-friendly designs, versatile functionality, and a focus on safety and sustainability, these machines stand out as reliable tools for accomplishing a wide range of outdoor tasks.