INSTALLATION

If the heating equipment manufacturer has made provisions or recommendations for the location of this control, then follow those instructions. If not, the following suggestions should be observed.

1.The control should be mounted in the wall, approximately five feet from the floor, as near as possible to the center of the controlled area.

2.It should be mounted on a partitioning wall, not on an outside wall.

3.It should be mounted as far as possible from undesirable sources of heat and cold such as:

a.Windows and doors

b.Direct rays from sun

c.Hot water or cold water pipes

d.Adjoining outside walls

WIRING

All wiring must conform to local and national electrical codes and ordinances.

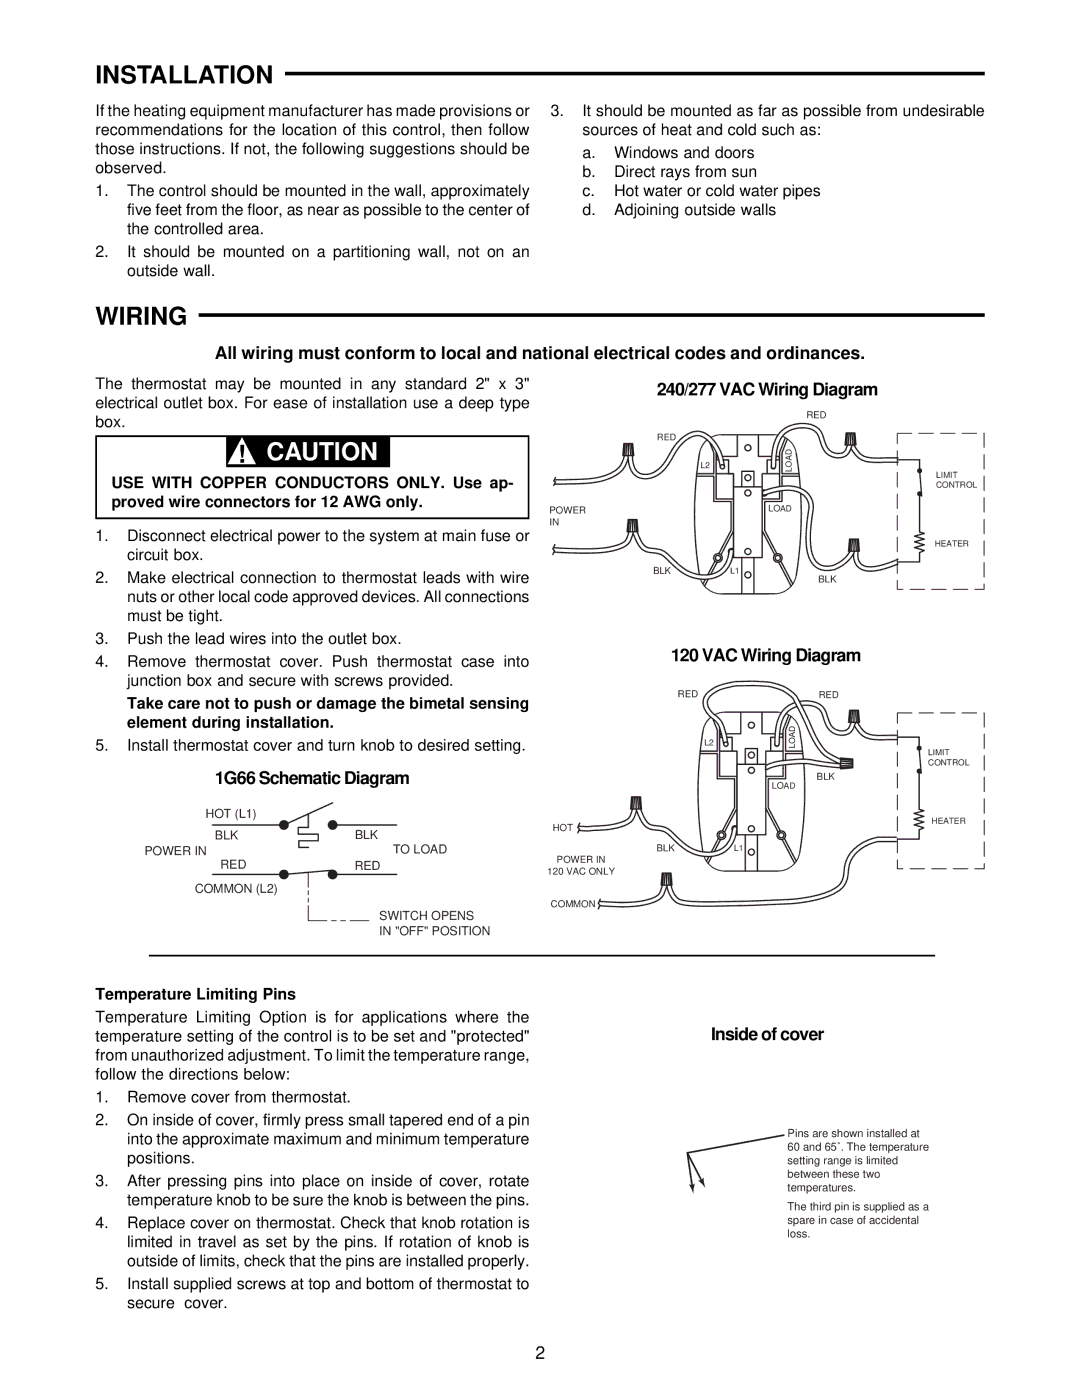
The thermostat may be mounted in any standard 2" x 3" electrical outlet box. For ease of installation use a deep type box.

!CAUTION

USE WITH COPPER CONDUCTORS ONLY. Use ap- proved wire connectors for 12 AWG only.

1.Disconnect electrical power to the system at main fuse or circuit box.

2.Make electrical connection to thermostat leads with wire nuts or other local code approved devices. All connections must be tight.

3.Push the lead wires into the outlet box.

240/277 VAC Wiring Diagram

RED


RED


L2

LOAD

POWER


LOAD

IN

BLKL1

BLK

LIMIT CONTROL

HEATER

4.Remove thermostat cover. Push thermostat case into junction box and secure with screws provided.

Take care not to push or damage the bimetal sensing element during installation.

5.Install thermostat cover and turn knob to desired setting.

1G66 Schematic Diagram

HOT (L1)


BLK

BLK

POWER IN

TO LOAD

RED

RED

COMMON (L2)


SWITCH OPENS


IN "OFF" POSITION

120 VAC Wiring Diagram

RED

RED

L2

LOAD


BLK


LOAD

HOT


BLK

L1

POWER IN


120 VAC ONLY


COMMON


LIMIT CONTROL

HEATER

Temperature Limiting Pins

Temperature Limiting Option is for applications where the temperature setting of the control is to be set and "protected" from unauthorized adjustment. To limit the temperature range, follow the directions below:

1.Remove cover from thermostat.

2.On inside of cover, firmly press small tapered end of a pin into the approximate maximum and minimum temperature positions.

3.After pressing pins into place on inside of cover, rotate temperature knob to be sure the knob is between the pins.

4.Replace cover on thermostat. Check that knob rotation is limited in travel as set by the pins. If rotation of knob is outside of limits, check that the pins are installed properly.

5.Install supplied screws at top and bottom of thermostat to secure cover.

Inside of cover

Pins are shown installed at 60 and 65˚. The temperature setting range is limited between these two temperatures.

The third pin is supplied as a spare in case of accidental loss.

2

Page 2
Image 2
White Rodgers 1G66, 150 installation instructions Installation, Wiring

150, 1G66 specifications

The White Rodgers 150,1G66 is a versatile and efficient thermostat that has garnered attention for its user-friendly features and advanced technology. This model is part of the White Rodgers product line, which is known for its commitment to quality and innovation in climate control solutions.

One of the primary features of the White Rodgers 150,1G66 is its compatibility with a wide range of heating and cooling systems. It supports both single-stage and multi-stage systems, making it suitable for various residential and commercial applications. Homeowners and HVAC professionals appreciate its adaptability, allowing for easy integration into many existing setups without the need for extensive modifications.

The thermostat employs digital technology, enabling precise temperature control and improved energy efficiency. Users can program their heating and cooling schedules to optimize comfort while minimizing energy consumption. This feature is particularly beneficial for those looking to reduce their utility bills. With multiple program options, users can customize settings for different days of the week, ensuring that the environment is comfortable when needed and energy is conserved when it isn’t.

Another standout characteristic of the White Rodgers 150,1G66 is its intuitive interface. The large, easy-to-read display allows users to navigate settings effortlessly. Features such as backlighting make it simple to read in low-light conditions, while straightforward buttons and menus ensure that even those who are not tech-savvy can operate the thermostat with ease.

In terms of installation, the White Rodgers 150,1G66 is designed for convenience. It comes with a straightforward setup guide and is compatible with various mounting options, which means it can be installed quickly by homeowners or HVAC technicians alike. Additionally, its durable design ensures longevity, promising reliable performance over the years.

Energy-saving technologies are increasingly vital in today’s environment-conscious society, and the White Rodgers 150,1G66 meets this demand. With its ability to learn user preferences and adjust accordingly, it can significantly contribute to energy efficiency over time. This feature not only aids in reducing energy consumption but also supports a more sustainable lifestyle.

Overall, the White Rodgers 150,1G66 stands as a commendable choice for those seeking a reliable, user-friendly thermostat that balances technology with efficiency. Its range of features, coupled with its ease of use, make it an appealing option for homeowners desiring comfort and control over their indoor climate. Whether for new installations or replacements, the 150,1G66 sets a high standard in thermostat technology.