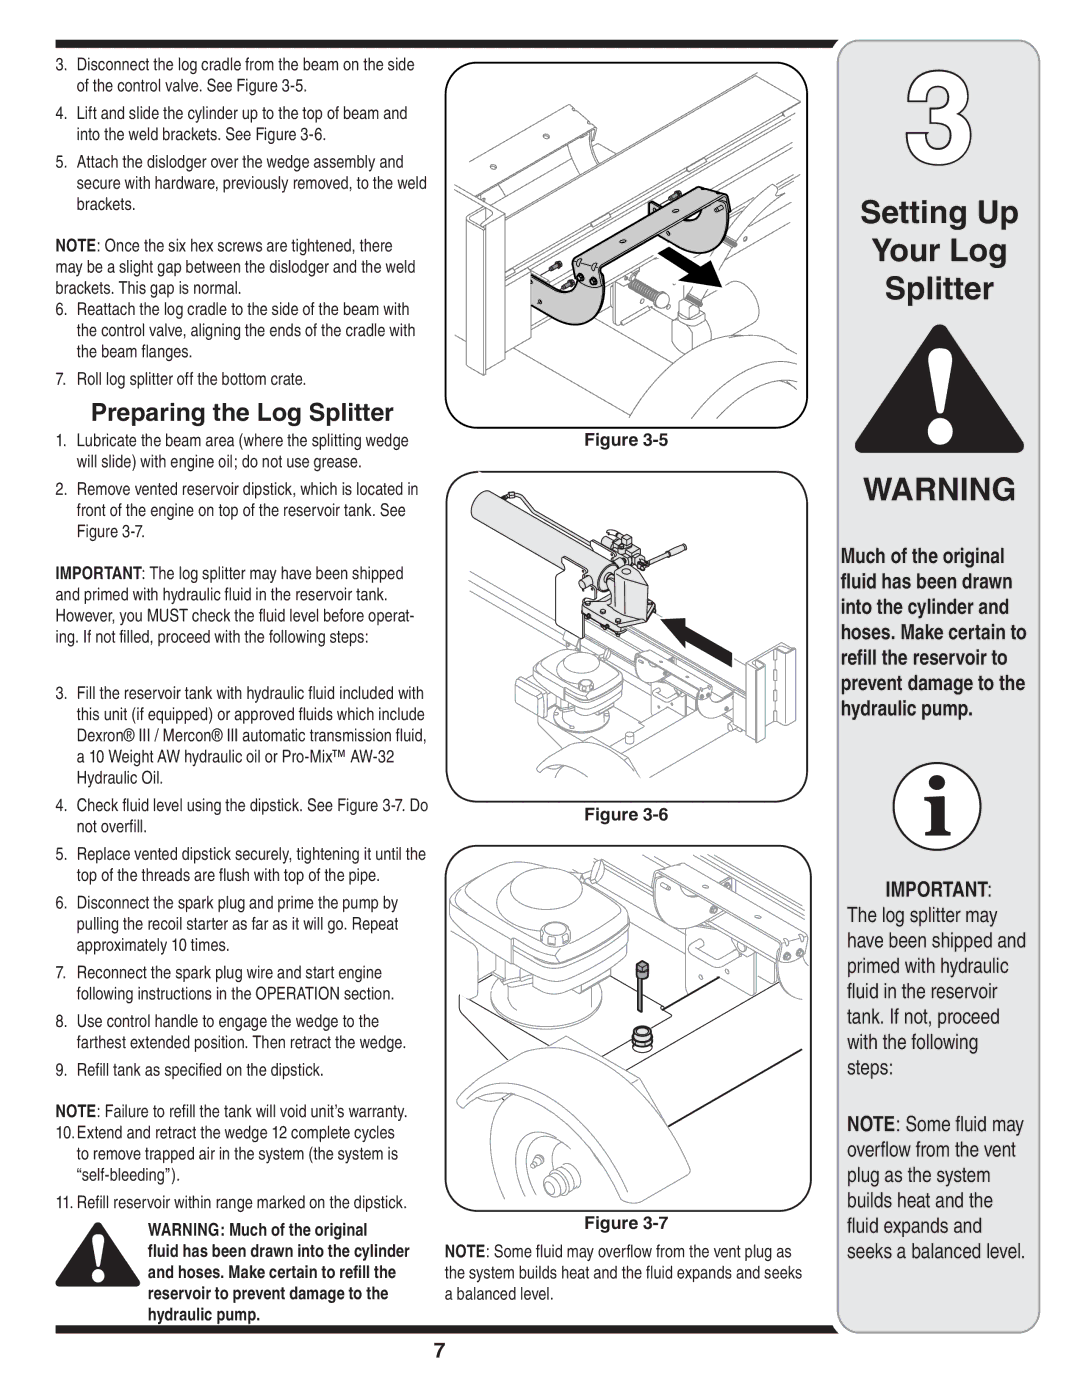
3.Disconnect the log cradle from the beam on the side of the control valve. See Figure 3-5.

4.Lift and slide the cylinder up to the top of beam and into the weld brackets. See Figure 3-6.

5.Attach the dislodger over the wedge assembly and secure with hardware, previously removed, to the weld brackets.

NOTE: Once the six hex screws are tightened, there may be a slight gap between the dislodger and the weld brackets. This gap is normal.

6.Reattach the log cradle to the side of the beam with the control valve, aligning the ends of the cradle with the beam flanges.

7.Roll log splitter off the bottom crate.

Preparing the Log Splitter

1.Lubricate the beam area (where the splitting wedge will slide) with engine oil; do not use grease.

2.Remove vented reservoir dipstick, which is located in front of the engine on top of the reservoir tank. See Figure 3-7.

IMPORTANT: The log splitter may have been shipped and primed with hydraulic fluid in the reservoir tank. However, you MUST check the fluid level before operat- ing. If not filled, proceed with the following steps:

3.Fill the reservoir tank with hydraulic fluid included with this unit (if equipped) or approved fluids which include Dexron® III / Mercon® III automatic transmission fluid, a 10 Weight AW hydraulic oil or Pro-Mix™ AW-32 Hydraulic Oil.

4.Check fluid level using the dipstick. See Figure 3-7. Do not overfill.

5.Replace vented dipstick securely, tightening it until the top of the threads are flush with top of the pipe.

6.Disconnect the spark plug and prime the pump by pulling the recoil starter as far as it will go. Repeat approximately 10 times.

7.Reconnect the spark plug wire and start engine following instructions in the OPERATION section.

8.Use control handle to engage the wedge to the farthest extended position. Then retract the wedge.

9.Refill tank as specified on the dipstick.

NOTE: Failure to refill the tank will void unit’s warranty.

10.Extend and retract the wedge 12 complete cycles to remove trapped air in the system (the system is “self-bleeding”).

11.Refill reservoir within range marked on the dipstick.

WARNING: Much of the original

fluid has been drawn into the cylinder and hoses. Make certain to refill the reservoir to prevent damage to the hydraulic pump.

Figure 3-5

Figure 3-6

Figure 3-7

NOTE: Some fluid may overflow from the vent plug as the system builds heat and the fluid expands and seeks a balanced level.

3

Setting Up

Your Log

Splitter

WARNING

Much of the original fluid has been drawn into the cylinder and hoses. Make certain to refill the reservoir to prevent damage to the hydraulic pump.

IMPORTANT: The log splitter may have been shipped and primed with hydraulic fluid in the reservoir tank. If not, proceed with the following steps:

NOTE: Some fluid may overflow from the vent plug as the system builds heat and the fluid expands and seeks a balanced level.

Page 7
Image 7
Yard-Man 550 Thru 570 manual Preparing the Log Splitter

550 Thru 570 specifications

The Yard-Man 550 thru 570 series of lawn mowers and garden equipment offers a range of cutting-edge features designed for both residential and commercial users. These models are specifically engineered to deliver top-notch performance, reliability, and ease of use, making them a favorite amongst garden enthusiasts and landscapers alike.

One of the standout characteristics of the Yard-Man 550 thru 570 series is their powerful engine options. These models are equipped with high-performance engines that ensure adequate power for cutting through thick grass and tackling various landscaping challenges. The advanced two-stroke engine technology not only provides strong torque but also enhances fuel efficiency, allowing users to operate longer on a single tank.

Additionally, these mowers feature a robust cutting deck design, which comes in various sizes to accommodate different yard sizes and types. The precision cutting technology ensures clean and consistent cuts, resulting in a well-manicured lawn, while the adjustable cutting heights allow users to customize their mowing experience based on grass types and seasonal requirements.

One of the key innovations in the Yard-Man 550 thru 570 models is the incorporation of self-propelling mechanisms. This feature significantly reduces user fatigue, making mowing more manageable, especially on hilly or uneven terrains. The intuitive control systems allow users to easily adjust their speed, providing greater comfort and control while mowing.

For added convenience, these models are designed with easy-start technology, minimizing the hassle often associated with starting gas-powered mowers. Additionally, the ergonomic handle design enhances handling and maneuverability, contributing to overall user satisfaction.

Maintenance is often a concern for equipment owners, and Yard-Man addresses this with features that simplify upkeep. Quick-release mechanisms for access to the cutting blade make it easier for users to perform maintenance tasks like sharpening or replacing blades.

Furthermore, the Yard-Man 550 thru 570 series prioritizes durability, featuring high-quality materials and robust construction. This longevity ensures that users can count on their tools for years of reliable service.

In conclusion, the Yard-Man 550 thru 570 series stands out as a solid choice for anyone looking for durable, efficient, and user-friendly lawn care equipment. From powerful engines to innovative features, these mowers are engineered to meet the demands of today's users, making lawn maintenance a breeze.