Cable Ties

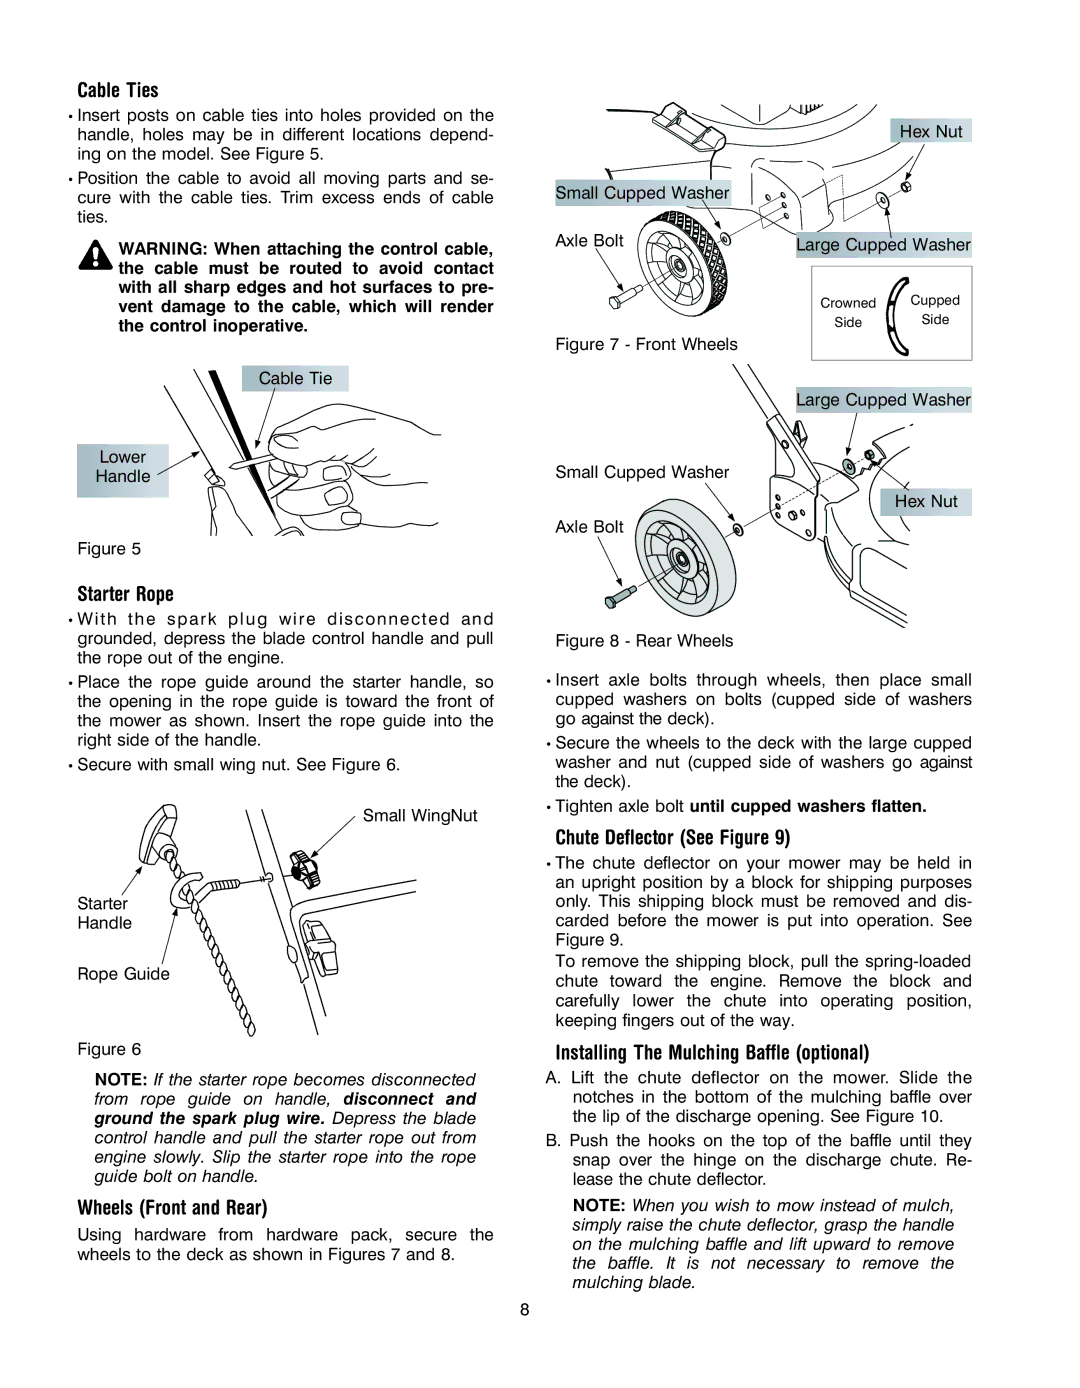
Insert posts on cable ties into holes provided on the handle, holes may be in different locations depend- ing on the model. See Figure 5.

Position the cable to avoid all moving parts and se- cure with the cable ties. Trim excess ends of cable ties.

WARNING: When attaching the control cable, the cable must be routed to avoid contact with all sharp edges and hot surfaces to pre- vent damage to the cable, which will render the control inoperative.

Cable Tie

Lower

Handle

Figure 5

Starter Rope

W ith the spark plug wire dis con nected and grounded, depress the blade control handle and pull the rope out of the engine.

Place the rope guide around the starter handle, so the opening in the rope guide is toward the front of the mower as shown. Insert the rope guide into the right side of the handle.

Secure with small wing nut. See Figure 6.

Small WingNut

Starter

Handle

Rope Guide

Figure 6

NOTE: If the starter rope becomes disconnected from rope guide on handle, disconnect and

ground the spark plug wire. Depress the blade control handle and pull the starter rope out from engine slowly. Slip the starter rope into the rope guide bolt on handle.

Wheels (Front and Rear)

Using hardware from hardware pack, secure the wheels to the deck as shown in Figures 7 and 8.


Hex Nut

Small Cupped Washer


Axle Bolt

Large Cupped Washer


Crowned

Cupped


Side

Side

Figure 7 - Front Wheels


Large Cupped Washer

Small Cupped Washer

Hex Nut

Axle Bolt

Figure 8 - Rear Wheels

Insert axle bolts through wheels, then place small cupped washers on bolts (cupped side of washers go against the deck).

Secure the wheels to the deck with the large cupped washer and nut (cupped side of washers go against the deck).

Tighten axle bolt until cupped washers flatten.

Chute Deflector (See Figure 9)

The chute deflector on your mower may be held in an upright position by a block for shipping purposes only. This shipping block must be removed and dis- carded before the mower is put into operation. See Figure 9.

To remove the shipping block, pull the spring-loaded chute toward the engine. Remove the block and carefully lower the chute into operating position, keeping fingers out of the way.

Installing The Mulching Baffle (optional)

A. Lift the chute deflector on the mower. Slide the notches in the bottom of the mulching baffle over the lip of the discharge opening. See Figure 10.

B. Push the hooks on the top of the baffle until they snap over the hinge on the discharge chute. Re- lease the chute deflector.

NOTE: When you wish to mow instead of mulch, simply raise the chute deflector, grasp the handle on the mulching baffle and lift upward to remove the baffle. It is not necessary to remove the mulching blade.

8

Page 8
Image 8
Yard Machines 070 Series manual Cable Ties, Starter Rope, Wheels Front and Rear, Chute Deflector See Figure

070 Series specifications

Yard Machines 070 Series offers a robust selection of outdoor power equipment, specifically designed to meet the needs of homeowners and weekend warriors alike. Known for its reliability and performance, this series is particularly admired for its user-friendly features and advanced technology.

One of the main attractions of the Yard Machines 070 Series is its powerful engine lineup. The units are equipped with reliable, high-torque engines that deliver ample power for various lawn care tasks, whether it’s mowing, trimming, or tilling. The engines are engineered for efficiency, allowing users to complete their yard work without constant refueling, making them both time-saving and environmentally-friendly.

In terms of features, the Yard Machines 070 Series is designed with versatility in mind. Many models come with adjustable cutting heights, allowing users to achieve their desired grass length easily. This feature becomes indispensable in maintaining a healthy lawn, adapting to seasonal growth patterns with ease. Additionally, the series offers a range of deck sizes, catering to different yard sizes and user preferences.

Safety is another key characteristic of the Yard Machines 070 Series. Many models incorporate features like automatic shut-off systems and safety guards to protect users during operation. This focus on safety does not come at the expense of performance, as the machines are built to handle even the toughest of mowing tasks.

The ergonomic design of the Yard Machines 070 Series also sets it apart. Models are equipped with comfortable grips, and lightweight construction, making them easy to maneuver. This attention to user comfort goes a long way in reducing fatigue during extended use.

Technologically, the Yard Machines 070 Series embraces cutting-edge advancements that enhance its usability. Features such as self-propulsion systems can significantly improve ease of use, especially on uneven terrain or steep inclines. Moreover, some models boast easy-start technology, ensuring that users can start their machines with minimal effort, even in colder conditions.

In summary, the Yard Machines 070 Series combines power, safety, and user-friendly design to offer an exceptional range of outdoor equipment suited for various landscaping needs. With its reliance on innovative technology and practical features, it provides efficient solutions for every gardening enthusiast, making yard maintenance a breeze. Whether you are a seasoned landscaper or a first-time homeowner, the Yard Machines 070 Series has something to offer everyone.