Vivitek D5500 manual Adjusting Picture Position Manually

Page 35

DLP Projjecttor—User’s Manuall

Adjusting the Picture Position and Picture Size

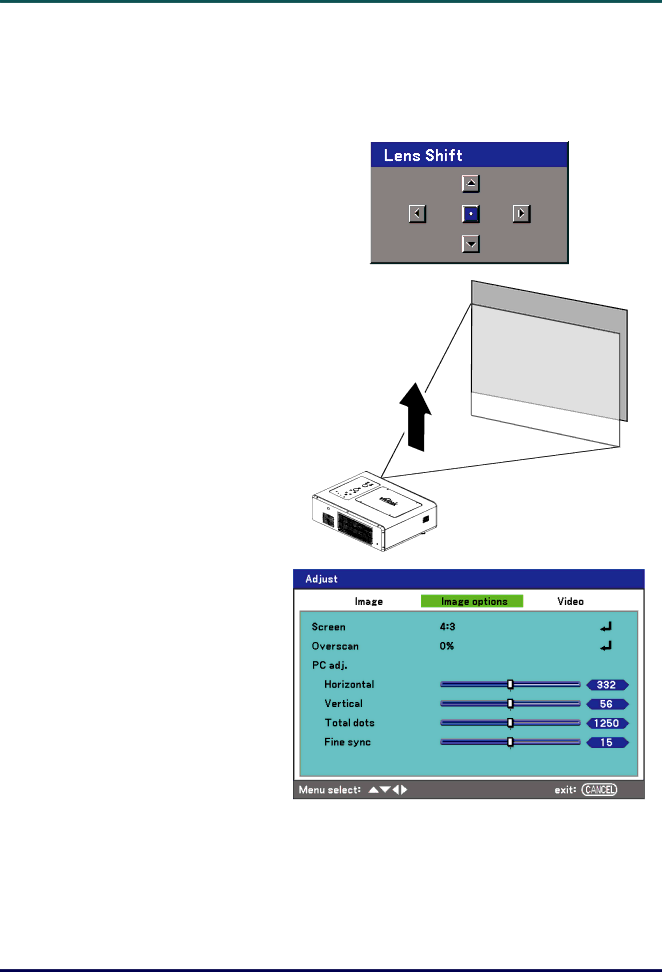
The Picture Position and Picture Size can be adjusted manually from the lens control panel or from the remote control unit. Refer to the following guides to adjust Picture Position manually.

Adjusting Picture Position Manually

1. Press the Lens Shift keypad on the projector in any direction to bring up the Lens Shift window.

2. Press the directional key as re- quired to shift the image. Releasing the directional arrow will re-center the cursor.

3. To alter the picture size, press Menu and select the Adjust menu using ▲or▼. Press to open the Adjust menu. Press ◄or► to se- lect Image Options followed by ▲or▼ to select Screen. Press .

– 28 –

Image 35
Contents Copyright Important Safety Information Preface Main Features Table of Contents Using ON-SCREEN Display Regulatory Compliance Introduction Packing ChecklistViews of Projector Parts Front-right ViewTop view Bottom view Lens Controls Top FeaturesOSD Controls and Status LEDs PowerDLP Projector User’s Manual 100 Terminal Panel FeaturesPower Switch Remote Control Parts DLP Projector User’s Manual Projector and Remote Control Buttons Remote ControlRemote Control Operating Range Inserting the Remote Control Batteries Setup and OperationRemoving the Existing Lens From the Projector Installing or Removing the Optional LensPull out the existing lens slowly Installing the New LensDiagonal Width Height Throw Distance and Screen SizeDiagonal Width Height Distance Installing the Optional Color Wheel DLP Projjecttor User’s Manuall DLP Projjecttor-User’s Manuall Making Connections Connecting Your PC or Macintosh ComputerConnecting an External Monitor Connecting Your DVD Player with Component Output Connecting Your VCR or Laser Disc Player Turning on the Projector Projecting AN Image Basic OperationDLP Projjecttor-User’s Manuall Selecting an Input Source Adjusting the Picture Position and Picture Size Adjusting Picture Position ManuallyLens Shift Adjustable Range From the Remote Control Unit DLP Projjecttor User’s Manuall Adjusting the Projector Level Optimizing an RGB Image Automatically Adjusting the Image Using AutoAdjusting Volume Up and Down Turning off the Projector After Use About Direct Power OffFreezing a Picture Turning Off the Image and SoundAdjusting the Focus/Zoom Manually Adjusting by Using the OSD Control PanelChanging Lamp Mode Changing Lamp Mode by Using the Projectors OSD Control PanelGetting Information Adjusting Position/Total Dots/Fine Sync Correcting Keystone by Using the Remote Control Higher resolution than XGA narrows the adjustable range Preventing the Unauthorized Use of the Projector Locking the ProjectorUnlocking the Projector Using the Physical Lock Using the Kensington LockNavigating the OSD Using the MenusDLP Projjecttor-User’s Manuall Menu Tree DLP Projjecttor-User’s Manuall TitleHighlight Slide bar Exit Radio button Menu ElementsLabel Input Menu Descriptions and FunctionsImage menu Adjust Menu Descriptions and FunctionsImage options menu Overscan ScreenVideo menu Progressive Noise reduction3D Y/C separation Film Color matrixBasic Detail Setting Menu Descriptions and FunctionsGamma White balance Color correction Setting Menu Descriptions and Functions Lamp control Lamp modeKeystone Language Lamp intervalInstallation Communication speed Ceiling & RearPIN Code Lock Display timeBackground RC sensor Network SettingKey lock DynamicBlackPC control Standby modeDhcp Network settingOption Fan control Power managementScreen trigger Message Default input selectFilter warning Search modeInformation Menu Descriptions and Functions Usage timeInput Network Version Reset Menu Descriptions and Functions Cleaning the projector Cleaning the CabinetCleaning the Lens Cleaning the Filters Replacing the Lamps DLP Projjecttor-User’s Manuall DLP Projector User’s Manual Resetting the Lamp Time Counter Power LED Indicator MessagesTroubleshooting Lamp LEDs Common Problems and SolutionsTips for Troubleshooting Image Problems Lamp ProblemsHaving the Projector Serviced Remote Control ProblemsAudio Problems Projector Specifications Optical SpecificationsElectrical Specifications Optional Parts Mechanical SpecificationsEnvironmental Considerations Cabinet Dimensions PIN Number RGB Signal Analog YCB CR Signal Pin Assignments of Mini D-Sub 15 Pin Input ConnectorATE KH Z Compatible Input Signal ListPC Control Codes and Cable Connections Command Function Functional Execution Command TableStatus Read Command Table Screen Trigger Preparation Before Use Handling of the Address for Operation by Using a BrowserOperation Using Http Browser OverviewDomain Configuring Network SettingsTest Mail Http// the projectors IP address /index.html Structure of the Http Server105 EN 55022 Warning Safety CertificationsFCC Warning Canada