Dell GX400 manual Replacing the Power Supply

Page 39

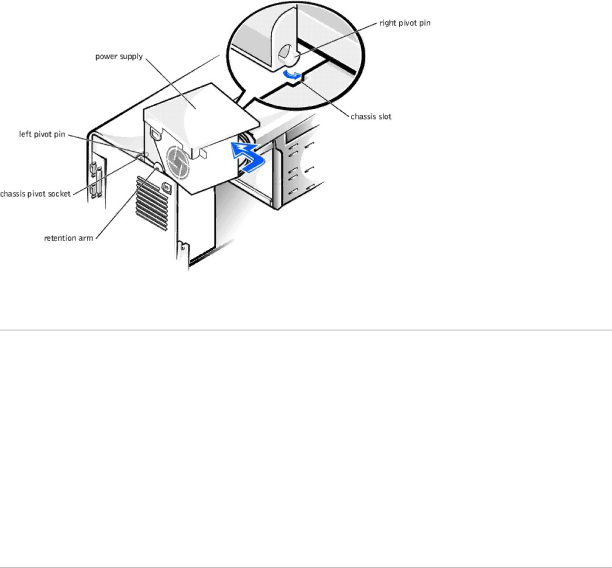
7. Disengage the pivot pin on the left rear of the power supply from the chassis socket.

Removing the Power Supply

8. Lift the power supply away from the chassis.

Replacing the Power Supply

1.Insert the pivot pin on the left rear of the power supply into the chassis socket.

2.Insert the retention arm pin on the left side of the power supply in the retention arm socket.

3.Rotate the right side of the power supply toward the chassis.

The pivot pin on the right rear of the power supply inserts into the chassis slot. See "Removing the Power Supply."

4.Connect the power supply cables to the system board.

5.Connect the power supply cables to all drives.

6.Rotate the power supply back into position until the securing tab snaps into the release latch.

7.Replace the computer cover and restart the computer.

Back to Contents Page

Image 39
Contents VRM AGP Card Brace Removing the AGP Card BraceReplacing the AGP Card Brace Computer Battery Removing the Computer BatteryReplacing the Computer Battery Restarting the Computer Precautionary MeasuresBefore You Begin Recommended ToolsChassis Intrusion Switch Removing the Chassis Intrusion SwitchReplacing the Chassis Intrusion Switch Back to Contents Control Panel ComponentsRemoving the Control Panel Replacing the Control Panel Computer Cover Removing the Computer CoverReplacing the Computer Cover Replacing the Cover Disk Drives and Media Drive LocationRemoving the Floppy Drive Replacing the Floppy Drive Removing a CD, Zip, or Other External Drive Replacing a CD, Zip, or Other External Drive Attaching Drive Cables Removing a Hard Drive Replacing a Hard Drive Attaching Hard-Drive Cables Page Expansion Cards Expansion Card TypesRemoving an Expansion Card Removing an Expansion Card Back to Contents Expansion-Card Guide Removing the Expansion-Card GuideReplacing the Expansion-Card Guide Back to Contents Front Panel Removing the Front PanelReplacing the Front Panel Front-Panel Buttons Removing Front-Panel ButtonsReplacing Front-Panel Buttons Page Front-Panel Inserts Removing Front-Panel InsertsReplacing Front-Panel Inserts Chassis Interior Inside Your ComputerSystem Memory Removing a Memory ModuleReplacing a Memory Module Back to Contents Removing the Microprocessor MicroprocessorReplacing the Microprocessor Back to Contents Microprocessor Cooling Fan Removing the Microprocessor Cooling FanReplacing the Microprocessor Cooling Fan Page Microprocessor Airflow Shroud Removing the Microprocessor Airflow ShroudReplacing the Microprocessor Airflow Shroud Power Supply Rotating the Power SupplyRemoving the Power Supply Replacing the Power Supply Removing the System Board System BoardReplacing the System Board Labels System Board ComponentsJumpers Setting DescriptionBack to Contents Back to Contents Replacing the VRM Removing the VRMBack to Contents