Asus P5B manual Primary PCI Express x16 slot, Universal PCI-E slot max. x4 mode

Page 47

We recommend that you install a VGA card on the primary (blue) PCI Express slot, and install any other PCI Express device on the Universal PCI-E slot (black).

Primary PCI Express x16 slot

The primary PCI Express x16 slot supports PCI Express x16 graphic cards that comply with the PCI Express specifications.

Universal PCI-E slot (max. x4 mode)

This motherboard also supports a Universal PCI-E slot with a maximum speed of 2 GB/s. The operating frequency of this slot changes,

depending on the type of PCI Express card you install. Refer to the table below and page 4-23 for details.

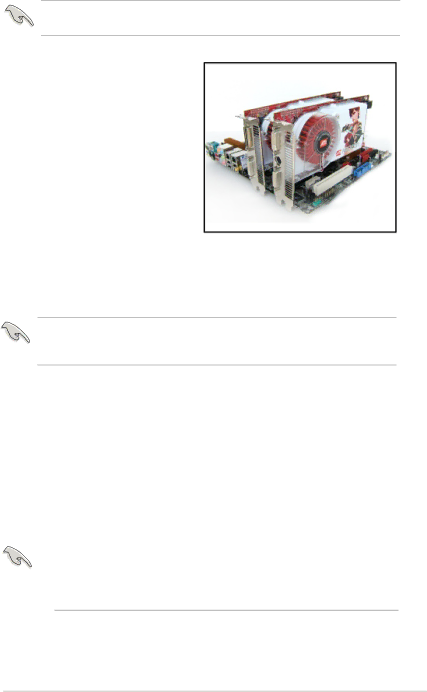
The figure shows two graphics cards installed on the primary PCI Express x16 slot and the Universal PCI-E slot.

If you install two VGA cards, we recommend that you plug the rear chassis fan cable to the motherboard connector labeled CHA_FAN1 for better thermal environment. See page 2-31 for the connector location.

Options for Universal

PCI Express operating speed


PCI Express slot


Auto

Automatically optimizes performance


and functionality according to devices


installed


x4 mode [fast]

User gets the best performance but this


mode disables the PCI Express x1 slot


x2 mode [compatible]

Always runs at PCI Express x2 speed


Some PCI Express graphics cards cannot operate on x4/x2 mode. We

suggest that you install these cards on the primary PCI Express slot (blue) to increase system stability.

Some PCI Express devices cannot operate on x4/x2 mode.

ASUS P5B Deluxe

2-21

Image 47
Contents Motherboard Copyright 2006 ASUSTeK Computer INC. All Rights Reserved E2668 Second Edition JulyContents Chapter Bios setup Chapter Powering upChapter Software support Creating a RAID/SATA driver disk Appendix CPU featuresRAID configurations Software informationCanadian Department of Communications Statement Federal Communications Commission StatementOperation safety Safety informationElectrical safety How this guide is organized Where to find more informationAbout this guide Typography Conventions used in this guideLAN P5B Deluxe specifications summaryUSB Other Features Back Panel I/O Ports Internal I/O Connectors It supports Chapter summary Welcome Package contentsProduct highlights Special featuresIeee 1394a support Dual RAID solutionDual Gigabit LAN solution Serial ATA 3.0 Gb/s technology and SATA-On-The-GoAsus Quiet Thermal Solution Asus AI Lifestyle featuresKingston HyperX PC2-8500 Ready default runs @1066MHz Asus Crystal Sound DTS Connect Asus Q-ConnectorAsus CrashFree Bios Asus Power LEDAsus Intelligent Overclocking features Asus Special featuresR. CPU Parameter Recall Hardware2 information Chapter summary Blue red Before you proceedScrew holes Placement directionMotherboard overview 24.5cm 9.6in Motherboard layoutLayout contents Chassis intrusion connector 4-1 pin Chassis Central Processing Unit CPU To install a CPU Locate the CPU socket on the motherboard Installing the CPULoad plate To install the CPU heatsink and fan Installing the CPU heatsink and fanHeatsink and fan assembly in place To uninstall the CPU heatsink and fan Uninstalling the CPU heatsink and fanRotate each fastener clockwise to ensure reinstalling Overview Memory configurationsSystem memory Windows XP Professional x64 Edition Windows 2000 Advanced ServerMicron 5JAIIZ9DQQ Kingmax Removing a Dimm Installing a DimmExpansion slots Installing an expansion cardConfiguring an expansion card To install an expansion cardThese IRQs are usually available for PCI devices Interrupt assignmentsStandard interrupt assignments IRQ assignments for this motherboardPCI Express x16 slots PCI slotsPCI Express x1 slot Primary PCI Express x16 slot Universal PCI-E slot max. x4 modeP5B Deluxe Clear RTC RAM JumperLAN port LED indications ConnectorsRear panel connectors Audio 2, 4, 6, or 8-channel configuration For WiFi-AP Edition OnlyExternal Sata port supports external Serial ATA IDE connector 40-1 pin Priide Internal connectorsFloppy disk drive connector 34-1 pin Floppy P5B Deluxe IDE connector Right angle side Serial ATA hard disk drive connectionP5B Deluxe Sataraid connector JMicron JMB363 Serial ATA RAID connector 7-pin SataraidP5B Deluxe USB 2.0 connectors Ieee 1394a port connector 10-1 pin IE13942P5B Deluxe Fan connectors CPU, chassis, power, and chipset fan connectorsATX power connectors Pin EATXPWR, 2x4-pin EATX12V Chassis intrusion connector 4-1 pin ChassisAafp Front panel audio connector 10-1 pin AafpBlack Optical drive audio connector 4-pin CDDigital audio connector 4-1 pin Spdif Reset button 2-pin Reset System panel connector 20-8 pin PanelSystem power LED 2-pin Pled ATX power button/soft-off button 2-pin PWRConnector system panel Fit the grooved edge to the heatsink Installing the optional fanHardware information Powering up Starting up for the first time Turning off the computer Starting up for the first time AMI Bios beep codesTurning off the computer Using the OS shut down functionUsing the dual function power switch Bios setup Chapter summary Installing Asus Update Managing and updating your BiosAsus Update utility Updating the Bios through the Internet Updating the Bios through a Bios file \bootdisk\makeboot a Creating a bootable floppy diskAsus EZ Flash 2 utility ASUSTek EZ Flash 2 Bios ROM UtilityTo update the Bios file using the Afudos utility Copying the current BiosUpdating the Bios file To copy the current Bios file using the Afudos utilityUtility verifies the file and starts updating the Bios Recovering the Bios from the USB flash disk Asus CrashFree Bios 3 utilityRecovering the Bios from the support CD Bios setup program Menu bar Bios menu screenConfiguration SettingsPop-up window Configuration fieldsMenu items Sub-menu itemsLegacy Diskette a 1.44M, 3.5 Main menuSystem Time System Date Day xx/xx/xxxxType Auto LBA/Large Mode AutoPIO Mode Auto SataIDE Configuration Processor Hard Disk Write Protect DisabledSystem Information IDE Detect Time Out SecAdvanced menu JumperFree ConfigurationAI Tuning Auto PCI Express Frequency Auto PCI Clock Synchronization Mode AutoCPU Frequency Dram Frequency AutoNB VCore Auto Memory Voltage AutoCPU VCore Voltage Auto FSB Termination Voltage AutoLAN Cable Status Post Check LAN Cable DisabledPost Check LAN cable Disabled USB Configuration CPU Configuration North Bridge Chipset Configuration Execute Disable Bit EnabledHyper Threading Technology Enabled InterR SpeedStep tm Tech. DisabledPCIEX162/PCIEX11 Force South Bridge Chipset ConfigurationConfiguration options Enabled Disabled Configuration options Auto Slow Normal Fast FasterOnBoard Devices Configuration PCI PnP Acpi 2.0 Support Enabled Power menuSuspend Mode Auto Repost Video on S3 Resume DisabledAPM Configuration Hardware Monitor Chassis Fan 1/2/3 Speed xxxxRPM or Ignored / N/A Chassis Q-Fan Control DisabledPower Fan Speed RPM xxxxRPM or Ignored / N/A CPU Q-Fan Profile Performance1st ~ xxth Boot Device xxx Drive Boot menuBoot Device Priority Boot Settings Configuration Interrupt 19 Capture Disabled Wait for ‘F1’ If Error EnabledHit ‘DEL’ Message Display Enabled Security Change Supervisor PasswordChange Supervisor Password Password Check Setup User Access Level Full AccessChange User Password Clear User PasswordAsus EZ Flash Main Advanced Power BootTools menu Start O.C. Profile Asus O.C. ProfileSave to Profle 1/2 Load from Profile 1/2Exit & Discard Changes Load Setup DefaultsExit menu Exit & Save ChangesBios setup Software5 support Installing an operating system Running the support CD Installing an operating systemSupport CD information Drivers menu Utilities menu Make JMicron JMB36X 32/64bit RAID/AHCI Driver Make Disk menuAdobe Acrobat Reader Marvell Yukon VCT Application Make Intel ICH8 32/64bit RAID/AHCI Driver DiskManuals menu Asus Contact information Motherboard Info Displays the general specifications of the motherboardDisplays the support CD contents in graphical format Other informationFilelist Displays the contents of the support CD in text formatTechnical support Form Asus MyLogo2 Software informationAsus P5B Deluxe AI NET2 Using the Virtual Cable TesterLaunching PC Probe Installing PC ProbeUsing PC Probe Asus PC ProbePreferences Changing the monitor panels position Hardware monitor panelsDMI browser WMI browserUsage PCI browserMemory usage Configuring PC ProbeLaunching Ai Suite Installing Ai SuiteUsing Ai Suite Asus Ai SuiteOther feature buttons Click Asus Ai Gear Asus Ai Nap Asus Ai N.O.S Click Apply at the bottom to save the configurationDrop-down list Enablebutton Fan boxClick Apply at the bottom to save the setup Asus Q-FanAsus Ai Booster SoundMAX High Definition Audio utility Audio Setup Wizard Jack configuration Audio preferences Various audio settingsMicrophone options RAID configurations Intel RAID configurations Installing Serial ATA hard disks↑↓-Select ESC-Exit ENTER-Select Menu Delete RAID VolumeXX.XGB Non-RAID Disk RAID0Stripe Select Disks 128KB Create VolumeDisks Port Drive Model Serial # Size StatusAre you sure you want to create this volume? Y/N RAID1Mirror Select Disks Creating a RAID 1 set mirroredCreating a RAID 10 set RAID 0+1 RAID5Parity Select Disks 64KB Name RAID Level DisksXxxxxxxxxxxx Before creating a RAID set JMicron RAID Configuration164 Non-RAID Entering the JMB363 RAID Bios utilityPress Ctrl-J to enter RAID Setup Utility Creating a RAID setDisks Select Disk Block N/A Size 159 GB Selected HDD shows a sign before itRAID Disk Create RAID on the selected HDD Y/N? Y Level 0-Stripe164 Non-RAID Disks Select Disk 164 RAID Inside RDD0 TAB-Switch Window ↑↓-Select Item ENTER-Action ESC-ExitDeleting a RAID set Resetting disks to non-RAID Rebuild Rebuilding.. %, please wait Solving a Mirror conflictMirror Rebuilding a Mirror Drive Saving the settings and exiting setupCreating a RAID driver disk in Windows Creating a RAID driver diskCreating a RAID driver disk without entering the OS Asus P5B Deluxe Software support CPU features Intel EM64T System requirements Using the Intel EM64T featureIntel EM64T Enhanced Intel SpeedStep Technology EistUsing the Eist Intel Hyper-Threading Technology Using the Hyper-Threading TechnologyAppendix CPU features