Polaroid 37 manual Connecting a VCR, Rear of TV

Page 19

Chapter 2 Installing the LCD TV
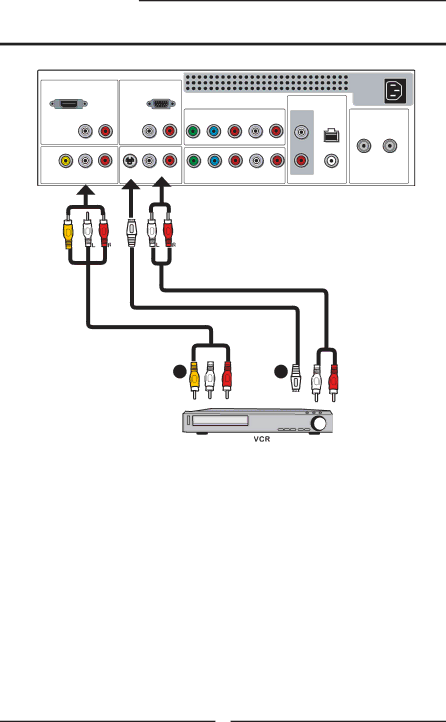
Connecting a VCR

Rear of TV

HDMI IN


VGA IN


AUD IO OUT


YPbPr1 IN


DIGITAL


AUD IO


AUD IO

Y

Pb

Pr

AUD IO

STEREO


OPTICAL


HDTV


TV


CABLE

AIR

L

R


L

R


L

R

L


Y

Pb

Pr

AUD IO


COAXIAL


VHF/UHF IN

L

R

S-VIDEO

L

R


L

R

R


VIDEO

AUD IO

AUD IO


YPbPr2 IN


VIDEO2 IN

S-VIDEO


AUDIO Cable

S-VIDEO Cable

AV Cable

A

B

METHOD A:

Use a composite cable to connect the VCR’s composite video/audio jacks to the LCD TV’s VIDEO2 IN jacks.

METHOD B:

Use an audio cable to connect the VCR’s audio output jacks to the LCD TV’s audio inputs. Use a S-Video cable to connect the VCR’s s-video output jack to the LCD TV’s S-VIDEO IN input jack.

Connect all AC power sources, before turning on the power switch of the LCD TV or other connected equipment.

Press the button on the remote to turn on the LCD TV.

To watch a videotape, press the Input button on the remote to select VIDEO2( METHOD A), or VIDEO3 (METHOD B).

18

Image 19
Contents LCD Television with NTSC/ATSC Tuners Federal Communications Commission Statement Important Safety Instructions English Outdoor Antenna Safety Instructions Table of Contents Chapter Introducing the LCD TV Key FeaturesPackage Contents Attach the Stand Setting Up Your LCD TVConnect other an external A/V device refer to page14-26 Front/Right Side View and Controls Your LCD TVAudio OUT-STEREO VIDEO2Hdmi VGANORMAL/FULL/WIDE/ZOOM Your Remote ControlVIDEO2/VIDEO3/VIDEO4/VIDEO5 OFF/CC1/CC2/CC3/CC4/TT1/TT2/TT3VIDEO6/COMPUTER Connecting a TV Cable or an Antenna Chapter Installing the LCD TVVHF Separate VHF and/or UHF antennasVHF/UHF UHFCable TV Catv Connection Method a Press the button on the remote to turn on the LCD TVMethod B Rear of TV Connecting a VCRRear of TV Right Side Connecting a Video Camera or Play StationMethod C Connecting a DVD PlayerEnglish COMPONENT/AUDIO Cable Connecting an AV Equipment with Hdmi Connector Connecting an AV Equipment with DVI Connector Connecting a PC Connecting to Audio Receiver Press the PIP button once to enter picture in picture mode Using Picture-In-PicturePress to change input source and press the OK button Press the PIP button again to view images side by side Displays at 43 aspect ratio Wide Screen ViewingVideo Menu Operating the MenuAudio Menu TV Menu Setup MenuHdtv Menu PCM Setting up the Hdtv FunctionHdtv menu includes the following options Using the Program Guide Video menu includes the following options Customizing the Video SettingsAudio menu includes the following options Customizing the Audio SettingsSAP Setup menu includes the following options Customizing the Setup SettingsAllows to select from 4 closed caption modes Rating Description Using the V-CHIP SettingsV-CHIP menu includes the following options Parental menu includes the following options Using the Parental SettingsCable STD/CABLE IRC/CABLE HRC Customizing the TV SettingsTV menu includes the following options AntennaVIDEO/AUDIOL/R WeightTFT LCD Chapter Programming your Remote Control Unlocking All Volume Control Restoring Global Unlock Locking Volume Control to One Mode Global Volume LockUnlocking a Single Device’s Volume Control RCA Setup Codes for Audio AmplifiersJVC NECABC Cable ConvertersBCC SSI Miscellaneous AudioAMW Audio Amp/TunersADC AMCMCS JBLKLH LXI1023, 1609 Satellite Receivers HTS GOISKY AOC Setup Codes for TVsCXC ESA KTV JCBJIL KECMTC MGANTC PCE SVA SSSTMK TVS ABS Setup Codes for VCRsCCE Page MEI HI-QMTX NAP STS Tnix Page 3D LAB Setup Codes for DVD PlayersIRT GPXJMB 0591 0741 0822, 1132, 1022, 0790 Care For service, support and warranty information, visit