JVC AV-36D203, AV-27D503, AV-36D303, AV-32D503, AV-32D203, AV-32D303 manual Connections, Diagram #2

Page 14

GE D-Series English 3/12/02 2:52 PM Page 14

Connections

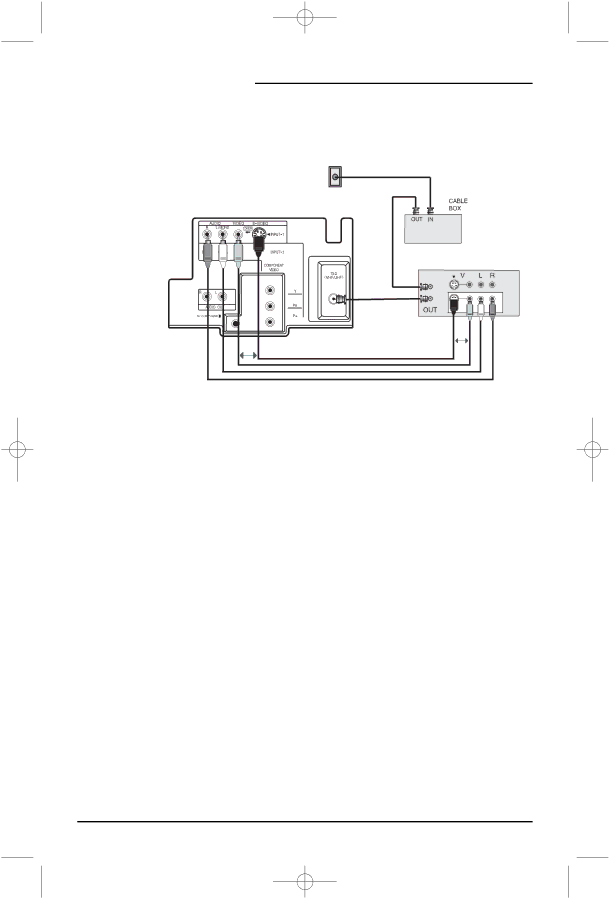
Cable and VCR Connections - Continued

Diagram #2

WALL

CABLE or ANTENNA

OUT

VCR

IN

OR

OR

Illustration of AV-32D503

1)Connect the antenna or cable TV wire from the wall outlet, in to the RF Input of the cable box.

2)Connect an RF cable from the RF Output of the cable box, in to the RF Input on the back of the VCR.

3)Connect an RF cable from the RF Output of the VCR, in to the RF Input on the back of the TV.

4)Connect the yellow video cable out from the VCR’s Video Output, in to the TV’s Video Input jack, OR connect an S-Video cable from the VCR’s S-Video output, to the TV’s S-Video input.

5)Connect the white audio cable out from the VCR’s Left Audio Output, in to the TV’s Left Audio Input Jack.

6)Connect the red audio cable out from the VCR’s Right Audio Output, in to the TV’s Right Audio Input jack.

Please see page 47 for information on using the PIP feature with a Cable Box.

If your VCR is a mono sound unit, it will have only one Audio Out jack. Connect it to the TV’s Left Audio Input.

Please consult your VCR’s owner’s manual for more information on its operation.

14

Image 14
Contents Color Television Users Guide Important Note to the CustomerImportant Safety Precautions Important Safeguards Important Recycling InformationUSE Service Table of Contents Video Plug RF Connectors Input PlugUnpacking Your Television Matching TV stand is also available optionalRear Panel Diagram Front Panel Diagram TV Models and Remotes GuideAV-36D303, AV-36D203 Remote Control RM-C252Models AV-32D303, and AV-32D203Getting Started Quick SetupStep One The Remote Control Basic OperationIllustration of AV-32D503 Step Two Making Basic ConnectionsProceed to Step Three Stop The Quick Setup is complete Step Three The Plug In MenuConnections Cable and VCR ConnectionsDiagram #2 ConnectionsDiagram #3 Connecting to a DVD player Connecting to an External Amplifier Connecting to a CamcorderConnecting to JVC AV Compu Link Remote Control Remote Control BasicsCable Box or Satellite codes Setting the CATV, VCR and DVD CodesRemote Programming VCR codes MGADVD codes JVCUsing the Guide Onscreen MenusOnscreen Menu System Introduction Auto Tuner SetupPlug In Menu LanguageAuto Clock Set Manual Clock Set Thank YOUChannel Summary Channel SummaryChip Special Note about RatingsUS V-Chip Ratings Setting US V-Chip Ratings Directions to set US V-Chip RatingsSetting ratings with the V-Chip button ExampleMovie Ratings Directions to set Movie Mpaa RatingsCanadian V-Chip Ratings Directions to set Canadian V-Chip RatingsUnrated Programs Directions to Block Unrated ProgramsSet Lock Code Picture Settings Color Temperature Noise MutingTreble Sound SettingsBass BalanceGeneral Items On/Off TimerOn/Off Timer Note for PIP D503 models only Than 3 seconds Closed CaptionFront Panel Lock XDS ID General ItemsAuto Shut Off V2 Component-InExit and PIP Off Button FunctionsMenu DisplayVideo Status Sleep TimerButton Functions Hyper SurroundReturn+ BBE100+ Button InputTheaterPro D6500K TV/CATV SwitchVCR/DVD Switch VCR ButtonsButton Functions PIP On/MoveChannel +/- for PIP FreezeSwap SourceTroubleshooting Parts WarrantyThis limited warranty provided by JVC does not cover LaborName Of Dealer Do not service the television yourself Authorized Service CentersHOW to Locate Your JVC Service Center AccessoriesVCR Search Codes Function Search CodesCable/Satellite Search Codes Function DVD Player Search Codes FunctionSpecifications Specifications subject to change without noticeGE D-Series English 3/12/02 252 PM JVC Company of America JVC CANADA, INC