JVC HR-VP780U manual Cable Box Control Setting, Situate Controller, Attach Controller

Page 15
Controller (suggested locations)
Cable box

EN 15

Cable Box

Control

Setting

Suggested location

Place the cable box on top of the VCR. Attach the VCR’s Controller to the top of the VCR with the Controller’s transmitter pointed towards the cable box’s remote sensor.

ATTENTION:

The Controller can also control a DBS receiver. If both a cable box and a DBS receiver are used, position the Controller so its signal reaches the remote sensors on both the cable box and DBS receiver.

Your VCR

Cable box


To

To

Controller

RF output

Audio/Video

(not supplied)


output


Transmitter


or


To

To


AUDIO/


ANT. IN

VIDEO IN

Your VCR

CABLE

BOX

The following procedure is required if you receive your TV channels through a cable box (descrambler). The Controller allows the VCR to automatically switch the cable box channel during timer recording. The Controller is effective for recording broadcasts that have been programmed using VCR Plus+ ( pg. 30) or Express timer programing ( pg. 34).

NOTE:

The Controller is not supplied with this unit. It can be requested by mailing in the completed JVC Cable Mouse Certificate that is included with the accessory package.

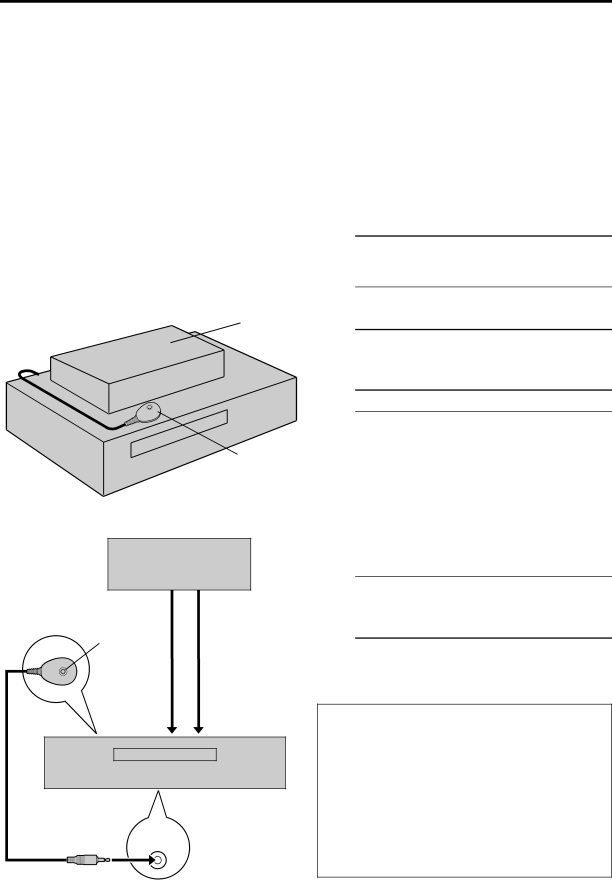
Installing Controller

1 Situate Controller

Place the Controller so that its transmitter is facing the cable box’s remote sensor.

Make sure the path between the Controller and the cable box’s remote sensor is not blocked.

2 Attach Controller

Fix securely using the adhesive strip attached on the back of the Controller.

3 Connect cable box to VCR

If your cable box does not have audio/video input connectors

Connect the RF output terminal on the cable box to the ANT. IN terminal on the rear of your VCR.

If your cable box has audio/video input connectors

Connect an audio/video cable between the AUDIO/VIDEO IN connectors on the rear of the VCR and the audio/video output connectors on the cable box.

NOTE:

When connecting your cable box, refer to its instruction manual.

4 Connect Controller to VCR Connect the Controller to the CABLE BOX Controller connector on the rear panel.

How to control the cable box

This VCR has two separate methods to control your cable box.

The VCR’s wireless Remote can control your cable box. This eliminates the need for a separate cable box’s Remote.

The VCR’s Controller can also control your cable box. This allows the VCR to change your cable box’s channel number during timer recording.

Each method must be set up separately. To set up the VCR’s Remote, refer to page 46. To set up the Controller, go to page 16.

Image 15
Contents HR-VP780U Telephone Number Dear CustomerGrounding or Polarization Power SourcesPower Lines Power Cord ProtectionReplacement Parts AccessoriesDamage Requiring Service CleaningContents Back of VCR Basic ConnectionsAntenna Video OUTFinal preparation for use Check contentsSituate VCR Connect VCR to TVPlug & Play Setting Perform Plug & Play setupWhat to do if Plug & Play setting failed Press Menu Language SettingSelect language Return to normal screenClock Setting 10 ENPreparations Select time zone Setting clock semiautomaticallySet Auto Clock to on Select host channelManual Clock Set Setting clock manuallySelect D.S.T. mode 12 ENAuto Channel Tuner SettingAccess Tuner Set screen Perform Auto Channel SetAdd or skip desired channels Setting channels manuallyAccess Manual Channel Set screen 14 ENConnect cable box to VCR Cable Box Control SettingSituate Controller Attach ControllerTurn on cable box Access Main Menu screen on VCRAccess Cable Box Set screen 16 ENAccessPress OKCable. Box Brand Set screen Enter cable box brandIf the cable boxs channel does not change to Connect Controller to VCR How to control the DBS receiver18 EN Connect DBS receiver to VCRAccess DBS Receiver Set screen Turn on DBS receiverSelect DBS receiver output channel Access DBS Receiver Brand Set screen 20 ENEnter DBS Receiver’s brand Basic Playback Load a cassetteStart playback Checking tape position Basic Playback Features22 EN Changing display informationAdjusting tracking condition Selecting monitor soundAutomatic operations after Locating beginning Locating beginning of timerAccess distant code 24 ENSet tape speed BasicRecording Select recording channelWatching one program while recording another Basic Recording Features26 EN Specifying recording lengthOther useful functions for recording Showing on-screen displayDisplay VCR status on TV screen Erase on-screen displayRapidly Picture Search High-Speed Picture Search Special Effect Playback28 EN Locating particular scenePause during playback Viewing still pictureSkipping unwanted portions Viewing slow motion pictureVCR Plus+ Timer Programing Daily Cancel30 EN Press SP/EP Engage timer recording standby modeTo use the VCR while it is in timer recording standby mode Input receiving channel numberVCR Plus+ Setup 32 ENVCR Plus+ guide channel matching Input guide channel number Access Guide Channel Set screen34 EN Express Timer ProgramingDBS To timer-record daily Monday-Friday or weekly serialsOFF Catv36 EN Checking program settingsConfirm overlapping programs Select program to modifyOverlapping programs blink on the screen Select Function Useful Function SettingsChange setting 38 ENWhen this function is set to OFF When this function is set to onFor Example 40 ENAV Compulink This VCRLink Video VCR only Video OUT PauseThis VCR for recording Edit From Camcorder42 EN ConnectionMake connections Select input mode on this VCRAccess Main Menu screen on this VCR Enable remote pause functionLoad cassettes Select input mode on recording VCREdit To Or From Another 44 ENOperate TV TV Brand SettingTurn on the TV Set TV brand codeEnter cable box brand code Cable Box Brand Setting46 EN Turn on the cable boxOperate DBS receiver DBS Receiver Brand SettingTurn on the DBS receiver Enter DBS receiver brand code48 EN Changing Remote Control CodePower 50 EN Timer RecordingOther Problems 52 EN Can the VCR indefinitely remain in still mode?What happens if the tape reaches its end during recording? VCR PLUS+ List of terms54 EN Front panelFront display panel On-screen display Rear panelHow to use the Remote 56 ENRemote Usable cassettes Full-Size VHS 30 ST-30Compact VHS* TC-20 ST-C20 TC-30 ST-C30 TC-40 ST-C40 58 EN HOW to Locate Your JVC Service CenterLimited Warranty HR-VP780U