Philips VR 617/07 Manual recording, Starting and stopping of recording manually, For

Page 25

8Manual recording

vP 0 1

Starting and stopping of recording manually

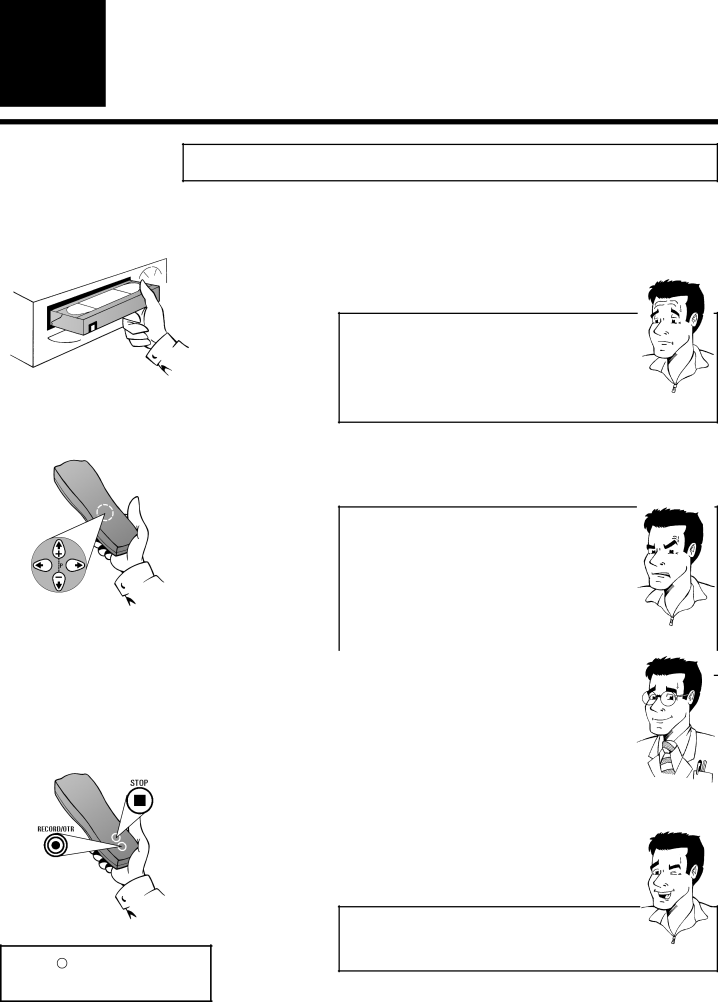
1Switch on the TV set and - if necessary - select the programme number set for video recorder operation

2Insert a cassette without erase protection

What is erase protection?


VHS cassettes can be protected from over-recording by


breaking off a thin strip of plastic (arrow). This erase


protection can be overridden by sticking one or more


strips of adhesive tape tightly over the gap which has

PARDON?

been created.

3Use the buttons =P- or ;P+ to select the programme number, under which your video recorder has stored the desired TV channel

8 I can’t find the TV channels from my satellite receiver

8 I want to record from an additional device


4 Signals from additional devices - such as a


camcorder, other video recorder, PCs, etc. - are


received via the scart socket of the video recorder.


The programme numbers “E1” and “E2” are

PROBLEM

allocated for these sources.


Selecting the recording speed


You have the option of two playback and recording


speeds: Standard Play (SP) offers the usual first-class


picture quality. By using Long Play (LP), you can (with


somewhat reduced picture quality) for example record


about 360 minutes of programmes on a 180 minute


cassette.This chapter explains how to set the desired


FOR

recording speed (“Selecting the recording speed”).

EXPERTS


4Start recording by pressing the Record button n (remote control or on front of set).The display will show “ ”.

Displaying tape position


With the OK button you can display the current tape

TIP

position (see chapter “Playback”)

5End the recording by pressing the Stop button h

ENGLISH

25

STARTING / STOPPING RECORDING MANUALLY


Image 25
Contents Table of contents With VR 617/07TIP Remote controlChange between TV reception and video Select entry fieldImportant notes for operation IntroductionMost important functions of your new video recorder Important information for customers in Great Britain Preparing the remote control for operation Connecting the video recorderConnecting to a TV set with a scart socket What is a scart cable?Recorder.PROBLEM ProblemMy TV set has more than one scart socket Soon as the transfer is complete, the currentAudio OUT Connecting additional devicesThere is no test image Setting TV channels, date and time for the first time Initial installationInitial setting of channel, date and time is completed Use =P- or P+ to select the option Searching for TV channels manuallyManual Search Press the Menu button Allocating decoderCheck decoder allocation at a glance Using a satellite receiverTo which TV channel on the video recorder a decoder is This channelFinish with the Menu button SettingsSequence of TV channels BBC2, ITC, CH 4, CH 5, othersALLOC. and confirm TV ChannelLeave the on-screen menu with the Menu button Changing the time and dateAdditional 0.Therefore for 9 you must enter General information Operating instructionsNavigation in the main menu TV Channel ALLOC. Record Speed Auto StandbyPlaying cassettes PlaybackPlaying back Ntsc cassettes Press the Playback button C to play the tapeSelecting tape position display type Special SettingsConfirm With OK Use =P- or P+ to select the option CounterWill increase Display / reset tape positionLater by pressing a button Bookmark at the appropriate place on the tapeImmediately to playback During slow motion there will be no soundWhat types of picture setting are available to me? Selecting picture setting Smart PictureIncrease in sharpness For animated films Play compact VHS cassettesOptimizing tracking Removing picture interferenceOptimizing still picture Starting and stopping of recording manually Manual recordingFor End the recording by pressing the Stop button hFor these sources Starting recording manually Stopping automaticallySelecting the recording speed Lining up manual recordingsStandard Play / Long Play / Auto Long Play Duration of the programmed recording,With OK Use =P- or P+ to select the option When using this video recorderSAT Recording Press the Timer button k Programming timer with Video Plus+Programmed recordings Video Plus screen will appearSelect to enter the required setting Signals on * or offConfirm with OK The screen will briefly show Stored Activate VPS/PDCSolution Problem solving Video Plus-ProgrammingPress the Timer button k twice Timer screen will appear Programming timer without Video Plus+Display will show k Use Select to enter the required settingMuch remaining playing time is available Problemsolution Problem solving Timer programmingPress the Turbo Timer button on the remote control Turbo Timer-RecordingProblem solving Turbo Timer programming It has been manually deleted Using the NexTView LinkAdjusting the child lock Adjusting automatic switch-off10Other functions Repeat Play Replaying cassette continuouslyTV systems Changing the TV systemProcess and show several transmission systems Again and select AutoSelecting the sound channel Adjusting the OSD informationClock Display Energy-saving modeMono sound track can be heard Mono sound track as well as the leftFactory setting of the video recorder is Adapting remote controlRecorder. Each button has been allocated a specific Both video recorders is possible once moreRemote Control Codes Using the TV remote control11Suppressing interference Signals are transmittedOptimizing the modulator Which modulator frequency should I enter?Modulator when there is interference with Switching the modulator on / offModulator Picture or sound see below12Before you call an engineer ProblemEnglish English English Video recorder / display English