Panasonic PV-DV702 Replace the Battery, Remote Controlling Two Palmcorders, For VCR

Page 10

Before Using

Replace the Battery

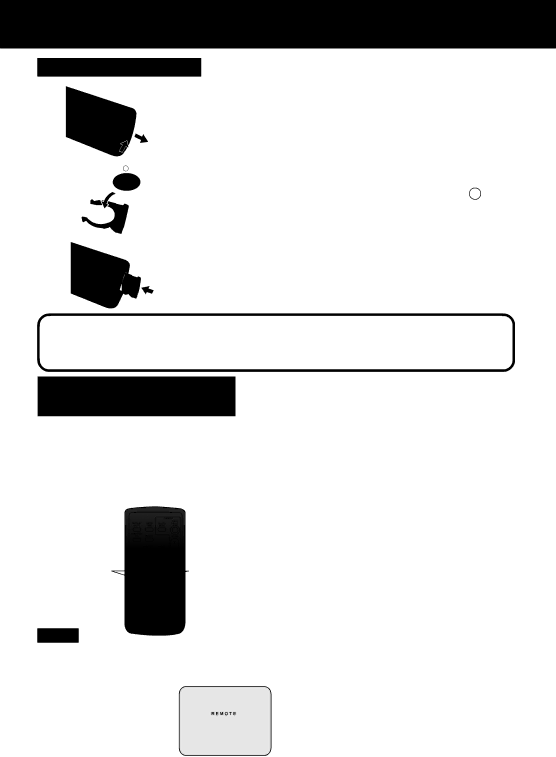
B1 While pressing the tab in the direction of the arrow (A)

with your fingernail, pull out the Battery Tray (B).

A

+

2

3

Insert the battery into the Battery Tray with the + mark facing up.

Do not reverse the polarity.

Insert the Battery Tray.

Replace battery with Panasonic PART NO. VSBW0004 (CR2025) only. Use of another battery may present a risk of fire or explosion.

Caution: Battery may explode if mistreated. Dispose of used battery properly. Keep away from children. Do not recharge, disassemble or dispose of in a fire.

Remote Controlling Two Palmcorders

You can control any two Panasonic Palmcorders with one Remote control. In order for the remote to distinguish between the two units, it is necessary to set one of the Palmcorders to VCR 2. On the remote, press VCR 1 or VCR 2 to control the desired Palmcorder.

For VCR 2 :

For VCR 1 :

Press these

Press these

buttons at the

buttons at the

same time.

same time.

Note

When the Palmcorder and remote are not set to the same mode (VCR1 or

VCR2), “CHECK REMOTE MODE (REMOTE)” will appear.

1 Set POWER to VCR or CAMERA.

The POWER Lamp lights red.

Be sure POWER is fully turned to VCR or CAMERA position.

2 Press MENU to display the VCR or CAMERA mode menu screen.

3 Rotate JOG KEY to select SET-UP in the CAMERA mode menu screen or PLAY MODE in the VCR mode menu screen, then press JOG KEY to display the CAMERA SET-UP or VCR PLAY MODE menu screen.

4 Rotate JOG KEY to select REMOTE , and then press JOG KEY to select VCR 2 (Menu OSD: pp. 110, 111). Leave the other Palmcorder set to VCR1.

5 Set the Remote Control to VCR 1 or VCR 2 to correspond with the Palmcorder you wish to control. (See above left.)

After replacing the Remote Control Battery, the remote will default to VCR 1.

10


Forassistance, pleasecall: 1-800-211-PANA(7262)orsende-mailto:consumerproducts@panasonic.com

Image 10
Contents Operating Instructions Above markings are located on the appliance bottom cover Safety PrecautionsThings You Should Know PV-DV702Important Safeguards Important Safeguards Table of Contents Unpack your Palmcorder Before UsingCGR-D08R Erase Protection Record Speed/Playback TimeEasy Cassette Eject/Insertion Before you beginHand Strap Adjust the LengthAttaching the Shoulder Strap Lens CapTo operate Camera functions Using the Built-in LightRemote Control To operate VCR functionsInsert the Battery Tray Replace the BatteryRemote Controlling Two Palmcorders Set Power to VCR or CameraInsert Cassette Insert the Battery PackQuick Guide CameraCamera Recording To Watch Playback in the LCD Liquid Crystal DisplayWhen inserting the Memory Card About the M-CARD Lock SwitchInsert Memory Card Insert the Battery Pack Remove the Battery Pack Supplying PowerCharge the Battery Pack on the AC Adaptor About the Flashing of the Charge LampTo avoid damage to the Battery Battery CareSafety precautions To ensure longer battery lifeExample Setting the ClockSet the Date and Time Push RotateDisplaying the Menu Using the Palmcorder MenuSetting the Menu Items EX. VCR Mode menu Camera Main menuSimple Recording To conserve powerCamera Recording EVFSwing the LCD monitor fully open Adjust the viewing angle Using the LCD MonitorTo adjust the LCD/EVF Brightness or Color Start recordingSet Power to Camera Digital PhotoShot ModeProgressive PhotoShot Mode Press Photoshot in Record/Pause modeZoom Microphone Function Set Power to Camera Zoom slowlyZoom Zoom quicklySelf Recording Recording CheckRecording Still Pictures Press Recording CheckPress Back Light again to cancel the Backlight feature Special Effect FeaturesCinema Mode BacklightProgram AE Fade Audio/Video Fade In/OutMagicVu IR Filter 0 Lux Fade OutMain Picture KEY 1POWER 2MENU 7REC Pause Camera StillPicture in Picture PinP PhotoshotRotate and press JOG KEY to select Photo Title5REC Pause White Balance Advanced SettingsFor manual White Balance adjustment Following cases, the indication flashesManual Focus Auto FocusMacro Focus for close-ups Manual Selection High Speed ShutterPress JOG KEY repeatedly to display Adjusting the Iris Manually WIND-CUTConnecting Earphone not supplied Playback using the LCD MonitorPlayback Your Recordings Blank Search Adjusting the VolumeRepeat Playback EVF/LCDRStill Picture Rapid Visual SearchFast Forward/Rewind Check Variable Speed Search Slow Motion Playback Remote Control OnlyRotate JOG KEY to adjust the playback speed Press SLOW/F.ADV during playADV Slow Frame by Frame Advance Remote Control Only3PLAY 1PAUSE Press SLOW/F.ADV to do a frame by frame advanceJog Frame by Frame Search Palmcorder Only Index Forward/Reverse Search Remote Control OnlyTo cancel this function, press Play or Stop Top ScanNorm Strobe Multi ModeFast SlowView Recording/Playback on your TV Camera mode Digital FeaturesDigital Zoom MagicPix Images VCR modeJOG KEY 2MENU 1POWER 5PLAY Rotate JOG KEY to selectI.S. may not function when Dual Digital Electronic Image Stabilization System D.E.I.S3REC/PAUSE Bplay To use the Wipe function Other Digital FunctionsTypes of Digital Functions To use the MIX functionEditing Features Audio Dubbing using the External or Built-in MicrophoneMemory-Stop Editing JOG KEYMonitor with your TV Copying your Tapes to S-VHS or VHS CassettePause Pause 6STOP 4REC Copying from Digital Equipment dubbingRecording Palmcorder Insert a pre-recorded tape intoCard PhotoShot Card FeaturesImage Resolution and Capacity supplied 8MB Memory Card Press Photoshot to record an imageRecording Images From a Tape 4PHOTOSHOT 2POWER 3PAUSE 3PLAYRepeat steps 1 and 2 on Set Power to VCR Repeat steps 3~4 to record another image to the Memory CardPlayback Still Images 2M-PLAY StopDelete ALL Delete Specific ImagesDelete FormatJOG KEY 2M-DEL Stop Delete All Image PagesRotate and press JOG KEY to select YES Format the Memory Card ALL1 Dpof SettingVariable ALL0PHOTOVU/MPEG4 Movie Messenger System Transferring Your Images WindowsPalmcorder USB Device Driver/Web Camera/SD Drive Palmcorder File ConverterTransferring Your Images Windows Palmcorder USB Device Driver/Web Camera Camera Mode PHOTOVU/MPEG4 Movie Messenger System VCR ModeVerifying the driver Windows 98SE/Me/2000/XP Uninstalling Application Software If you are using Windows 98SE or Me, click Add/RemoveTurn on your PC Set the Palmcorder Power to VCR Connection for PHOTOVU/MPEG4 Movie Messenger SystemPHOTOVU/MPEG4 Movie Messenger System To disconnect USB Cable safely Windows 2000/XPRunning the Photovu MPEG4 Movie Messenger System PC ConnectionUsing Tape Image Data USB USB 4STOP 2PLAYPlaying back the saved Motion and Still images VideoGift Screen Using the VideoGift Screen Using a Motion Image on the VideoGift ScreenSetting the Mail Software Repeat steps 4~6 on page 65 to Attaching captured Motion and Still images to your e-mailAttaching Motion images to e-mail Clicking on E-Mail will convertSelect the Still images. See steps 4~6 on Sending a Portion of a Motion ImageSlide-Show Edit Click on Slide Edit on the VideoGift screenSetting the Size and Quality Motion and Still Image Selecting a Frame from a Motion Image Drag the pointer 1 to select a desired frame Click OKClick on Uploader on the VideoGift screen Uploading the image to PictureStage HomePictureStage Home On nextGet a login ID and password Transferring Your Images i.LINK Windows PC Connection with DV Interface Cable i.LINKStop 2PLAY Using Tape Image DataWhen selecting Normal Click Play button on PC screen to playback the DV tapeTo capture Still images When selecting Detail When selecting DetailClick on Stop to end capture Turn on your PC Set the Palmcorder Power to M-CARD Connection for Palmcorder USB Device Driver/SD DriveIf you are using Windows Me, USB Disk will be displayed To disconnect USB Cable safely Windows Me/2000/XPUsing Memory Card Image Data Open My Computer Click Removable DiskPalmcorder File Converter Using Palmcorder File ConverterTo convert format for Panasonic Digital Palmcorder Select the folder to which the converted file is to be saved Web Camera Before Using Web Camera* FeaturesConditions for Use AV OUT Turn on your PC Set the Palmcorder Power to CameraConnection for Web Camera USBFor Windows 2000 users Click on About Windows Messenger in the Help menu Web Camera For Windows XP usersFor Windows Messenger Windows XP only Click Click here to signType in your e-mail address and password Click on Audio Tuning WizardPerson calling inviting side Invited person sideInstall the MSN Messenger Service Type in your Sign-in name and passwordClick on Audio Tuning Wizard in the Tools menu Click Accept on the screen NetMeeting screen is automatically openedUser information, etc. is input Click on AcceptWindows Click Download Now! on the screenTransferring Your Images Macintosh ConnectionArcSoft applications Installation Using Built-in SD DriveDouble click the Untitled icon Palmcorder Accessory System Palmcorder Accessory Order Form VisaReplacing the Bulb About the Memory Card MultiMediaCard or SD Memory CardApproximate Brightness Values MixtureVideo Signal Power SourcePower Consumption Operating TemperatureSelf Diagnostic System Before Requesting ServiceCleaning Care for Video Heads Tape Operations CautionSymptom Correction On-Screen Displays OSD Indications Condition101 Request for Service Notice Limited Warranty Limited WarrantyCustomer Services Directory Accessory PurchasesPrecauciones para su seguridad Advertencia del FCCAntes de comenzar Inserte de la bateríaFilm de protección Grabación con la cámara Al insertar la tarjeta de memoria Introducir la Tarjeta de memoria* Antes de comenzarAcerca del seguro M-CARD Con un clicCamera Mode Menu Screen 10 11 IndexBeep KEY LEDVCR Mode Menu Screen 16 LCD/EVF Setting p Card Mode Menu Screen12 C.RESET p REC Mode pCAMERA/VCR Mode Photo Important NoteCHK WIND-CUT Indication Light Indication pProgressive Indication Recording Mode Photo ModePhoto Play Mode Image Page Remaining IndicationSide View Index of ControlsFront View Rear ViewBack View Top ViewUnderside View AC Adaptor Index Recording Images From a Tape