Invacare TRACER EX manual Tipping Curbs Method 1 Wheelchair, Without Step Tubes

Page 9


SAFETY/HANDLING

TIPPING

Tipping - Curbs: Method 1 - Wheelchair


Without Step Tubes

WARNING

DO NOT tip the wheelchair without assistance.

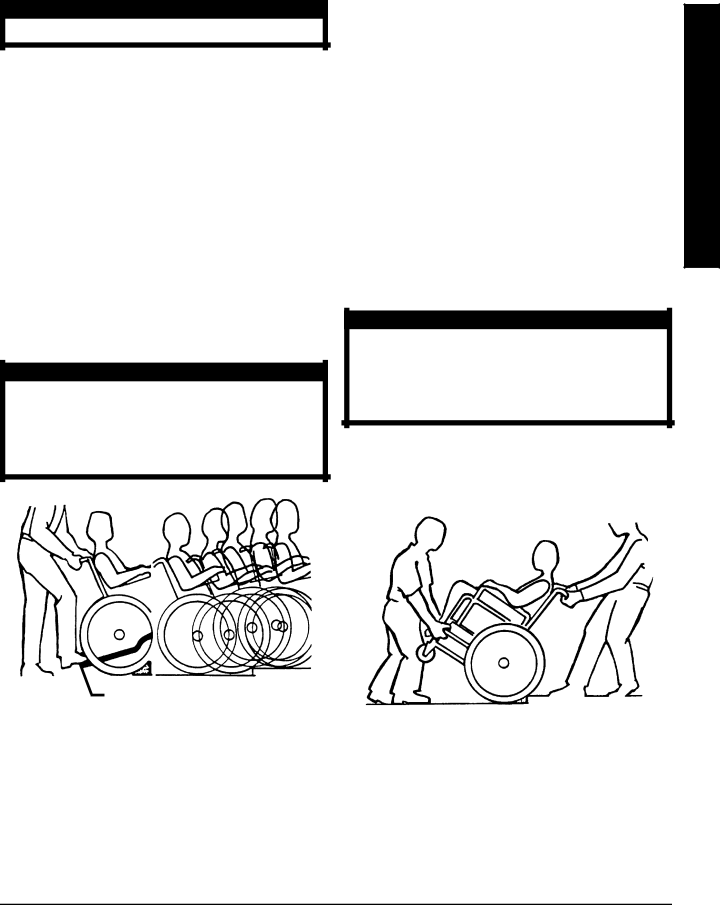
When tipping the wheelchair, an assistant should grasp the back of the wheelchair on a non-removable (non- detachable) part. Inform the wheelchair occupant be- fore tipping the wheelchair and remind him/her to lean back. Be sure the occupant’s feet and hands are clear of all wheels.

After mastering the techniques of tipping the wheel- chair, use one (1) of the following methods to tackle curbs, short stairs, etc.

Tipping - Curbs: Method 1 - Wheelchair With Step Tubes

Apply a continuous downward motion until the bal- ance point is achieved and the front casters clear the curb. At this point, the assistant will feel a difference in the weight distribution.

WARNING

When lowering the front casters of the wheel- chair, DO NOT let the wheelchair drop the last few inches to the ground. This could result in in- jury to the occupant and/or damage to the wheelchair.

This method requires two (2) assistants. The second assistant should be positioned at the front of the wheel- chair lifting upward on a non-removable (non-detach- able) part of the wheelchair frame when lifting the wheelchair and stabilizing the wheelchair when the wheelchair is being lowered to the ground.

The first assistant should stand on the sidewalk and turn the wheelchair so that the rear wheels are against the curb. Turn the anti-tippers so the anti-tip wheels are pointing up, The wheelchair should be tilted back to the balance point and, in one continuous upward movement, the rear wheels should be pulled up and over the curb. DO NOT return the front casters to the ground until the wheelchair has been pulled backward far enough for the front casters to clear the edge of the curb.

WARNING

When lowering the front casters of the wheel- chair, DO NOT let the wheelchair drop the last few inches to the ground. This could result in in- jury to the occupant and/or damage to the wheelchair.

Roll the wheelchair backward and SLOWLY lower the wheelchair in one continuous movement. DO NOT let the wheelchair drop the last few inches to the ground. This could result in injury to the occupant.

S A F E T Y

&

H A N D L I N G

Step Tube

METHOD 1 - WHEELCHAIR WITH STEP TUBE

METHOD 2 - WHEELCHAIR WITHOUT STEP TUBE

Roll the wheelchair forward and slowly lower the front of the wheelchair in one continuous movement onto the sidewalk. Do not let the wheelchair drop the last few inches to the ground. This could result in injury to the occupant. Push the wheelchair forward until the rear wheels roll up and over the curb.

9

Image 9
Contents Tracer EX Damage MAY Result Table of Contents Special Notes Special NotesSafety Summary Safety SummaryTire Pressure Percentage of Weight Distribution SAFETY/HANDLING of WheelchairsStability and Balance Coping with Everyday ObstaclesREACHING, Leaning Bending Forward Functional Reach from a WheelchairREACHING, Leaning Backwards Tipping Curbs Method 1 Wheelchair TippingWithout Step Tubes Tipping Curbs Method 1 Wheelchair With Step TubesTransferring to and from Other Seats StairwaysFolding and Unfolding the Wheelchair OpeningClosing Specifications SpecificationsSafety Inspection Check List Safety Inspection ChecklistMaintenance TroubleshootingMaintenance Safety Precautions Suggested Maintenance ProceduresSwingaway Footrest Assembly Installation Figure Heel Loop Replacement FigureSwingaway Footrest Height Adjustment Figure Front RiggingsElevating Legrest Assembly Installation Figure Adjusting the Elevating Legrest Assembly FigureProcedure Front Riggings Using or Replacing FLIP-BACK Adjusting Armrest Height Adjustable Height Arms only FigureArmrest Figure Removing or Replacing Standard Armrest FigureProcedure Adjusting Seat WidthReplacing the Seat Upholstery Figure Replacing the Back Upholstery FigureRemoving Upper Mounting Hardware Seat and BackREPLACING/REPAIRING Rear Wheel TIRE/TUBE REMOVING/INSTALLING the Rear Wheels FigureReplacing Rear Wheel Handrim Figure Rear Wheel Hex Screw Axle Mounting Hole Axle SpacerREPLACING/REPAIRING Front Caster TIRE/TUBE Adjusting Forks FigureReplacing Front Casters Figure Front CastersTop Middle Bottom Changing SEAT-TO-FLOOR HEIGHT- Tracer EX only FigureInstalling the Anti-tippers Figures 1 INSTALLING/ADJUSTING the ANTI-TIPPERSAdjusting The Anti-tippers Figure ANTI-TIPPERS/WHEEL LocksBolt and Locknut Wheel Lock Handle Shoe Rear 5/16-inches Wheel Lock Adjustment FigureInstalling the Amputee Attachment Figure Installing Fixed Height I.V. ROD FigureInstalling the Carrying Pocket Figure OptionsINSTALLING/ADJUSTING the Front ANTI-TIPPERS Figure Installing the Seat Positioning Strap FigureProcedure Options Installing Front Anti-TippersTriangular Assembly Wheel Inch Adjusting Front Anti-tippersKnob Installing the Telescoping I.V. RODUpper Rod Attachment Back Cane UpholsteryOptions Procedure Step tube shownSpacer LocknutUpper Step Tube Outer Tube Phillips Screw Repositioning The Upper Attachment FigureWarranty Limited WarrantyInvacare Corporation