HP g6-1c62us manual

Page 30

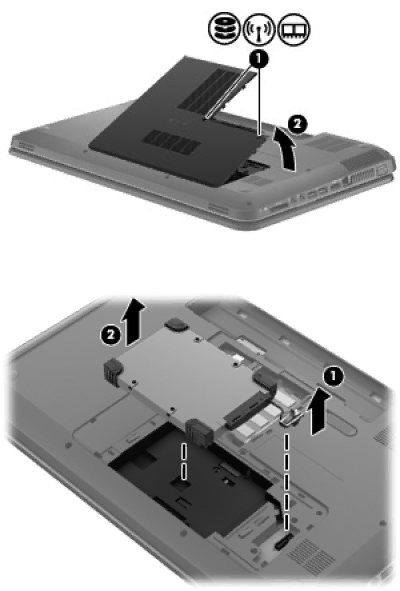
5.Remove the service door (2).

6.Disconnect the hard drive cable from the system board (1), and then lift the hard drive out of the hard drive bay (2).

24 Chapter 6 Maintenance

Image 30
Contents Getting Started Product notice Software termsSafety warning notice Iv Safety warning notice Table of contents Using TouchPad gestures Scrolling Pinching/Zooming Rotating Resource WelcomeFinding information Select Start Help and Support User GuidesWelcome TouchPad Getting to know your computerTop Component DescriptionLights Buttons Front KeysComponent Description Speakers Produce sound Right side Regulatory, Safety and Environmental Notices Left sideDisplay Communication and Chat CyberLink YouCamBottom HP QuickWeb select models only Getting startedStarting HP QuickWeb Key BehaviorUsing an Internet service provider NetworkingConnecting to a wireless network Connecting to an existing WlanSetting up a new Wlan network Configuring a wireless router Keyboard and pointing devices Using the keyboardUsing the action keys Icon Key DescriptionUsing pointing devices Setting pointing device preferencesUsing the TouchPad Turning the TouchPad off or on TouchPad light Icon DescriptionSelecting Scrolling Rotating Inserting the battery MaintenanceInserting or removing the battery Removing the batteryAdding or replacing a hard drive Removing the hard drivePage Installing a hard drive Adding or replacing memory modules Page Page Backup and recovery RestoreCreating restore media Follow the on-screen instructions Backup and recovery Performing a system restore Restoring using the restore mediaBacking up and recovering your information Changing the computer boot orderUsing Windows Backup and Restore Using Windows system restore pointsWhen to create restore points Customer support Contacting customer supportLabels ComponentDC plug of external HP power supply SpecificationsInput power Operating environmentIndex JacksQuickWeb