Carvin CX1252 Internal DSP Effects Program Chart, Setting UP the Sound System, On Stage Operation

Page 12

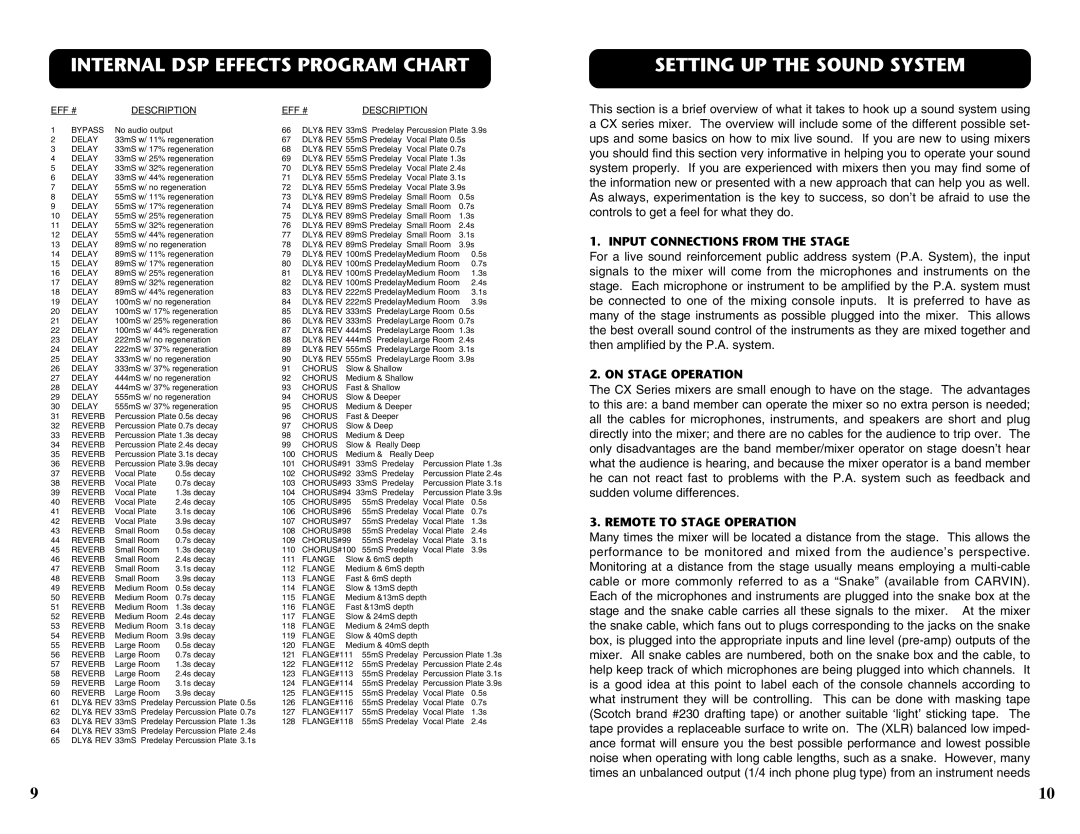
INTERNAL DSP EFFECTS PROGRAM CHART

EFF #

DESCRIPTION

EFF #


DESCRIPTION


1

BYPASS

No audio output


66

DLY& REV 33mS Predelay Percussion Plate 3.9s

2

DELAY

33mS w/ 11% regeneration

67

DLY& REV 55mS Predelay Vocal Plate 0.5s


3

DELAY

33mS w/ 17% regeneration

68

DLY& REV 55mS Predelay Vocal Plate 0.7s


4

DELAY

33mS w/ 25% regeneration

69

DLY& REV 55mS Predelay Vocal Plate 1.3s


5

DELAY

33mS w/ 32% regeneration

70

DLY& REV 55mS Predelay Vocal Plate 2.4s


6

DELAY

33mS w/ 44% regeneration

71

DLY& REV 55mS Predelay Vocal Plate 3.1s


7

DELAY

55mS w/ no regeneration

72

DLY& REV 55mS Predelay Vocal Plate 3.9s


8

DELAY

55mS w/ 11% regeneration

73

DLY& REV 89mS Predelay Small Room

0.5s

9

DELAY

55mS w/ 17% regeneration

74

DLY& REV 89mS Predelay Small Room

0.7s

10

DELAY

55mS w/ 25% regeneration

75

DLY& REV 89mS Predelay Small Room

1.3s

11

DELAY

55mS w/ 32% regeneration

76

DLY& REV 89mS Predelay Small Room

2.4s

12

DELAY

55mS w/ 44% regeneration

77

DLY& REV 89mS Predelay Small Room

3.1s

13

DELAY

89mS w/ no regeneration

78

DLY& REV 89mS Predelay Small Room

3.9s

14

DELAY

89mS w/ 11% regeneration

79

DLY& REV 100mS PredelayMedium Room

0.5s

15

DELAY

89mS w/ 17% regeneration

80

DLY& REV 100mS PredelayMedium Room

0.7s

16

DELAY

89mS w/ 25% regeneration

81

DLY& REV 100mS PredelayMedium Room

1.3s

17

DELAY

89mS w/ 32% regeneration

82

DLY& REV 100mS PredelayMedium Room

2.4s

18

DELAY

89mS w/ 44% regeneration

83

DLY& REV 222mS PredelayMedium Room

3.1s

19

DELAY

100mS w/ no regeneration

84

DLY& REV 222mS PredelayMedium Room

3.9s

20

DELAY

100mS w/ 17% regeneration

85

DLY& REV 333mS PredelayLarge Room 0.5s

21

DELAY

100mS w/ 25% regeneration

86

DLY& REV 333mS PredelayLarge Room 0.7s

22

DELAY

100mS w/ 44% regeneration

87

DLY& REV 444mS PredelayLarge Room 1.3s

23

DELAY

222mS w/ no regeneration

88

DLY& REV 444mS PredelayLarge Room 2.4s

24

DELAY

222mS w/ 37% regeneration

89

DLY& REV 555mS PredelayLarge Room 3.1s

25

DELAY

333mS w/ no regeneration

90

DLY& REV 555mS PredelayLarge Room 3.9s

26

DELAY

333mS w/ 37% regeneration

91

CHORUS

Slow & Shallow


27

DELAY

444mS w/ no regeneration

92

CHORUS

Medium & Shallow


28

DELAY

444mS w/ 37% regeneration

93

CHORUS

Fast & Shallow


29

DELAY

555mS w/ no regeneration

94

CHORUS

Slow & Deeper


30

DELAY

555mS w/ 37% regeneration

95

CHORUS

Medium & Deeper


31

REVERB

Percussion Plate 0.5s decay

96

CHORUS

Fast & Deeper


32

REVERB

Percussion Plate 0.7s decay

97

CHORUS

Slow & Deep


33

REVERB

Percussion Plate 1.3s decay

98

CHORUS

Medium & Deep


34

REVERB

Percussion Plate 2.4s decay

99

CHORUS

Slow & Really Deep


35

REVERB

Percussion Plate 3.1s decay

100

CHORUS

Medium & Really Deep


36

REVERB

Percussion Plate 3.9s decay

101

CHORUS#91 33mS Predelay

Percussion Plate 1.3s

37

REVERB

Vocal Plate

0.5s decay

102

CHORUS#92 33mS Predelay

Percussion Plate 2.4s

38

REVERB

Vocal Plate

0.7s decay

103

CHORUS#93 33mS Predelay

Percussion Plate 3.1s

39

REVERB

Vocal Plate

1.3s decay

104

CHORUS#94 33mS Predelay

Percussion Plate 3.9s

40

REVERB

Vocal Plate

2.4s decay

105

CHORUS#95

55mS Predelay Vocal Plate

0.5s

41

REVERB

Vocal Plate

3.1s decay

106

CHORUS#96

55mS Predelay Vocal Plate

0.7s

42

REVERB

Vocal Plate

3.9s decay

107

CHORUS#97

55mS Predelay Vocal Plate

1.3s

43

REVERB

Small Room

0.5s decay

108

CHORUS#98

55mS Predelay Vocal Plate

2.4s

44

REVERB

Small Room

0.7s decay

109

CHORUS#99

55mS Predelay Vocal Plate

3.1s

45

REVERB

Small Room

1.3s decay

110

CHORUS#100

55mS Predelay Vocal Plate

3.9s

46

REVERB

Small Room

2.4s decay

111

FLANGE

Slow & 6mS depth


47

REVERB

Small Room

3.1s decay

112

FLANGE

Medium & 6mS depth


48

REVERB

Small Room

3.9s decay

113

FLANGE

Fast & 6mS depth


49

REVERB

Medium Room

0.5s decay

114

FLANGE

Slow & 13mS depth


50

REVERB

Medium Room

0.7s decay

115

FLANGE

Medium &13mS depth


51

REVERB

Medium Room

1.3s decay

116

FLANGE

Fast &13mS depth


52

REVERB

Medium Room

2.4s decay

117

FLANGE

Slow & 24mS depth


53

REVERB

Medium Room

3.1s decay

118

FLANGE

Medium & 24mS depth


54

REVERB

Medium Room

3.9s decay

119

FLANGE

Slow & 40mS depth


55

REVERB

Large Room

0.5s decay

120

FLANGE

Medium & 40mS depth


56

REVERB

Large Room

0.7s decay

121

FLANGE#111

55mS Predelay Percussion Plate 1.3s

57

REVERB

Large Room

1.3s decay

122

FLANGE#112

55mS Predelay Percussion Plate 2.4s

58

REVERB

Large Room

2.4s decay

123

FLANGE#113

55mS Predelay Percussion Plate 3.1s

59

REVERB

Large Room

3.1s decay

124

FLANGE#114

55mS Predelay Percussion Plate 3.9s

60

REVERB

Large Room

3.9s decay

125

FLANGE#115

55mS Predelay Vocal Plate

0.5s

61

DLY& REV 33mS Predelay Percussion Plate 0.5s

126

FLANGE#116

55mS Predelay Vocal Plate

0.7s

62

DLY& REV 33mS Predelay Percussion Plate 0.7s

127

FLANGE#117

55mS Predelay Vocal Plate

1.3s

63

DLY& REV 33mS Predelay Percussion Plate 1.3s

128

FLANGE#118

55mS Predelay Vocal Plate

2.4s

64DLY& REV 33mS Predelay Percussion Plate 2.4s

65DLY& REV 33mS Predelay Percussion Plate 3.1s

SETTING UP THE SOUND SYSTEM

This section is a brief overview of what it takes to hook up a sound system using a CX series mixer. The overview will include some of the different possible set- ups and some basics on how to mix live sound. If you are new to using mixers you should find this section very informative in helping you to operate your sound system properly. If you are experienced with mixers then you may find some of the information new or presented with a new approach that can help you as well. As always, experimentation is the key to success, so don’t be afraid to use the controls to get a feel for what they do.

1. INPUT CONNECTIONS FROM THE STAGE

For a live sound reinforcement public address system (P.A. System), the input signals to the mixer will come from the microphones and instruments on the stage. Each microphone or instrument to be amplified by the P.A. system must be connected to one of the mixing console inputs. It is preferred to have as many of the stage instruments as possible plugged into the mixer. This allows the best overall sound control of the instruments as they are mixed together and then amplified by the P.A. system.

2. ON STAGE OPERATION

The CX Series mixers are small enough to have on the stage. The advantages to this are: a band member can operate the mixer so no extra person is needed; all the cables for microphones, instruments, and speakers are short and plug directly into the mixer; and there are no cables for the audience to trip over. The only disadvantages are the band member/mixer operator on stage doesn’t hear what the audience is hearing, and because the mixer operator is a band member he can not react fast to problems with the P.A. system such as feedback and sudden volume differences.

3. REMOTE TO STAGE OPERATION

Many times the mixer will be located a distance from the stage. This allows the performance to be monitored and mixed from the audience’s perspective. Monitoring at a distance from the stage usually means employing a multi-cable cable or more commonly referred to as a “Snake” (available from CARVIN). Each of the microphones and instruments are plugged into the snake box at the stage and the snake cable carries all these signals to the mixer. At the mixer the snake cable, which fans out to plugs corresponding to the jacks on the snake box, is plugged into the appropriate inputs and line level (pre-amp) outputs of the mixer. All snake cables are numbered, both on the snake box and the cable, to help keep track of which microphones are being plugged into which channels. It is a good idea at this point to label each of the console channels according to what instrument they will be controlling. This can be done with masking tape (Scotch brand #230 drafting tape) or another suitable ‘light’ sticking tape. The tape provides a replaceable surface to write on. The (XLR) balanced low imped- ance format will ensure you the best possible performance and lowest possible noise when operating with long cable lengths, such as a snake. However, many times an unbalanced output (1/4 inch phone plug type) from an instrument needs

9

10

Image 12
Contents Helpline CX Mixer Specifications Fuse SelectionReceiving Inspection For the NEW OwnerCX Stereo Series Parts List MaintenanceQuick Start UP Speaker Connections Tape Decks and External EffectsChannel PAN Control Channel EFFECTS/REVERB Level ControlTAPE/EFFECTS Return Level Control DSP Return Level ControlMonitor Line OUT Jack LEFT/RIGHT Line OUT JacksInternal DSP Effects Warranty and Service Information Do not OpenTable of Contents Channel Features Master Section Features CX1252Power LED Phantom Power Switch and LEDTesting the Monitor Amplifier and Speakers Protect LEDInternal DSP Effects Program Chart Setting UP the Sound SystemInput Connections from the Stage On Stage Operation