KitchenAid Sinks 8534966 Installation Instructions, Clamp positions, Installing in countertop

Page 3

Installation Instructions...

As with all metal objects, follow proper handling techniques.

The sink installation must comply with national and local plumbing codes and ordinances

This sink should be examined for damage prior to installation. Do not install a damaged sink. Return the sink to the dealer from whom you purchased it. Failure to do so will void the warranty.

Clamp positions

All provided clamps have two positions.

The install position refers to the position of the hardware, as it is attached or attaches to the sink, when the claw portion is NOT pointed to the outer edges of the sink rim. This position allows the sink to fit through the countertop opening.

The mount position refers to the hardware, as it is attached or attaches to the sink, with the claw portion pointed toward the outer edges of the sink rim. This position allows the sink to be clamped to the countertop via the claws.

Installing in countertop

Prepare countertop:

1. Locate template in sink package (NOTE: If no template

is provided contact KitchenAid, see “Requesting Assistance or Service” section). Set template on countertop surface in desired position. Hold template down firmly and trace around the template with a pencil onto the countertop. Remove the template.

2. Drill a 3/8” pilot hole on the inside edge of the line that was traced onto the countertop. Set jigsaw blade into the pilot hole and cut along the outline traced on the countertop.

Prepare the sink:

3. Remove any protective film, plastic bag and/or tape from the sink.

Install hardware:

4. Assemble clamps, attach the assembled clamps to the sink in their install positions (claws resting against sink or pointing away from the countertop).

Check sink fit/adjust:

5. Set the sink into the countertop opening in the desired position (see Figure 1). The countertop opening may need to be adjusted for the sink. Proper fit may be accomplished with the jigsaw and /or file. Care should be taken not to chip or crack the countertop material by aggressive filing or sawing. The sink rim should rest evenly on the countertop. Remove sink, turn upside down and proceed to step 6.

Figure 1

Sink

Countertop

Install sink:

6. Place a continuous bead of silicone sealant around the entire perimeter of the sink rim. Lift the sink, turn it right side up, and lower back into the countertop cutout opening in the desired position (see Figure 1). Move all clamps to their mount positions (claws pointing away from the sink under the countertop). Begin tightening clips (see Figure 2) but do not overtighten. It is only necessary to draw the sink rim down firmly to the countertop. Tighten until the entire sink rim is sealed. Wipe off any excess sealant from the countertop with a dry cloth.

Figure 2

1


2

7


8

6

3

4

5

Tighten clamps gradually, in a sequence similar to that shown.

3

Image 3
Contents Table of Contents Installation Instructions Use & Care GuideCountertop requirements Installation requirementsTools and Parts Plumbing requirementsInstallation Instructions Installing in countertopClamp positions Use & Care Guide WarrantyOur consultants provide assistance with Requesting Assistance or ServiceIf you need assistance or service in U.S.A For further assistance

Sinks 8534966 specifications

The KitchenAid Sinks 8534966 is a remarkable addition to any kitchen, designed to combine functionality with modern styling. This sink model exemplifies KitchenAid's commitment to quality and user-friendly design, making meal preparation and cleanup more efficient and enjoyable.

One of the primary features of the KitchenAid Sinks 8534966 is its durable construction. Crafted from high-quality stainless steel, the sink resists scratches, stains, and rust, ensuring it maintains its sleek appearance even after years of heavy use. Its 16-gauge thickness offers added strength, making it ideal for busy kitchens where durability is paramount.

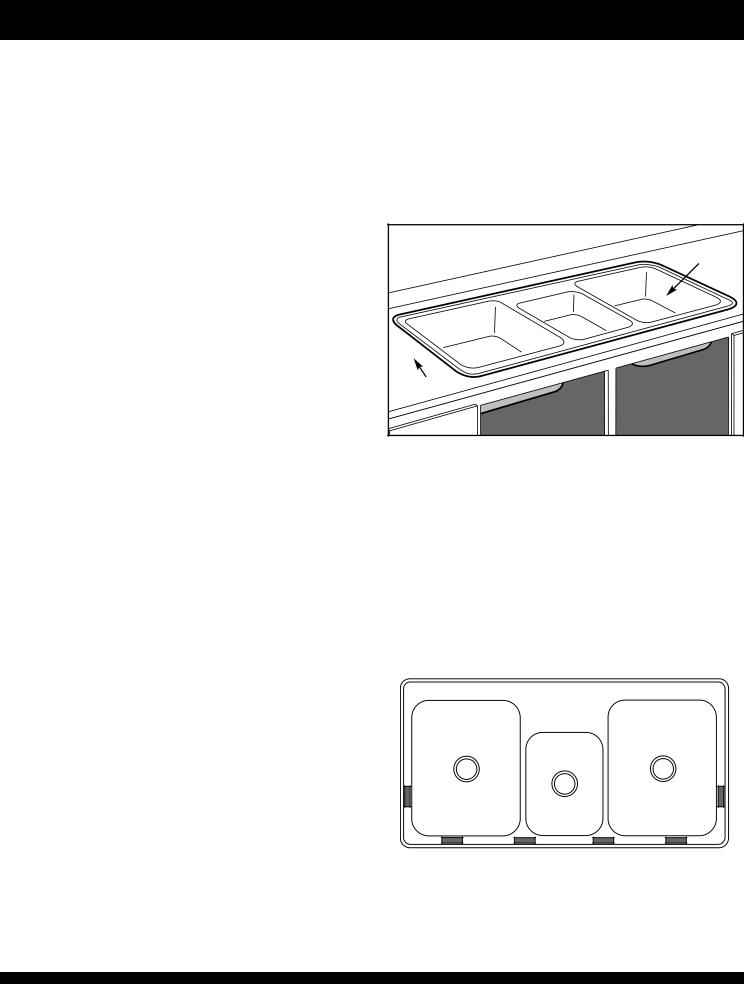
The design of the sink is another notable aspect. The KitchenAid Sinks 8534966 typically showcases a contemporary, undermount configuration, allowing for easy integration into a variety of countertop materials such as granite or quartz. This design not only enhances the visual appeal of the kitchen but also facilitates seamless cleaning, as there are no rim edges to catch debris.

Equipped with a deep basin, the sink enables ample space for washing pots, pans, and large dishes, while the gentle slopes of the sink bottom aid in draining water effectively. The sound-deadening technology integrated into its design minimizes noise, providing a quieter environment while dishes are being washed.

Furthermore, the KitchenAid Sinks 8534966 often come with features that cater to the modern home chef. Optional accessories such as a cutting board, colander, and dish drying rack can enhance the sink's versatility, allowing you to multitask efficiently while preparing meals.

The installation process is straightforward, designed for both professionals and DIY enthusiasts. KitchenAid provides comprehensive guidelines to ensure that users can achieve a secure fit within their kitchen layout.

In summary, the KitchenAid Sinks 8534966 stands out for its robust build, stylish design, practical features, and intelligent technologies. Whether you are a seasoned cook or an occasional gourmet, this sink promises to elevate your kitchen experience, providing both style and utility to meet your culinary needs. The perfect blend of form and function, the KitchenAid Sinks 8534966 is a choice that many homeowners will appreciate for years to come.