UK
INTRODUCTION
To get the best out of your new appliance, please read this user guide carefully before using it for the first time. We also re- commend that you keep the instructions for future reference, so that you can remind yourself of the functions of your appliance.
SAFETY MEASURES
•The appliance, cord or plug must not be placed in water or any other liquid.
•Never touch the appliance, cord or plug with wet or damp hands.
•Never leave the appliance unattended when it is switched on. Children should be supervised when using it.
•Switch the appliance off when it is not in use, before cleaning, and before you empty the dust container or clean the filters.
•Take the adaptor out of the socket after charging.
•Avoid pulling the cord when removing the adapter from the socket. Instead, hold the adapter. Keep the cord and appli- ance away from heat sources, hot objects and naked flames.
•Never use the appliance if it, the charging station, the cord or adapter is damaged or if the appliance is not functioning cor- rectly. Never use the appliance if the filter or dust container have not been fitted correctly.
•Only use accessories manufactured or recommended by the manufacturer.
•The appliance is for indoor domestic use only. Do not use it on wet surfaces. Take particular care when vacuuming stairs, due to the risk of falling, or the appliance falling and breaking.
•Do not use the appliance to vacuum up matches, hot ashes, cigarette butts, hard or sharp objects, wet or damp substan- ces, combustible materials (petrol, solvents, etc.) or vapour from these.
•Do not cover the appliance’s suction or exhaust port. Ensure that you keep clothing, hair and body parts away from the nozzle and moving parts of the appliance.
•Never try to repair the appliance yourself. If the appliance, charging station, cord or adapter needs to be repaired, it should be taken to an authorised service centre. Please contact the store where you bought the appliance for repairs under guarantee.
•Never attempt to open or repair the battery of this appliance.
•Never use the battery of this appliance in other devices.
•The battery of this apparatus may only be charged with the charging station included.
•Dispose of batteries in accordance with local regulations, for example by delivering them to the local recycling center.
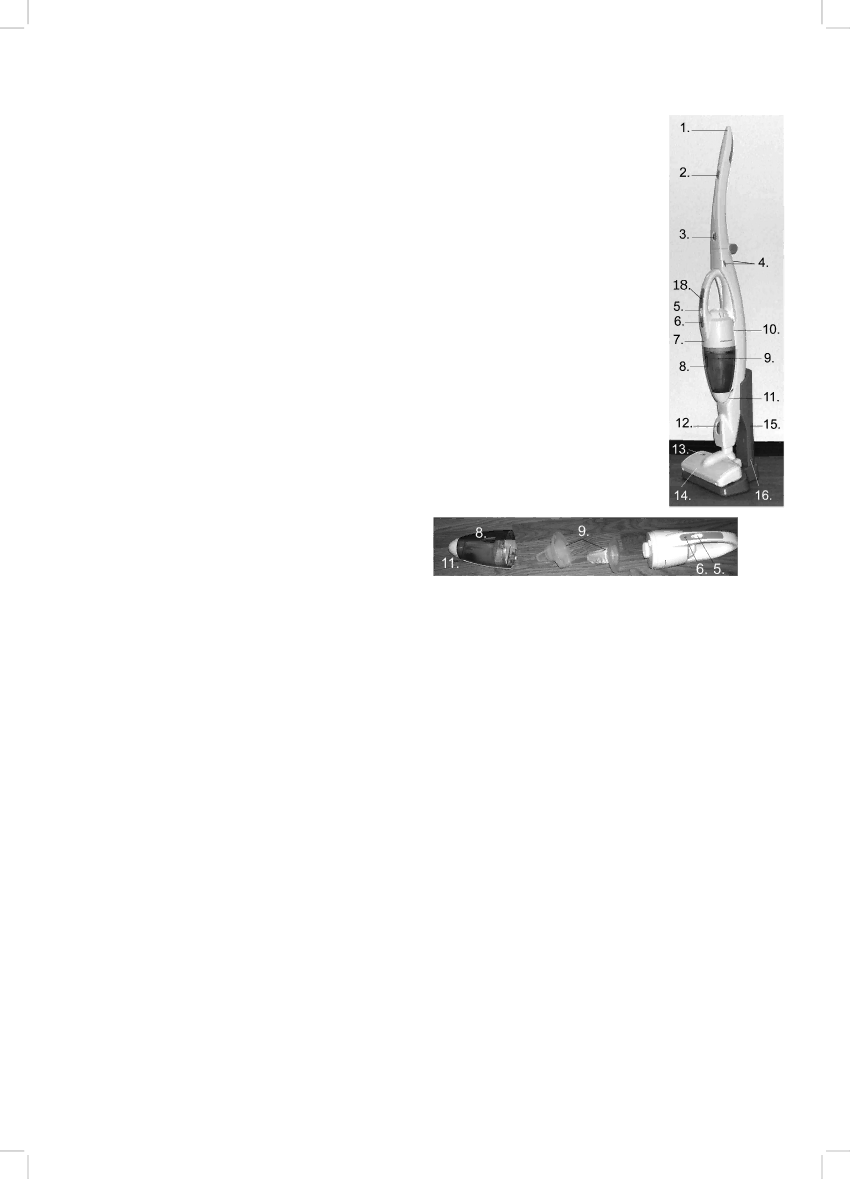
KEY TO MAIN COMPONENTS OF THE APPLIANCE
1.Foldable handle
2.On/off button
3.Release button for foldable handle
4.Release button for
5.On/off button (hand held)
6.Indicator for battery charging
7.
8.Dust container
9.Dust filter
10.Release button for dust container (on back of
11.Crevice nozzle
12.Release button for floor nozzle
13.Indicator on floor nozzle
14.Floor nozzle
15.Charging station
16.Plug for adapter
17.Adapter (not visible on picture)
18.Battery indicator
PREPARING THE APPLIANCE
•Connect the adapter (17) to the plug (16) on the charging station (15), plug adapter into a wall socket, and switch on the electricity.
•Place the entire appliance in the charging station. The indicator (6) lights up while the battery is charging and the wall socket is turned on.
Important!
It normally takes between 12 and 14 hours to charge the vacuum cleaner.
Important!
When charging the appliance it is important that the
During operation the battery indicator (18) will indicate the battery level. When only red is indicated, the vacuum cleaner should be recharged.
USE
This apparatus can be used both as a floor vacuum and as a
Using the floor vacuum
•Turn on the appliance at the on/off button (2) on the foldable handle (1). When the appliance is turned on, the indicator on the floor nozzle will light up. (13).
•Switch the appliance off when you have finished using it.
14