Craftsman 917.27538 owner manual To Change Engine OIL, AIR Filter, Clean AIR Screen

Page 21

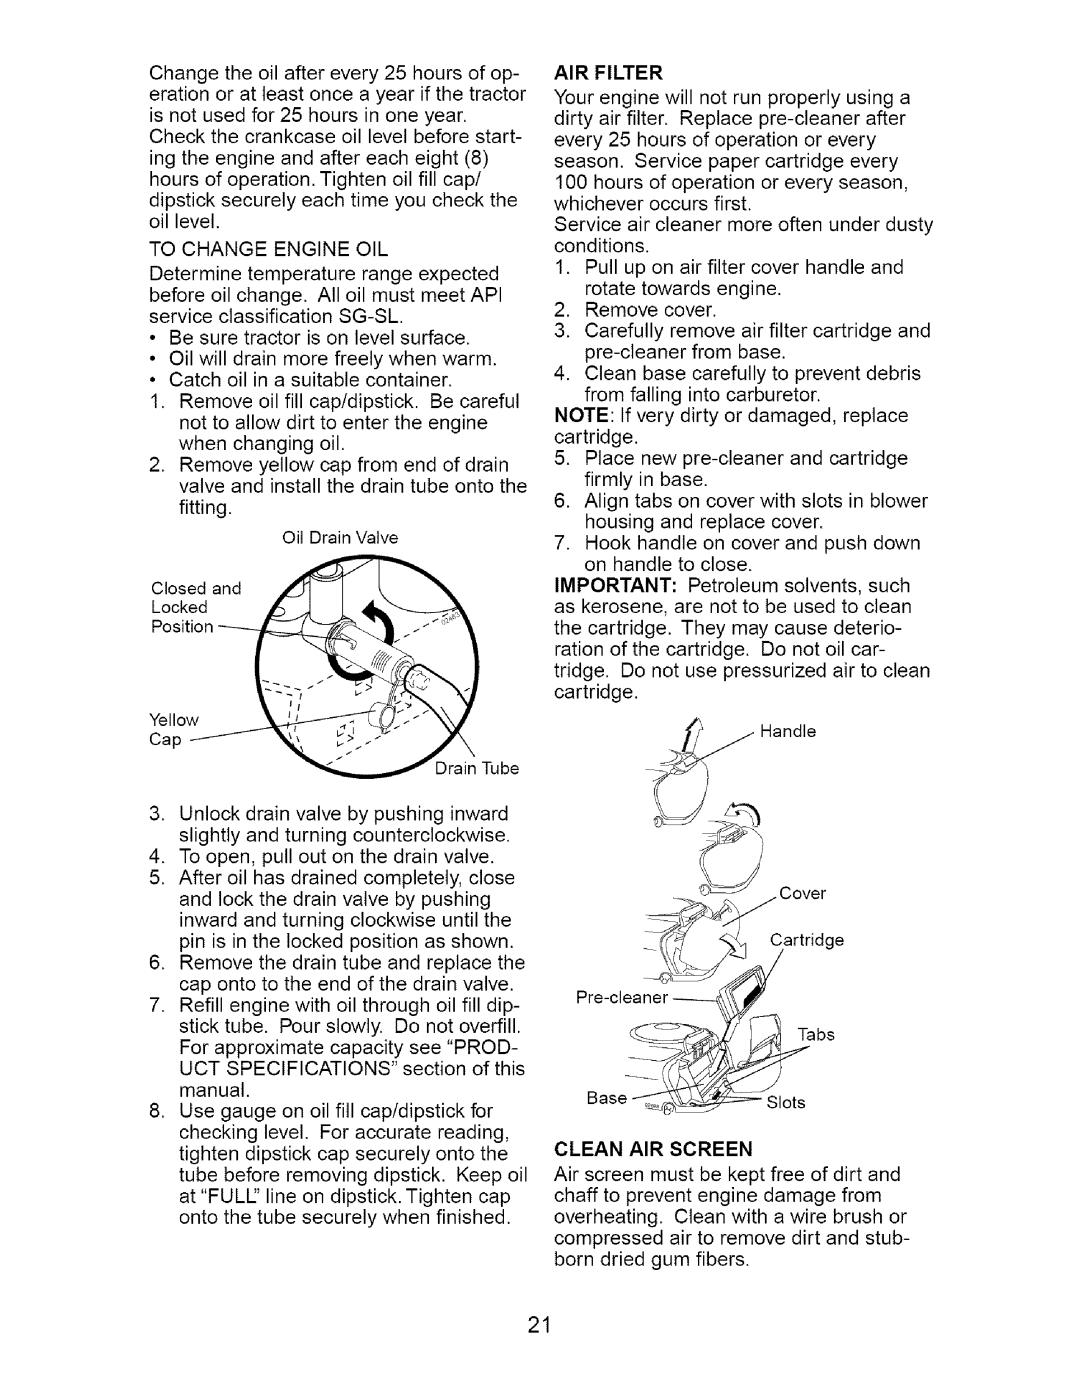
Change the oil after every 25 hours of op- eration or at least once a year if the tractor is not used for 25 hours in one year.

Check the crankcase oil level before start- ing the engine and after each eight (8) hours of operation. Tighten oil fill cap/ dipstick securely each time you check the oil level.

TO CHANGE ENGINE OIL

Determine temperature range expected before oil change. All oil must meet API service classification SG-SL

Be sure tractor is on level surface.

Oil will drain more freely when warm.

Catch oil in a suitable container.

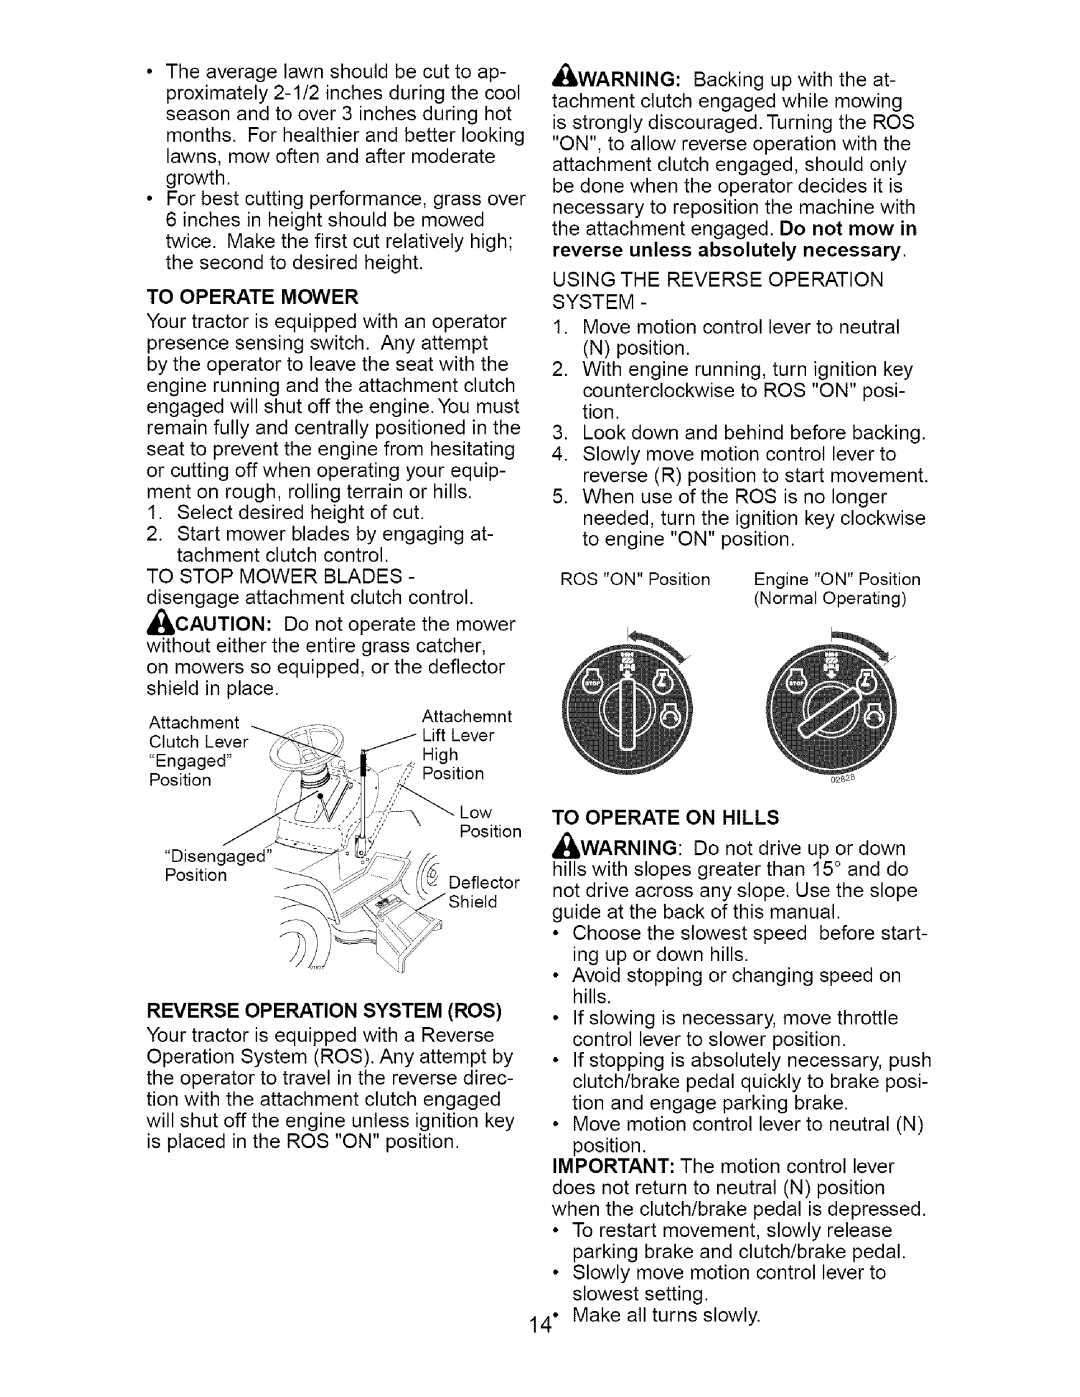
1.Remove oil fill cap/dipstick. Be careful

not to allow dirt to enter the engine when changing oil.

2.Remove yellow cap from end of drain valve and install the drain tube onto the

fitting.

Oil Drain Valve

Closed and

Locked

Yellow

Cap

Tube

3.Unlock drain valve by pushing inward slightly and turning counterclockwise.

4.To open, pull out on the drain valve.

5.After oil has drained completely, close and lock the drain valve by pushing inward and turning clockwise until the pin is in the locked position as shown.

6.Remove the drain tube and replace the cap onto to the end of the drain valve.

7.Refill engine with oil through oil fill dip- stick tube. Pour slowly. Do not overfill.

For approximate capacity see "PROD-

UCT SPECIFICATIONS" section of this manual.

8.Use gauge on oil fill cap/dipstick for checking level. For accurate reading, tighten dipstick cap securely onto the tube before removing dipstick. Keep oil at "FULl" line on dipstick. Tighten cap onto the tube securely when finished.

AIR FILTER

Your engine will not run properly using a dirty air filter. Replace pre-cleaner after every 25 hours of operation or every season. Service paper cartridge every 100 hours of operation or every season, whichever occurs first.

Service air cleaner more often under dusty conditions.

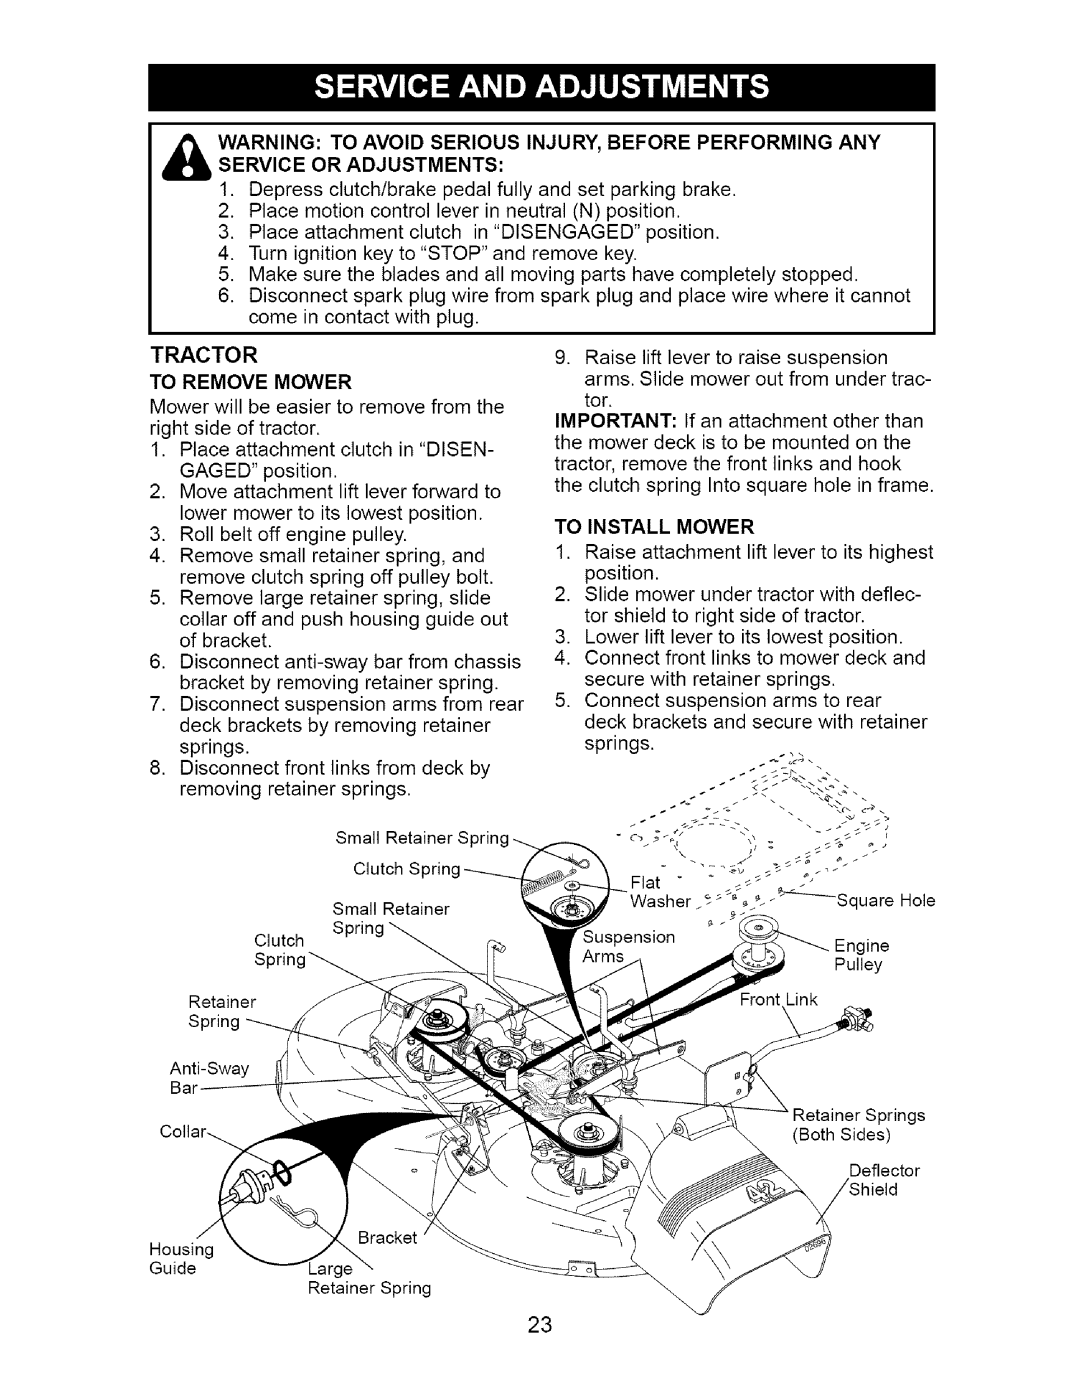
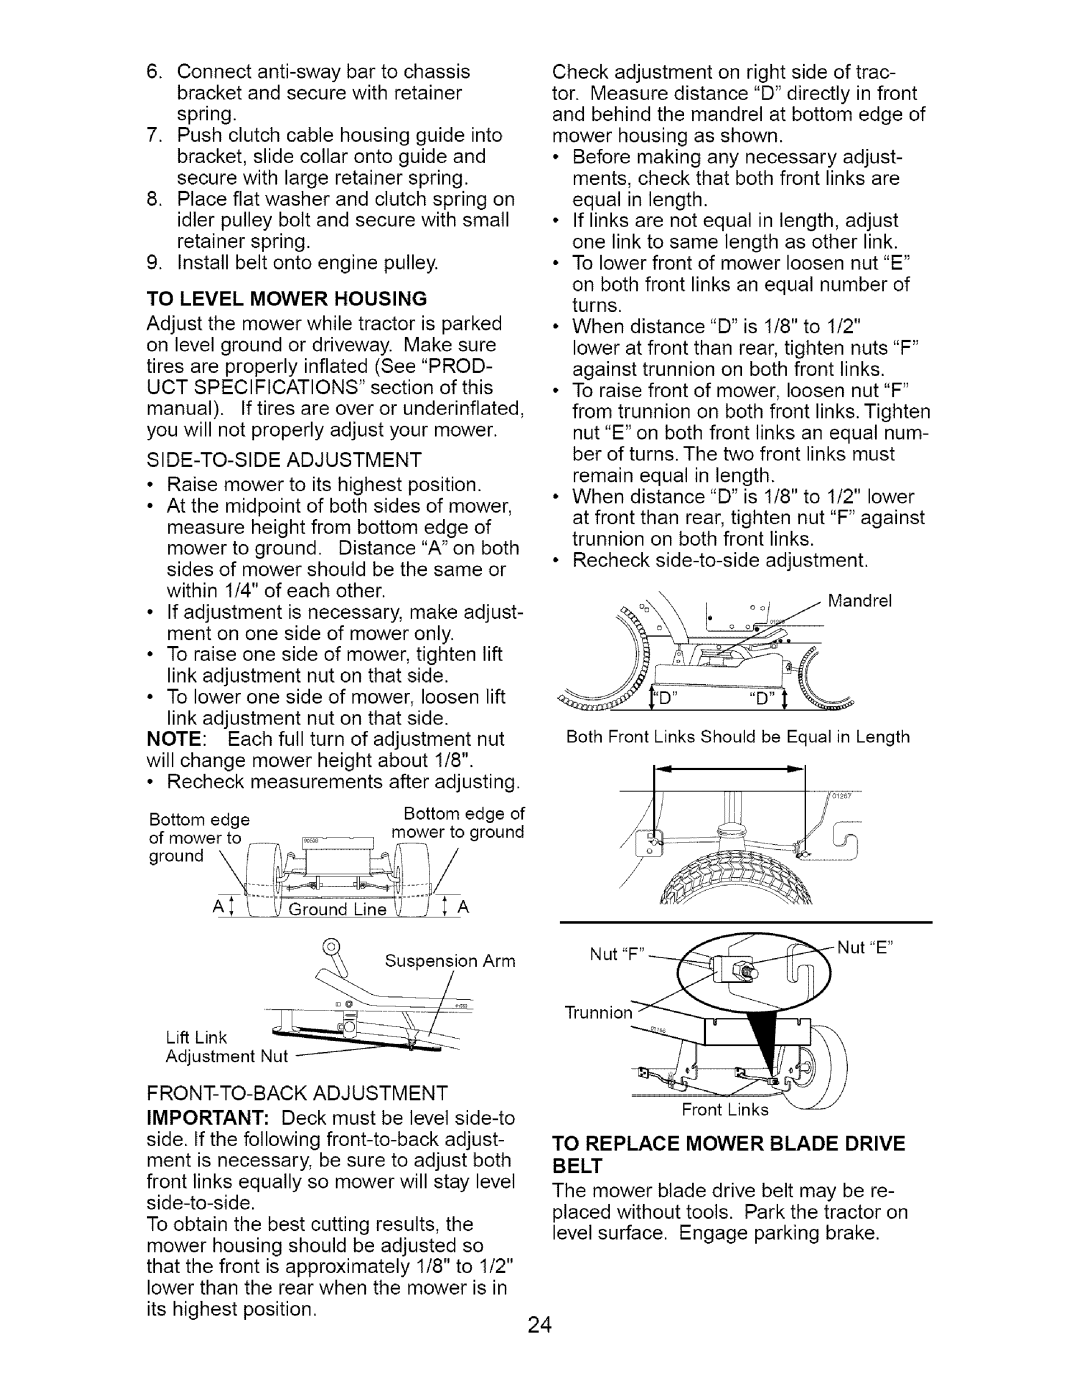
1.Pull up on air filter cover handle and rotate towards engine.

2.Remove cover.

3.Carefully remove air filter cartridge and pre-cleaner from base.

4.Clean base carefully to prevent debris from falling into carburetor.

NOTE: If very dirty or damaged, replace cartridge.

5.Place new pre-cleaner and cartridge firmly in base.

6.Align tabs on cover with slots in blower housing and replace cover.

7.Hook handle on cover and push down on handle to close.

IMPORTANT: Petroleum solvents, such as kerosene, are not to be used to clean the cartridge. They may cause deterio- ration of the cartridge. Do not oil car- tridge. Do not use pressurized air to clean cartridge.

?Handle

Cover

Cartridge

Tabs

CLEAN AIR SCREEN

Air screen must be kept free of dirt and chaff to prevent engine damage from

overheating. Clean with a wire brush or compressed air to remove dirt and stub- born dried gum fibers.

21
Image 21
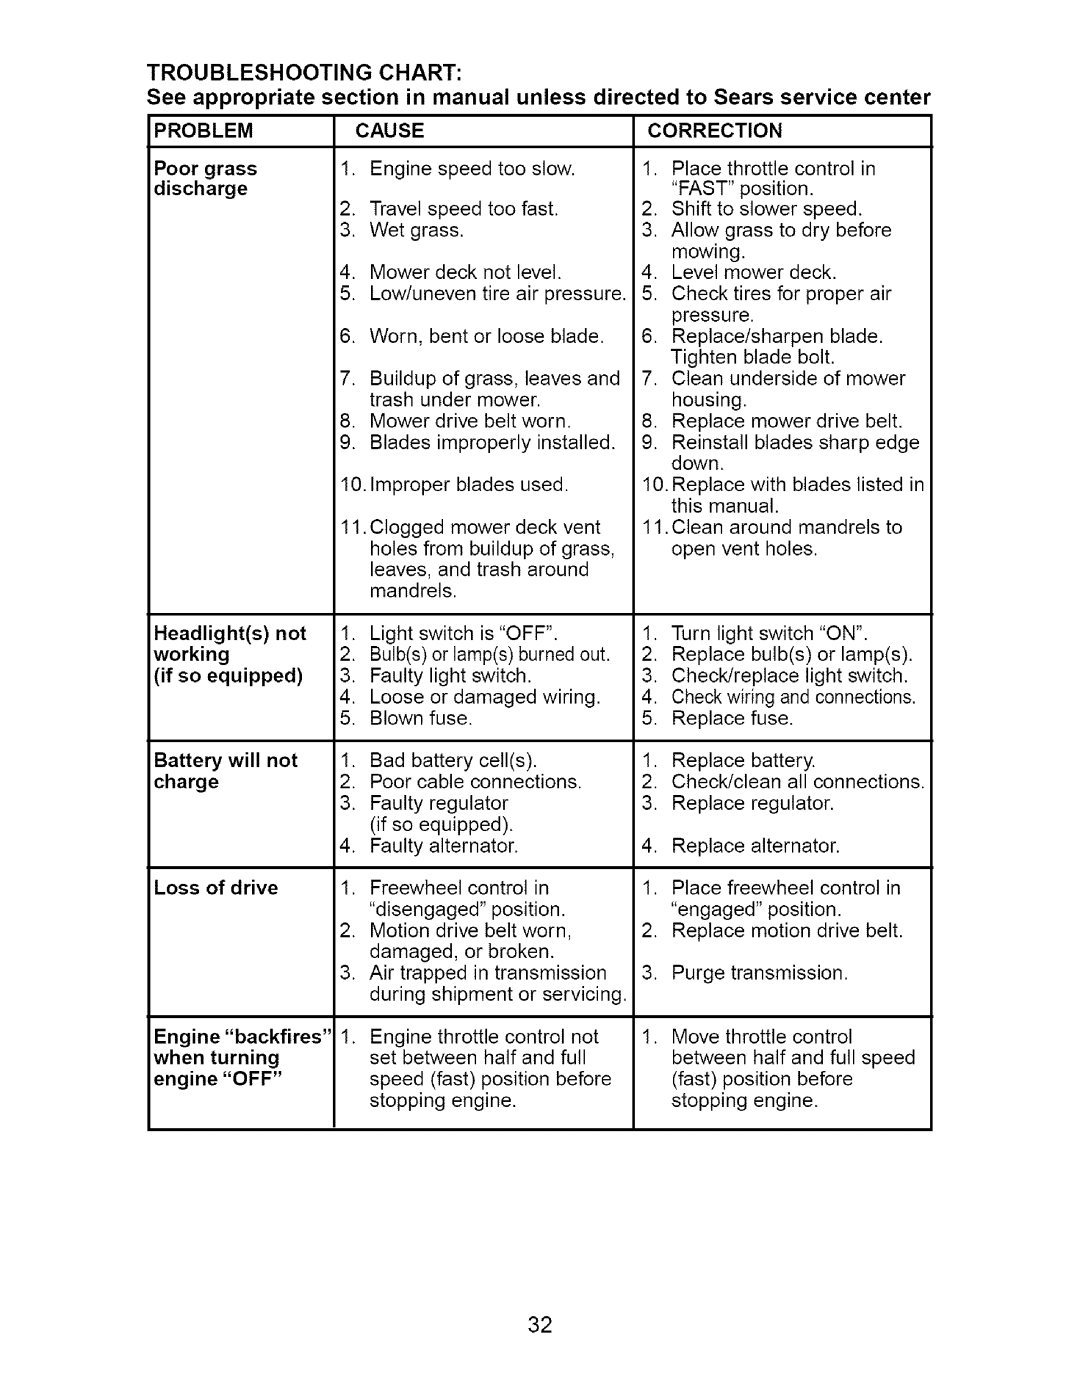
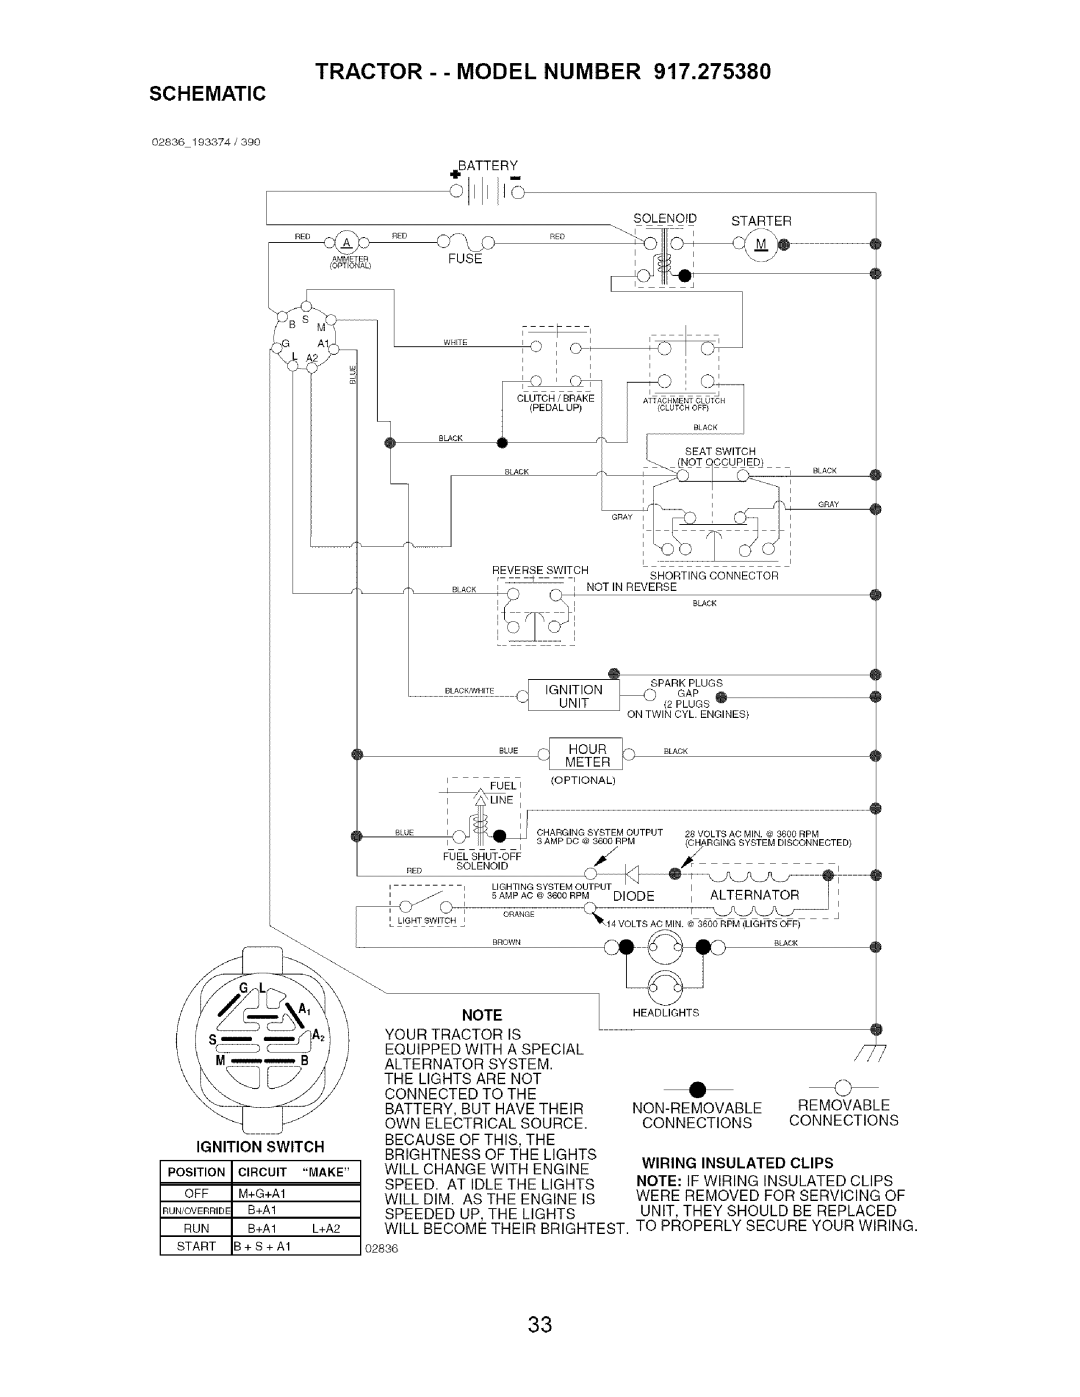
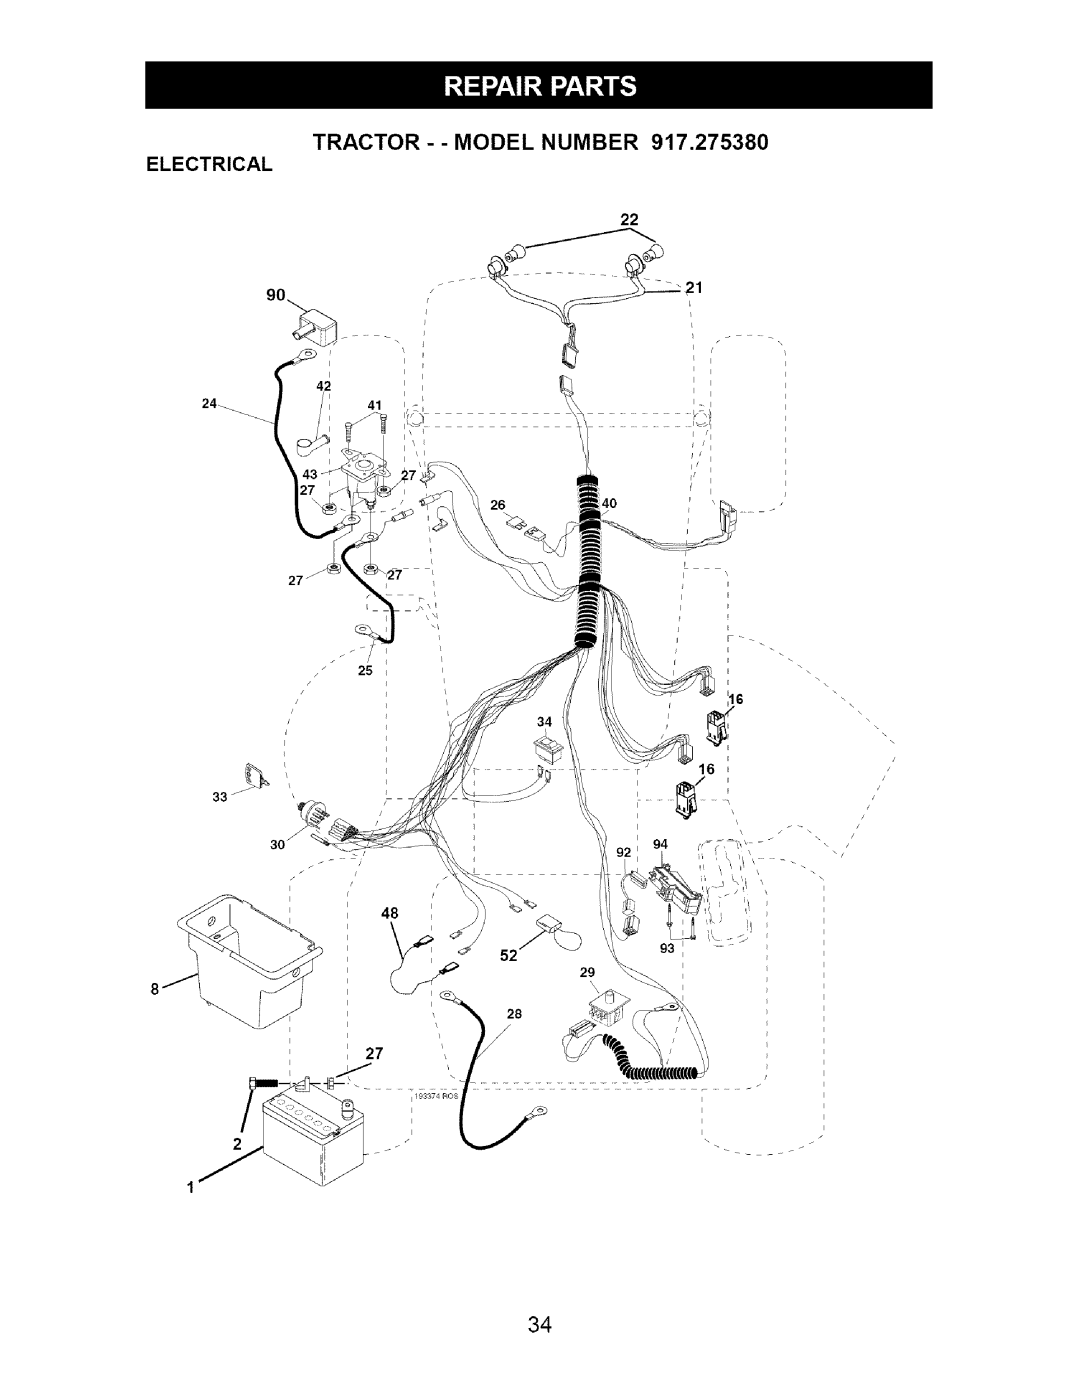
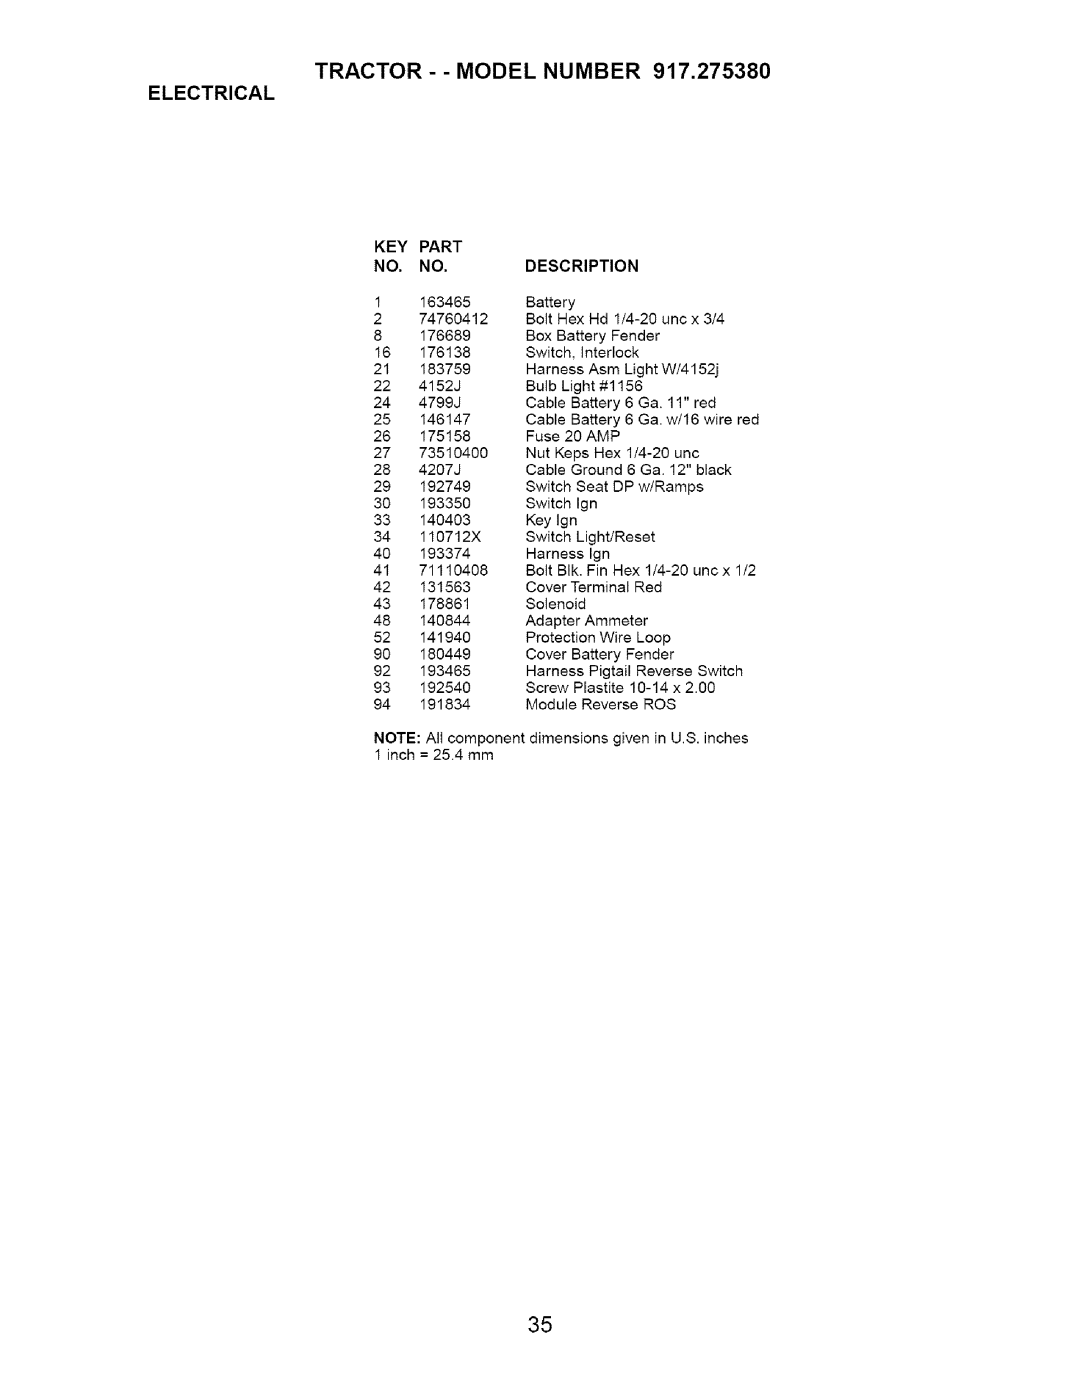
Contents Jcrrftsmrnj Limited Warranty on Battery Limited Warranty on Craftsman Riding EquipmentGeneral Operation III. Children Service Safe Handling of GasolineIV. Towi NG II, Slope OperationGeneral Service Repair Protection Agreements Customer Responsibilities16 Lock Washer Install Seat Tools Required for AssemblyUnpack Carton Before Removing Tractor From Skid Attach Steering WheelTo Drive Tractor OFF Skid Check BatteryChecktire Pressure Check for Proper Position of ALL BeltsCheck Deck Levelness Check Brake SystemTo the tractor and/or engine Tractor Light Switch Position TurnsTo Adjust Mower Cutting Height HOW to USE Your Tractor To SET Parking BrakeTo Move Forward and Backward StoppingTo Operate Mower Using the Reverse Operation SystemTo Stop Mower Blades Reverse Operation System ROSMents Towing Carts and Other AttachBefore Starting the Engine Check Engine OIL LevelPurge Transmission Automatic Transmission Warm UPMowing Tips General Recommendations FillinoatesBlade Removal Blade CareTo Sharpen Blade Batt E RYEngine Lubrication Clean AIR Screen To Change Engine OILAIR Filter Engine Cooling System CleaningIN-LINE Fuel Filter MufflerTo Remove Mower To Install MowerTo Level Mower Housing SIDE-TO-SIDE AdjustmentTo Replace Mower Blade Drive Belt To Replace Motion Drive Belt Transmission Removal Replacement Transaxle Motion Control LE VER Neutral AdjustmentMent To Remove Wheel for RepairsReplacing Battery To Replace Headlight BulbTo Remove Hood and Grill AS Sembly To Adjust Carburetor To Adjust Throttle Control CablePreliminary Setting EngineFuel System BatteryEngine OIL CylindersProblem Cause CorrectionStart Troubleshootingchart =ROBLEMCause Correction Problemcause Battery will not chargeTractor - Model Number SchematicElectrical Electrical KEY Part Description Tractor - Model Number 917.275380 Chassis and Enclosures KEY Part Description Tractor - Model Number Ground Drive KEY Part Description Tractor - Model Number 917,275380 Ground DriveTractor - Model Number 917,275380 Steering Assembly Tractor - Model Number 917.275380 Steering Assembly Optional Equipment 137352 Tractor - Model Number Seat Assembly Wheels &TIRES DecalsTractor - Model Number 917,275380 Lift Assembly Tractor - Model Number Lift Assembly Tractor - Model Number 917,275380 Mower Deck TUV Tractor - Model Number Mower DeckO715 # 0 062W 20@ 6170 616 947 1783A.@ 697174 KEY Part NO. no Page Only Ride UP and Down Hill Not Across Hill Degrees MAX Suggested Guide for Sighting Slopes for Safe OperationYour Home