SAFETY WARNINGS AND INSTRUCTIONS: POLARIZED PLUG
To reduce the risk of electric shock, this equipment has a polarized plug (one blade is wider than the other). This equipment must be used with a suitable polarized 2 wire or 3 wire extension cord. Polarized connections will fit together only one way. Make sure that the receptacle end of the extension cord has large and small blade slot widths. If the plug does not fit fully into the extension cord, reverse the plug. If it still does not fit, obtain a suitable extension cord. If the extension cord does not fit
fully into the outlet, contact a qualified electrician to install the proper outlet. Do not change the tool plug or extension cord in
any way.BEFORE OPERATING
BEFORE OPERATING
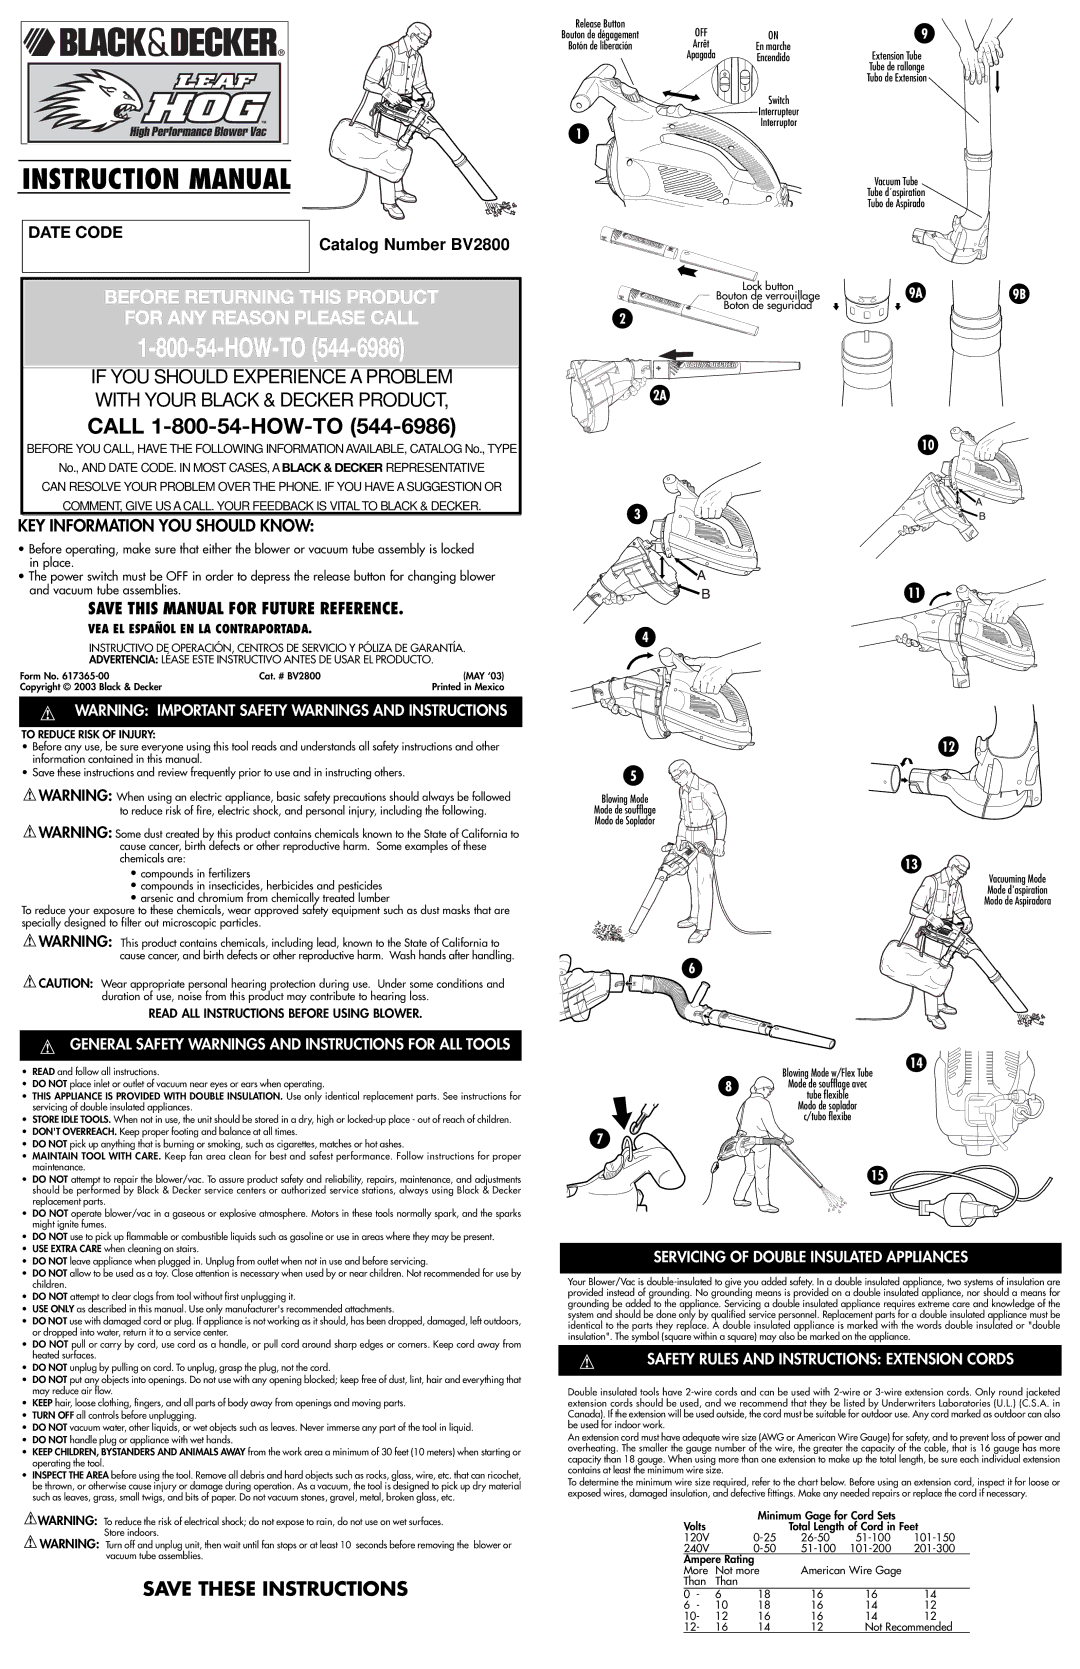
•SECURING POWER SUPPLY CORD - Secure the extension cord in the tool's built-in cord retainer as shown in Figure 14 or secure the power supply cord and a suitable extension cord as shown in Figure 15.
SWITCH
NOTE: The switch will not operate if the release button, shown in Figure 1, is depressed.
To turn the tool ON, slide the switch forward, as shown in Figure 1. To turn tool OFF, slide switch to the rear.
OPERATION
USE AS A BLOWER: ALWAYS WEAR SAFETY GLASSES, WEAR A FILTER MASK IF THE OPERATION IS DUSTY. USE OF RUBBER GLOVES AND SUBSTANTIAL FOOTWEAR IS RECOMMENDED WHEN WORKING OUTDOORS. FOR HOUSEHOLD USE ONLY.
•BLOWER MODE - STRAIGHT TUBES ONLY
Ensure that the unit is switched OFF and is disconnected from the power supply. Assemble blow tubes as shown in Figure 2 and Figure 2A. (This only needs to be done the first time you assemble the unit.)
 WARNING: When turning the tool off for tube installation or any other reason, wait 10 seconds for the fan to stop rotating before disassembly.
Attach the blower tube assembly (The assembly includes the blower tubes, and the fan chamber) to the front of the tool, as shown in Figure 3 by inserting point A into the matching recess marked point B, also shown in Figure 3. Swing the tube up to engage the lock, as shown in Figure 4.
NOTE: The lock will not engage if the ON/OFF switch is in the forward (ON) position.
Hold the end of the blower tube approximately 7 inches (180mm) above the ground and turn the tool ON. Using a sweeping motion, from side to side, advance slowly keeping the accumulated debris (leaves,grass clippings etc.) in front of you, as shown in Figure 5. Once you have blown the debris into a pile, you can convert to vacuum mode to collect the debris for disposal.
•BLOWER MODE - FLEX TUBE
Ensure that the unit is switched OFF and is disconnected from the power supply. Assemble flex blow tube as shown in Figure 6.
 WARNING: When turning the tool off for tube installation or any other reason, wait 10 seconds for the fan to stop rotating before disassembly.
Attach the blower tube assembly (The assembly includes the blower tubes, the flex tube, and the fan chamber) to the front of the tool by inserting point A into the matching recess marked point B, shown in Figure 3. Swing the tube up to engage the lock, as shown in Figure 4.
NOTE: The lock will not engage if the ON/OFF switch is in the forward (ON) position.
To attach the shoulder strap to the blower, snap the hooks at the end of the strap to the metal ring located on the top of the unit as shown in Figure 7.
For right handed operation, begin with the blower behind you on your left side. Lift the blower and place the shoulder strap over your LEFT shoulder, then grasp the flex tube handle with one hand as shown in Figure 8. Sweep from side to side with the nozzle several inches above the ground. Slowly advance keeping the accumulated pile of debris in front of you. NOTE: For left handed operation, reverse the procedure above. Once you have blown the debris into a pile, you can convert to vacuum mode to collect the debris for disposal.
•REMOVING THE BLOWER TUBE ASSEMBLY Switch off the unit and unplug from the outlet.
To disconnect the blower tube assembly from the tool, depress the release button, shown in Figure 1, ensuring that the tube does not fall to the ground.
NOTE: The release button will not depress if the ON/OFF switch is in the forward (ON) position.
USE AS A VACUUM CLEANER: ALWAYS WEAR SAFETY GLASSES. WEAR A FILTER MASK IF THE OPERATION IS DUSTY. USE OF RUBBER GLOVES AND SUBSTANTIAL FOOTWEAR IS RECOMMENDED WHEN WORKING OUTDOORS. FOR HOUSEHOLD USE ONLY.
•VACUUMING MODE
Ensure that the unit is switched off and disconnected from the power supply. Position the vacuum tube and extension tube as shown in Figure 9. Push the extension tube into the vacuum tube until it snaps into place and the arrows shown in Figure 9A are covered as in Figure 9B. If necessary, this can be made easier by wiping the end of the extension tube with a cloth dampened with soapy water only.
Attach the vacuum tube assembly (The assembly includes the extension tube, the vacuum tube and the fan chamber.) to the front of the tool. Insert point "A", shown in Figure 10, into the matching recess in the front of the tool point "B", also shown in Figure 10, and swing the tube up to engage the lock, as shown in Figure 11.
Attach the collection bag to the vacuum outlet using the bayonet fitting, as shown in Figure 12.
Hold the vacuum as shown in Figure 13. Tilt the vacuum tube slightly and use a sweeping action similar to the action described under Blower Mode. The light debris will flow into and through the vacuum tube into the collection bag. Things such as leaves and small twigs will be mulched as they pass through the fan chamber so that the collection bag will hold a lot of debris.
When the collection bag gets full, suction will noticeably decrease. Turn off and unplug the tool and unzip the bag to empty before continuing to operate.
 CAUTION: NEVER UNZIP THE COLLECTION BAG WITHOUT FIRST TURNING OFF AND UNPLUGGING THE VACUUM.
NOTE: If the suction decreases and the bag is not full, the vacuum tube is probably clogged with debris. Turn off and unplug the vacuum and clear the tube before continuing.
MAINTENANCE
•CLEANING AND STORAGE
TURN OFF AND UNPLUG TOOL! (Unplug extension cord at power source.)
Use only mild soap and a damp cloth to clean the tool. Clean out any clippings which may have accumulated in the Blower/Vac. When used properly with dry leaves the fan chamber of your Blower/Vac should remain clean. If damp earth and debris are ingested some of the particles may build up on the inside of the fan chamber. If this happens the performance of the unit will decrease. This area can be cleaned out by gently wiping out with a damp rag after disconnecting from the power source. Your Blower/Vac should be stored in a dry place.
 CAUTION: DO NOT POUR OR SPRAY WATER ON THE TOOL IN AN ATTEMPT TO CLEAN.
Do not store the tool on or adjacent to fertilizers or chemicals. Such storage can cause rapid corrosion of the metal parts.
Use only mild soap and a damp cloth to clean the tool. Never let any liquid get inside the tool; never immerse any part of the tool into a liquid.
ACCESSORIES
Recommended accessories for use with your tool are available from your local dealer or authorized service center. If you need assistance regarding accessories, please call: 1-800-54-HOW-TO (544-6986).
 WARNING: The use of any accessory not recommended for use with this tool could be hazardous.
Leaf Collection System Cat. No. BV-006 (Available from your dealer at extra cost.)
The Leaf Collection System replaces the collection bag with a system of collecting debris directly into a 30-33 gallon trash can. Complete directions for the system’s use are included. (Trash can not included.)
IMPORTANT
To assure product SAFETY and RELIABILITY, repairs, maintenance and adjustment (including brush inspection and replacement) should be performed by authorized service centers or other qualified service organizations, always using identical replacement parts.
SERVICE INFORMATION
Black & Decker offers a full network of company-owned and authorized service locations throughout North America. All Black & Decker Service Centers are staffed with trained personnel to provide customers with efficient and reliable power tool service.
Whether you need technical advice, repair, or genuine factory replacement parts, contact the Black & Decker location nearest you.
To find your local service location, refer to the yellow page directory under “Tools—Electric” or call: 1-800-54-HOW-TO (544-6986).
FULL TWO-YEAR HOME USE WARRANTY
Black & Decker (U.S.) Inc. warrants this product for two years against any defects in material or workmanship. The defective product will be replaced or repaired at no charge in either of two ways:
The first, which will result in exchanges only, is to return the product to the retailer from whom it was purchased (provided that the store is a participating retailer). Returns should be made within the time period of the retailer’s policy for exchanges (usually 30 to 90 days after the sale). Proof of purchase may be required. Please check with the retailer for their specific return policy regarding returns that are beyond the time set for exchanges.
The second option is to take or send the product (prepaid) to a Black & Decker owned or authorized Service Center for repair or replacement at our option. Proof of purchase may be required. Black & Decker owned and authorized Service Centers are listed under “Tools-Electric” in the yellow pages of the phone directory.
This warranty does not apply to accessories. This warranty gives you specific legal rights and you may have other rights which vary from state to state. Should you have any questions, contact the manager of your nearest Black & Decker Service Center. This product is not intended for commercial use.
Imported by | | See ‘Tools-Electric’ |
|
Black & Decker (U.S.) Inc., | | – Yellow Pages – |
701 E. Joppa Rd. | | for Service & Sales |
Towson, MD 21286 U.S.A. | | |
GUIDE D’UTILISATION
AVANT DE RETOURNER LE PRODUIT, PEU IMPORTE
LA RAISON, PRIÈRE DE COMPOSER LE
1 800 544-6986.
RENSEIGNEMENTS IMPORTANTS
•Avant de faire fonctionner l’outil, s’assurer que le souffleur ou l’assemblage du tube d’aspiration soit bien enclenché.
•Mettre l’interrupteur en position d’arrêt (OFF) avant d’enfoncer le bouton de dégagement en vue de remplacer l’assemblage du souffleur ou du tube d’aspiration.
CONSERVER LE PRÉSENT GUIDE À TITRE DE RÉFÉRENCE.
AVERTISSEMENT : IMPORTANTES MESURES DE SÉCURITÉ
AFIN DE RÉDUIRE LES RISQUES DE BLESSURES :
•Avant toute utilisation, s’assurer que tous ceux qui se servent de l’outil lisent et comprennent toutes les mesures de sécurité et tout autre renseignement contenus dans le présent guide.
•Conserver ces mesures et les relire fréquemment avant d’utiliser l’outil ou d’en expliquer le fonctionnement à d’autres personnes.
 AVERTISSEMENT : Afin de réduire les risques d’incendie, de secousses électriques ou de blessures lorsqu’on utilise des outils électriques, il faut toujours respecter les mesures de sécurité suivantes.
 AVERTISSEMENT : Le produit génère de la poussière qui peut renfermer des produits chimiques. Selon l’état de la Californie, ces produits chimiques peuvent causer le cancer ainsi que des malformations congénitales, et ils présentent d’autres dangers au système reproductif humain. Voici des exemples de tels produits chimiques :
•les composés d’engrais;
•les composés d’insecticides, d’herbicides et de pesticides;
•l’arsenic et le chrome provenant de bois traité.
Afin de minimiser les risques, porter de l’équipement de sécurité approuvé comme des masques antipoussières spécialement conçu pour filtrer les particules microscopiques.
 AVERTISSEMENT : Le produit renferme des produits chimiques, dont du plomb. Selon l’état de la Californie, ce produit chimique peut causer le cancer ainsi que des malformations congénitales, et il présente d’autres dangers au système reproductif humain. Se laver les mains après l’utilisation.
 MISE EN GARDE : Porter un dispositif approprié de protection de l’ouïe lors de l’utilisation du produit. Dans certaines conditions et durées d’utilisation, le produit peut émettre un niveau de bruit provoquant la perte de l’ouïe.
LIRE TOUTES LES DIRECTIVES AVANT D’UTILISER L’OUTIL.
MESURES DE SÉCURITÉ POUR TOUS LES OUTILS•
•LIRE et respecter toutes les mesures de sécurité.
•NE PAS porter l’entrée ou la sortie du tube de l’aspirateur à proximité des yeux ou des oreilles lorsque l’outil fonctionne.
•L’OUTIL EST MUNI D’UNE DOUBLE ISOLATION. Utiliser seulement des pièces de rechange identiques. Voir les directives sur l’entretien des outils à double isolation.
•RANGER LES OUTILS NON UTILISÉS dans un endroit sec, situé en hauteur ou fermé à clé, hors de portée des enfants.
•NE PAS DÉPASSER SA PORTÉE. Toujours demeurer dans une position stable et garder son équilibre en tout temps.
•NE PAS aspirer d’objets en combustion tels des mégots de cigarette, des allumettes ou des cendres chaudes.
•BIEN ENTRETENIR L’OUTIL. Garder le ventilateur propre afin d’optimiser et de sécuriser le rendement. Suivre les directives d’entretien.
•NE PAS tenter de réparer l’outil. Pour garantir la sécurité et la fiabilité du produit, en confier les réparations, l’entretien et les réglages à un centre de service Black & Decker ou à un atelier d’entretien autorisé utilisant uniquement des pièces de rechange Black & Decker.
•NE PAS utiliser l’outil dans des endroits où l’atmosphère renferme des vapeurs combustibles ou explosives. Les étincelles que produit habituellement le moteur en marche pourraient enflammer ces produits.
•NE PAS se servir de l’outil pour ramasser des liquides inflammables ou combustibles (comme de l’essence) ni l’utiliser dans des endroits où de tels produits peuvent se trouver.
•FAIRE TRÈS ATTENTION lorsqu’on travaille dans des escaliers.
•NE PAS laisser l’outil branché sans surveillance. Le débrancher lorsqu’on ne s’en sert pas et avant d’en faire l’entretien.
•IL NE S’AGIT PAS d’un jouet. Faire particulièrement attention lorsqu’un enfant utilise l’outil ou qu’on s’en sert près d’un enfant. Il est déconseillé de laisser un enfant se servir de l’outil.
•NE PAS tenter de débloquer l’outil avant de le débrancher.
•UTILISER SEULEMENT L’OUTIL de la manière prescrite dans le présent guide. Utiliser uniquement les accessoires recommandés par le fabricant.
•NE PAS utiliser lorsque le cordon ou la fiche sont endommagés. Confier l’outil à un centre de service lorsqu’il ne fonctionne pas convenablement, lorsqu’il est tombé ou endommagé, lorsqu’il a été laissé à l’extérieur ou lorsqu’il est tombé à l’eau.
•NE PAS tirer sur le cordon ni se servir du cordon pour transporter l’outil. Ne pas tirer sur le cordon près d’arêtes tranchantes ou de coins. Éloigner le cordon de toute surface chauffée.
•NE PAS débrancher l’outil en tirant sur le cordon. Pour le débrancher, en saisir la fiche et non le cordon.
•NE RIEN insérer dans les ouvertures. Ne pas utiliser l’outil lorsqu’une ouverture est bouchée; garder les ouvertures exemptes de poussière, de charpie, de cheveux et de tout ce qui peut réduire le débit d’air.
•ÉLOIGNER les cheveux, les vêtements amples, les doigts et le corps des ouvertures ainsi que des pièces mobiles.
•METTRE TOUTES LES COMMANDES HORS FONCTION avant de débrancher l’outil.
•NE PAS utiliser pour aspirer de l’eau, tout autre liquide ou des objets mouillés comme des feuilles. Ne jamais immerger l’outil, au complet ou en partie.
•NE PAS manipuler la fiche ni l’outil avec les mains mouillées.
•S’ASSURER QUE LES ENFANTS, LES OBSERVATEURS ET LES ANIMAUX SE TROUVENT À UNE DISTANCE minimale de 10 mètres (30 pieds) de la surface de travail lorsqu’on démarre l’outil ou qu’on s’en sert.
•EXAMINER LA ZONE avant d’utiliser l’outil. Enlever tout débris ou objet dur (comme des pierres, du verre, des fils) qui peut ricocher, être éjecté ou provoquer des blessures ou des dommages lors de l’utilisation de l’outil. Lorsqu’on se sert de l’outil pour aspirer, celui-ci est conçu pour ramasser des matériaux secs (comme des feuilles, de l’herbe, de petites branches et des bouts de papier). Ne pas aspirer des roches, du gravier, du métal, du verre cassé ou d’autres objets semblables.
 AVERTISSEMENT : Afin de minimiser les risques de secousses électriques, protéger de la pluie, ne pas s’en servi sur des surfaces mouillées et ranger à l’intérieur.
 AVERTISSEMENT : Arrêter et débrancher l’appareil. Attendre au moins 10 secondes ou jusqu’à ce que le ventilateur s’arrête complètement avant de retirer l’assemblage du souffleur ou du tube d’aspiration.
CONSERVER CES MESURES.
ENTRETIEN DES OUTILS À DOUBLE ISOLATION
L'aspirateur-souffleur à double isolation procure une protection supplémentaire. Dans ce type d’outil, les deux systèmes d’isolant remplacent la mise à la terre. Il n’y a aucun moyen de mettre l’outil à la terre et aucun système de mise à la terre ne doit être ajouté à l’outil. L’entretien d’un outil à double isolation exige beaucoup de soin et une excellente connaissance du système; il ne devrait être confié qu’à un technicien compétent. Les pièces de rechange de ce type d’outil doivent être identiques aux pièces d’origine. Un outil à double isolation porte l’inscription «DOUBLE INSULATED» ou «DOUBLE INSULATION». Le symbole (un carré à l’intérieur d’un carré) peut aussi figurer sur l’outil.
MESURES DE SÉCURITÉ : CORDONS DE RALLONGE
Les outils à double isolation sont munis d’un cordon bifilaire et ils peuvent être utilisés avec un cordon de rallonge muni de 2 ou de 3 fils. Il faut seulement utiliser des cordons de rallonge à gaine ronde et ils devraient être homologués par l’organisme américain Underwriters Laboratories (U.L.) ou la CSA (au Canada). Lorsque le cordon de rallonge est utilisé à l’extérieur, il doit être prévu à cet effet. Tout cordon extérieur peut servir à l’intérieur.
Les cordons de rallonge doivent être faits de conducteurs de calibre approprié (AWG ou jauge américaine des fils) par mesure de sécurité et afin de prévenir les pertes de puissance et les surchauffes. Le numéro de calibre du fil est inversement proportionnel à la capacité du cordon. Ainsi, un cordon de calibre 16 a une capacité supérieure à un cordon de calibre 18. Lorsqu’il est nécessaire d’utiliser plus d’un cordon de rallonge, veiller à ce que chaque cordon ait au moins le calibre minimal.
Le tableau ci-dessous permet de déterminer le calibre minimal des cordons. Avant d’utiliser un cordon de rallonge, s’assurer qu’il n’y a pas de fils dénudés ni détachés, et que l’isolant et les raccords ne sont pas défectueux. Effectuer les réparations nécessaires ou remplacer le cordon, le cas échéant.
| | | Calibre minimal des cordons de rallonge |
Tension | | Longueur totale du cordon en pieds |
120 V | | | De 0 à 25 | De 26 à 50 | De 51 à 100 | De 101 à 150 |
240 V | | | De 0 à 50 | De 51à 100 | De 101 à 200 | De 201 à 300 |
Intensité (A) | | | | |
Au | | Au | | Jauge américaine des fils (AWG) |
moins | | plus | | | | |
0 | - | 6 | 18 | 16 | 16 | 14 |
6 | - | 10 | 18 | 16 | 14 | 12 |
10 | - | 12 | 16 | 16 | 14 | 12 |
12 | - | 16 | 14 | 12 | Non recommandé |


