|
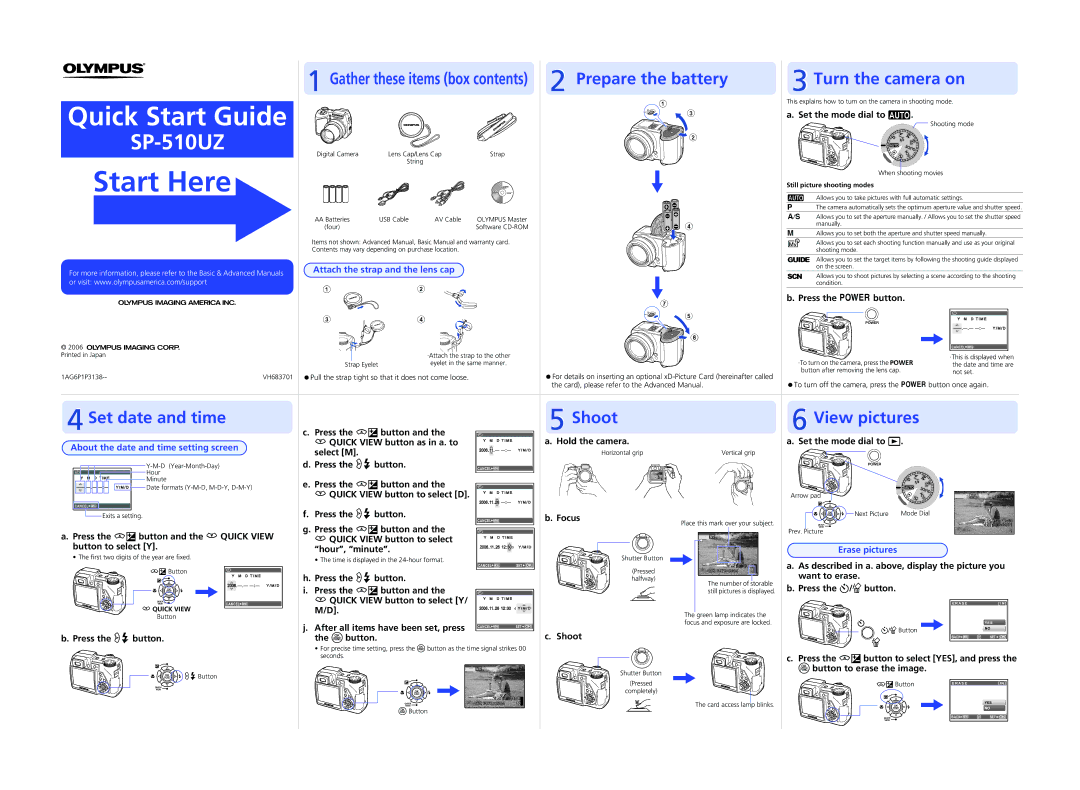
| Gather these items (box contents) | Prepare the battery |
| Turn the camera on | ||||
Quick Start Guide |
|
|
|
| 1 | This explains how to turn on the camera in shooting mode. | |||
|
|
|
|
|
| Shooting mode | |||
|
|
|
| 3 | a. Set the mode dial to h. | ||||
|
|
|
|
|
| ||||
|
|
|
|
| 2 |
|
|
| |
|
|
|
|
|
|
|
|
| |
|
| Digital Camera | Lens Cap/Lens Cap | Strap |
|
|
|
| |
Start Here |
|
| String |
|
|
|
|
|
|
|
|
|
|
|
|
| When shooting movies | ||
|
|
|
|
|
|
|
| ||
|
|
|
|
|
|
| Still picture shooting modes |
| |
|
|
|
|
|
|
| h Allows you to take pictures with full automatic settings. | ||
|
|
|
|
|
|
| P | The camera automatically sets the optimum aperture value and shutter speed. | |
|
| AA Batteries | USB Cable | AV Cable | OLYMPUS Master |
| A/S | Allows you to set the aperture manually. / Allows you to set the shutter speed | |
|
| 4 |
| manually. |
| ||||
|
| (four) |
|
| Software |
|
| ||
|
|
|
| M | Allows you to set both the aperture and shutter speed manually. | ||||
|
|
|
|
|
|
| |||
|
| Items not shown: Advanced Manual, Basic Manual and warranty card. |
| r | Allows you to set each shooting function manually and use as your original | ||||
|
| Contents may vary depending on purchase location. |
|
|
| shooting mode. |
| ||
|
|
|
|
|
|
| g Allows you to set the target items by following the shooting guide displayed | ||
For more information, please refer to the Basic & Advanced Manuals | Attach the strap and the lens cap |
|
|
| on the screen. |
| |||
|
| s Allows you to shoot pictures by selecting a scene according to the shooting | |||||||
|
|
|
|
| |||||
or visit: www.olympusamerica.com/support |
|
|
|
|
|
| |||
| 1 | 2 |
|
|
|
| condition. |
| |
|
|
|
|
| b. Press the obutton. |
| |||
|
|
|
|
|
| 7 |
| ||
|
|
|
|
|
|
|
|
| |
|
| 3 | 4 |
|
| 5 |
|
| X |
|
|
|
|
|
| Y M D T I M E | |||
|
|
|
|
|
|
|
|
| |
© 2006 |
|
|
|
|
| 6 |
|
|
|
|
|
|
|
|
|
|
| CANCEL MENU | |
|
|
|
|
|
|
|
|
| |
Printed in Japan |
|
|
| ·Attach the strap to the other |
| ·To turn on the camera, press the POWER | ·This is displayed when | ||
|
| Strap Eyelet |
| eyelet in the same manner. |
| the date and time are | |||
VH683701 | Pull the strap tight so that it does not come loose. |
| For details on inserting an optional |
| button after removing the lens cap. | not set. | |||
| To turn off the camera, press the obutton once again. | ||||||||
|
|
|
|
|
| the card), please refer to the Advanced Manual. | |||
Set date and time | c. Press the sF button and the |
|
| Shoot | View pictures |
| X |
| a. Hold the camera. | a. Set the mode dial to q. | |
About the date and time setting screen | rQUICK VIEW button as in a. to | Y M D T I M E |
| ||
select [M]. | Y / M / D | Horizontal grip | Vertical grip | ||
|
|
|
|
| d. Press the q#button. | CANCEL MENU |
|
|
|
|
|
|
| |
X |
| Hour |
|
|
|
|
|
|
|
|
|
Y M D T I M E |
| Minute | e. Press the sF button and the |
|
|
|
|
|
|
|
|
Y / M / D | Date formats | X |
|
|
|
| Arrow pad |
|
| ||
|
|
| rQUICK VIEW button to select [D]. | Y M D T I M E |
|
|
|
| [IN] |
| |
|
|
|
|
|
|
|
|
|
|
| |
|
|
|
| 2006.11.26 |
|
|
|
|
|
| HQ |
|
|
|
| Y / M / D |
|
|
|
|
|
| |
CANCEL MENU |
|
|
|
|
|
|
|
|
|
|
|
Exits a setting. |
| f. Press the q#button. | CANCEL MENU | b. Focus |
|
|
| Next Picture | Mode Dial |
| |
|
|
| g. Press the sF button and the |
| Place this mark over your subject. |
| '06.11.26 | 12:30 | |||
|
|
|
|
|
| Prev. Picture | 100 - 0001 | ||||
a. Press the sF button and the rQUICK VIEW | X |
|
|
|
|
| 1 | ||||
rQUICK VIEW button to select | Y M D T I M E |
|
|
|
|
|
|
| |||
button to select [Y]. | “hour”, “minute”. | 2006.11.26 12:30 | Y / M / D |
|
|
| Erase pictures |
|
| ||
• The first two digits of the year are fixed. | • The time is displayed in the |
|
| Shutter Button | [ | ] |
|
|
| ||
|
|
|
|
|
|
| |||||
sF Button | X |
| CANCEL MENU | SET OK | [IN] | a. As described in a. above, display the picture you | |||
Y M D T I M E | h. Press the q#button. |
|
| (Pressed | HQ 3072×2304 4 | want to erase. |
|
| |
|
|
| halfway) |
|
|
| |||
| Y / M / D |
|
|
| The number of storable | b. Press the Y/Sbutton. |
|
| |
|
| i. Press the sF button and the | X |
|
| still pictures is displayed. |
|
| |
| CANCEL MENU | rQUICK VIEW button to select [Y/ | Y M | D T I M E |
|
|
| E R A S E | [ I N ] |
rQUICK VIEW |
| M/D]. | 2006.11.26 12:30 | Y / M / D |
|
|
|
| |
Button |
|
|
|
|
| The green lamp indicates the |
|
|
|
|
| j. After all items have been set, press | CANCEL MENU | SET OK | focus and exposure are locked. | Y/SButton |
| YES | |
|
|
|
| NO | |||||
b. Press the q#button. |
| the obutton. |
|
| c. Shoot |
|
|
| |
|
|
|
|
| BACK MENU | SET OK | |||
|
| • For precise time setting, press the obutton as the time signal strikes 00 |
|
|
|
| |||
|
| seconds. |
|
|
|
| c. Press the sF button to select [YES], and press the | ||
q#Button |
|
|
|
| Shutter Button |
| obutton to erase the image. |
|
|
|
|
|
|
|
|
|
| ||
|
| [ | ] | (Pressed |
| aF Button |
|
| |
|
|
|
| E R A S E |
| ||||
|
|
|
|
| completely) |
|
|
|
|
|
|
|
| [IN] |
|
|
|
| |
|
|
| HQ 3072×2304 | 4 | The card access lamp blinks. |
|
| YES | |
|
| oButton |
|
|
|
|
| NO | |
|
|
|
|
|
|
|
| ||
|
|
|
|
|
|
| BACK MENU | SET OK | |
|
|
|
|
|
|
|
| ||