Operation (Continued)

WARNING

To reduce the risk associated with shear, pinch, and entanglement hazards:

Turn air and electrical supplies off on associated equipment before performing any adjustments, maintenance, or servicing the machine or taping heads

Never attempt to work on the taping heads or load tape when the box drive system is running

To reduce the risk associated with sharp blade hazards:

Keep hands and fingers away from tape cutoff blades under orange blade guards. The blades are extremely sharp

It is recommended that the detailed instructions and sketches in this manual be referred to the first few times the taping head is loaded/threaded until the operator becomes thoroughly familiar with the tape loading operation.

Note – Remove tape roll before removing taping head from machine to minimize weight.

CAUTION

To reduce the risk associated with muscle strain:

Use proper body mechanics when removing or installing taping heads that are moderately heavy or may be considered awkward to lift

To reduce the risk associated with impact hazards:

Place the taping head on a smooth level surface when maintaining or servicing this equipment

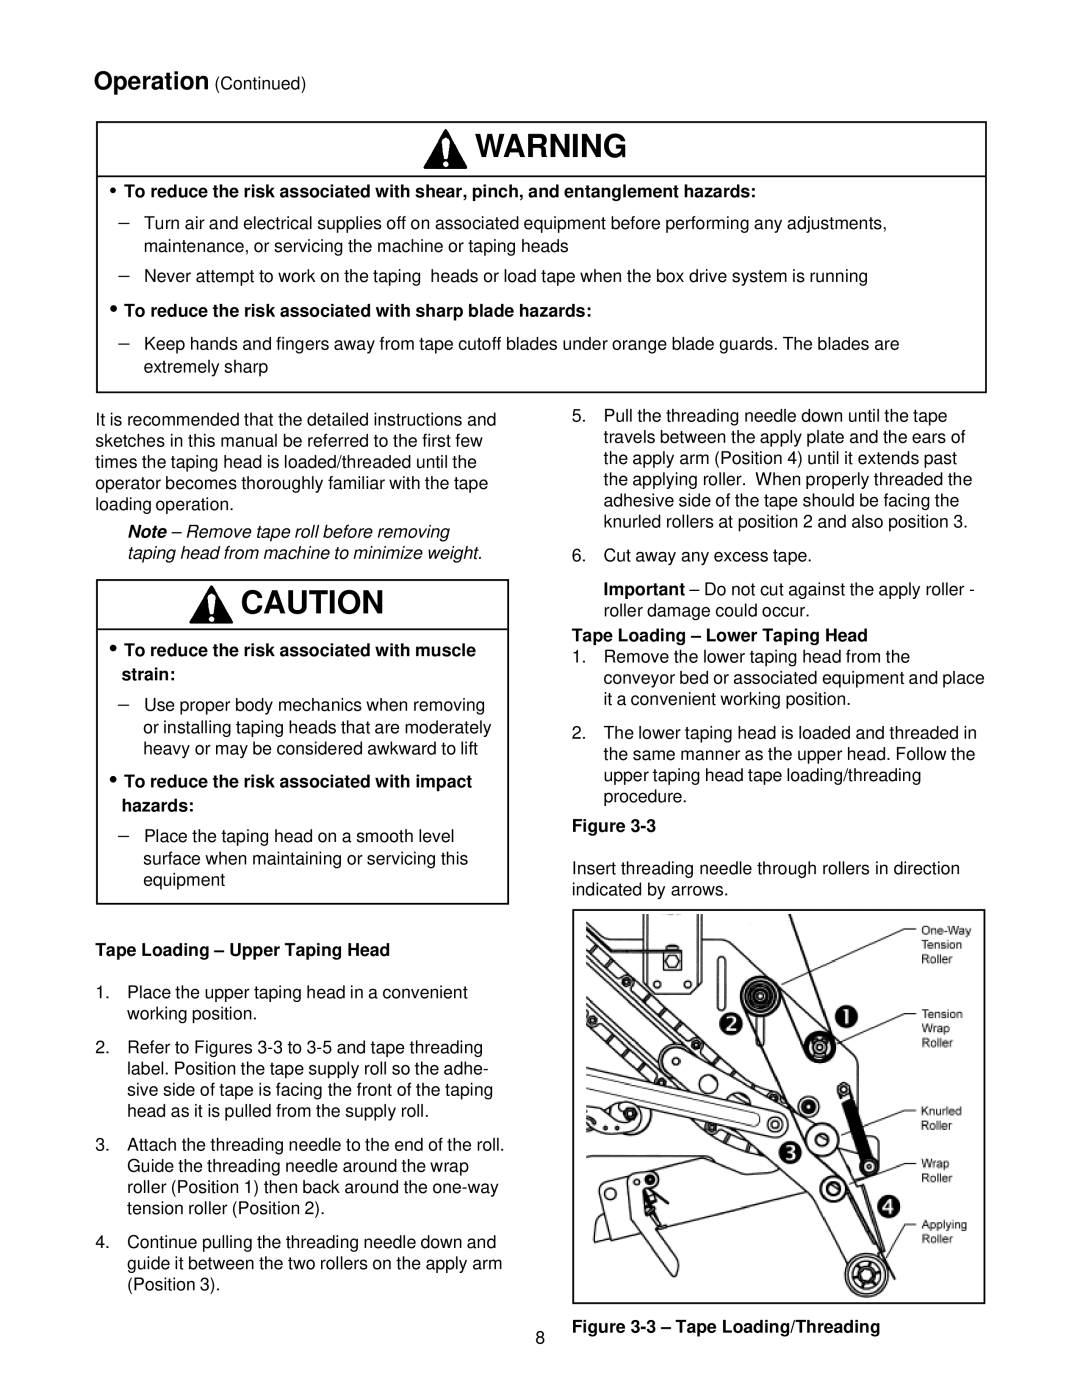
5.Pull the threading needle down until the tape travels between the apply plate and the ears of the apply arm (Position 4) until it extends past the applying roller. When properly threaded the adhesive side of the tape should be facing the knurled rollers at position 2 and also position 3.

6.Cut away any excess tape.

Important – Do not cut against the apply roller - roller damage could occur.

Tape Loading – Lower Taping Head

1.Remove the lower taping head from the conveyor bed or associated equipment and place it a convenient working position.

2.The lower taping head is loaded and threaded in the same manner as the upper head. Follow the upper taping head tape loading/threading procedure.

Figure 3-3

Insert threading needle through rollers in direction indicated by arrows.

Tape Loading – Upper Taping Head

1.Place the upper taping head in a convenient working position.

2.Refer to Figures 3-3 to 3-5 and tape threading label. Position the tape supply roll so the adhe- sive side of tape is facing the front of the taping head as it is pulled from the supply roll.

3.Attach the threading needle to the end of the roll. Guide the threading needle around the wrap roller (Position 1) then back around the one-way tension roller (Position 2).

4.Continue pulling the threading needle down and guide it between the two rollers on the apply arm (Position 3).

8

Figure 3-3 – Tape Loading/Threading


Page 16
Image 16
3M 10500 manual Tape Loading Lower Taping Head, Tape Loading Upper Taping Head

10500 specifications

The 3M 10500 is a robust and versatile product, widely recognized in various industries for its reliability and performance. Primarily, this offering is utilized in applications requiring high-quality adhesive solutions, primarily due to its exceptional bonding capabilities. The 3M 10500 is designed to meet the demands of diverse manufacturing processes, making it an indispensable tool for professionals in fields such as automotive, electronics, and construction.

One of the standout features of the 3M 10500 is its strong adhesion properties. It is engineered to create lasting bonds between a variety of substrates, including metals, plastics, and composites. This versatility ensures that it can be employed in both simple and complex projects, offering flexibility to users. The high initial tack of the adhesive allows for quick assembly, which can significantly enhance productivity and efficiency on the production line.

In terms of technology, the 3M 10500 incorporates advanced formulations that promote excellent performance under testing conditions. The adhesive exhibits outstanding temperature resistance, allowing it to function effectively in environments that subject materials to high heat or variable temperatures. This characteristic is especially critical for applications where thermal stability is paramount.

Moreover, the 3M 10500 is designed to be user-friendly, with easy application processes. It can be dispensed through various systems, making it suitable for automated processes as well as manual applications. This adaptability allows companies to optimize their production workflows, reducing downtime and minimizing waste.

Another essential characteristic of the 3M 10500 is its long-lasting durability. Once cured, the adhesive provides a strong bond that withstands mechanical stress, ensuring that applications maintain their integrity even under challenging conditions. This durability is particularly relevant in industries such as automotive manufacturing, where components are often subjected to dynamic loads and vibrations.

Overall, the 3M 10500 stands out in the marketplace due to its unmatched bond strength, temperature resilience, and user-friendly applications. Its advanced technology and robust characteristics make it a preferred choice for those seeking a reliable adhesive solution that can meet and exceed the demands of modern manufacturing processes.