System Configuration
The A125 Noise Reduction board is configured by two jumper switches, (JMP1 and JMP2), shown in Table 1.
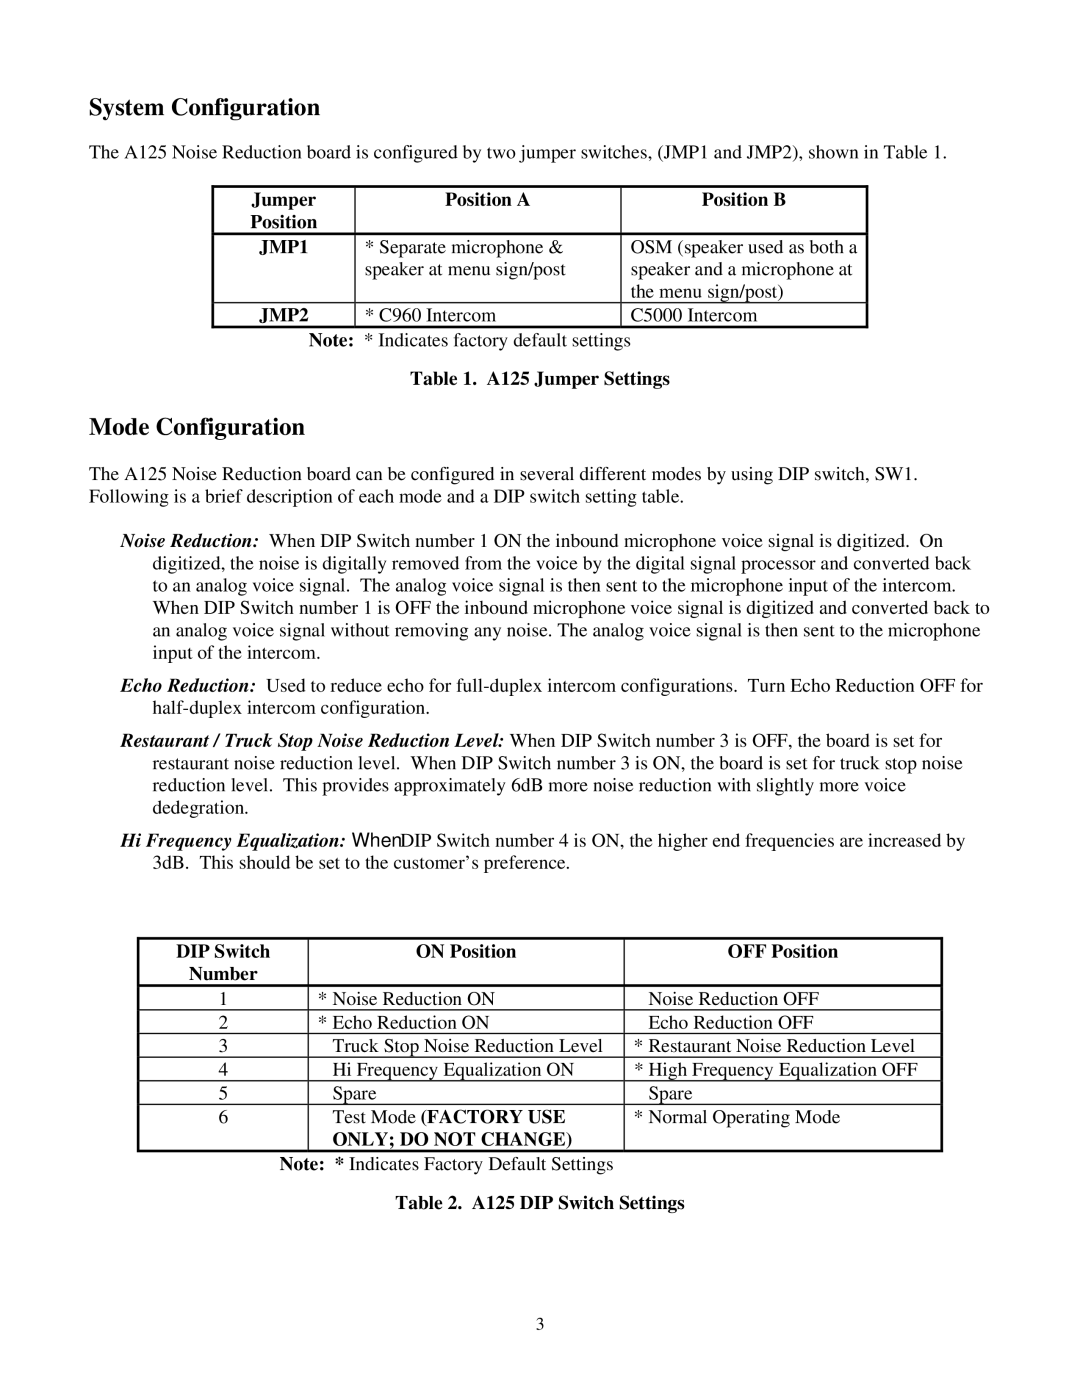
Jumper | Position A | Position B |
Position |
|
|
JMP1 | * Separate microphone & | OSM (speaker used as both a |
| speaker at menu sign/post | speaker and a microphone at |
|
| the menu sign/post) |
JMP2 | * C960 Intercom | C5000 Intercom |
Note: * Indicates factory default settings
Table 1. A125 Jumper Settings
Mode Configuration
The A125 Noise Reduction board can be configured in several different modes by using DIP switch, SW1. Following is a brief description of each mode and a DIP switch setting table.
Noise Reduction: When DIP Switch number 1 ON the inbound microphone voice signal is digitized. On digitized, the noise is digitally removed from the voice by the digital signal processor and converted back to an analog voice signal. The analog voice signal is then sent to the microphone input of the intercom. When DIP Switch number 1 is OFF the inbound microphone voice signal is digitized and converted back to an analog voice signal without removing any noise. The analog voice signal is then sent to the microphone input of the intercom.
Echo Reduction: Used to reduce echo for
Restaurant / Truck Stop Noise Reduction Level: When DIP Switch number 3 is OFF, the board is set for restaurant noise reduction level. When DIP Switch number 3 is ON, the board is set for truck stop noise reduction level. This provides approximately 6dB more noise reduction with slightly more voice dedegration.
Hi Frequency Equalization: When DIP Switch number 4 is ON, the higher end frequencies are increased by 3dB. This should be set to the customer’s preference.
DIP Switch |
| ON Position | OFF Position |
Number |
|
|
|
1 |
| * Noise Reduction ON | Noise Reduction OFF |
2 |
| * Echo Reduction ON | Echo Reduction OFF |
3 |
| Truck Stop Noise Reduction Level | * Restaurant Noise Reduction Level |
4 |
| Hi Frequency Equalization ON | * High Frequency Equalization OFF |
5 |
| Spare | Spare |
6 |
| Test Mode (FACTORY USE | * Normal Operating Mode |
|
| ONLY; DO NOT CHANGE) |
|
| Note: * Indicates Factory Default Settings |
| |
Table 2. A125 DIP Switch Settings
3