SECTION C

Mounting

8.THREAD THE CONNECTOR ONTO THE FIBER

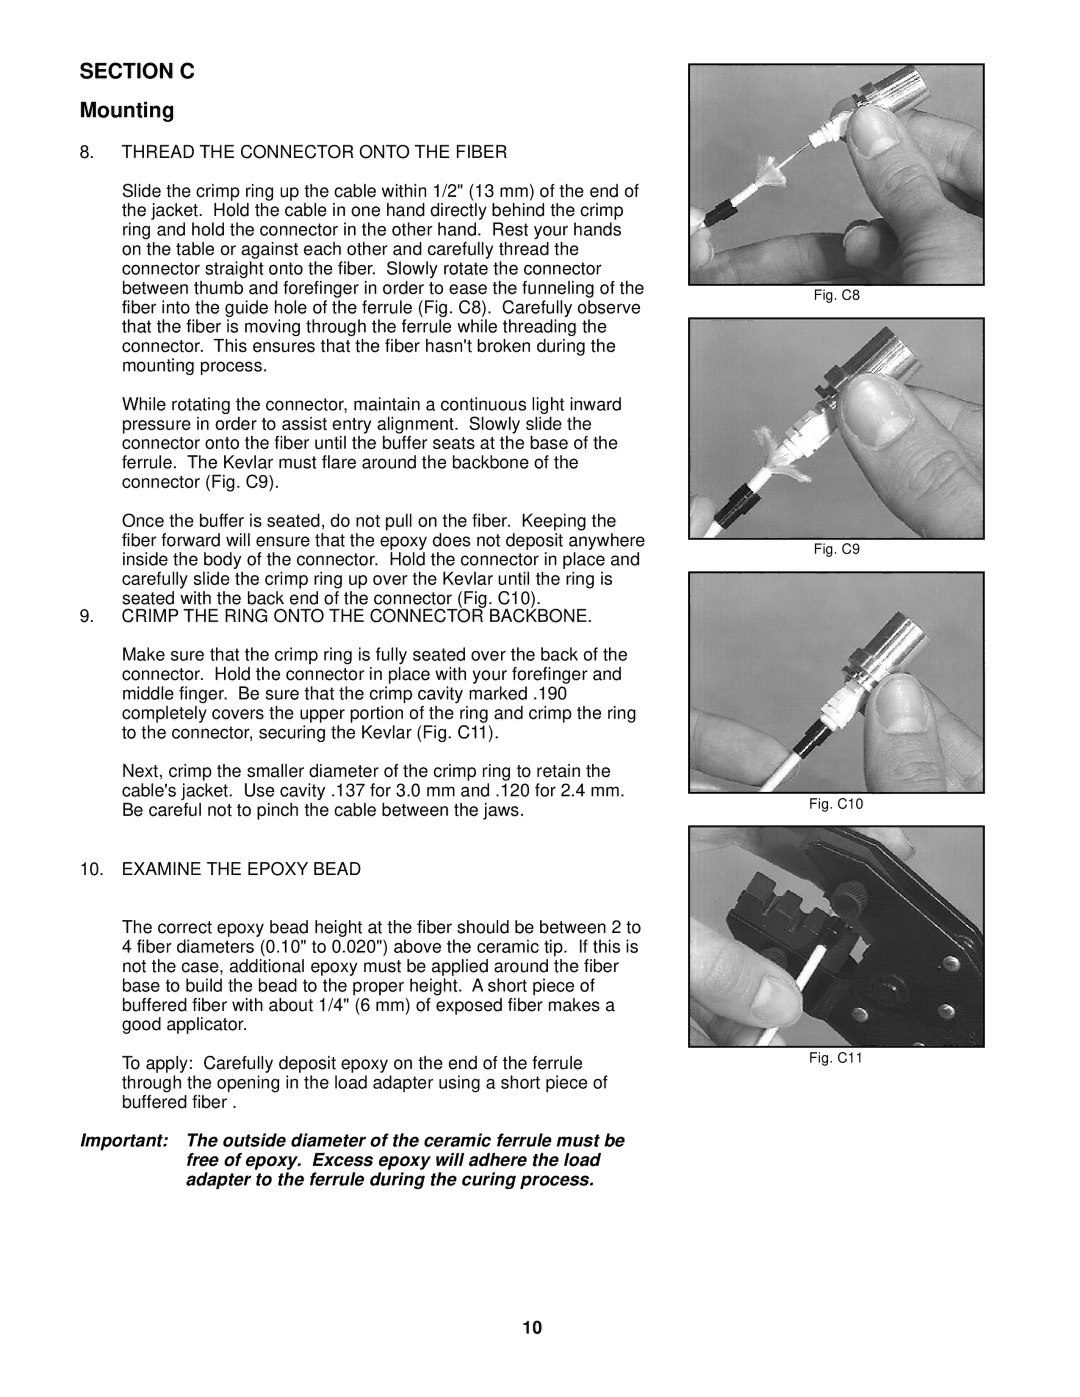
Slide the crimp ring up the cable within 1/2" (13 mm) of the end of the jacket. Hold the cable in one hand directly behind the crimp ring and hold the connector in the other hand. Rest your hands on the table or against each other and carefully thread the connector straight onto the fiber. Slowly rotate the connector between thumb and forefinger in order to ease the funneling of the fiber into the guide hole of the ferrule (Fig. C8). Carefully observe that the fiber is moving through the ferrule while threading the connector. This ensures that the fiber hasn't broken during the mounting process.

While rotating the connector, maintain a continuous light inward pressure in order to assist entry alignment. Slowly slide the connector onto the fiber until the buffer seats at the base of the ferrule. The Kevlar must flare around the backbone of the connector (Fig. C9).

Once the buffer is seated, do not pull on the fiber. Keeping the fiber forward will ensure that the epoxy does not deposit anywhere inside the body of the connector. Hold the connector in place and carefully slide the crimp ring up over the Kevlar until the ring is seated with the back end of the connector (Fig. C10).

9.CRIMP THE RING ONTO THE CONNECTOR BACKBONE.

Make sure that the crimp ring is fully seated over the back of the connector. Hold the connector in place with your forefinger and middle finger. Be sure that the crimp cavity marked .190 completely covers the upper portion of the ring and crimp the ring to the connector, securing the Kevlar (Fig. C11).

Next, crimp the smaller diameter of the crimp ring to retain the cable's jacket. Use cavity .137 for 3.0 mm and .120 for 2.4 mm. Be careful not to pinch the cable between the jaws.

10.EXAMINE THE EPOXY BEAD

The correct epoxy bead height at the fiber should be between 2 to 4 fiber diameters (0.10" to 0.020") above the ceramic tip. If this is not the case, additional epoxy must be applied around the fiber base to build the bead to the proper height. A short piece of buffered fiber with about 1/4" (6 mm) of exposed fiber makes a good applicator.

To apply: Carefully deposit epoxy on the end of the ferrule through the opening in the load adapter using a short piece of buffered fiber .

Important: The outside diameter of the ceramic ferrule must be free of epoxy. Excess epoxy will adhere the load adapter to the ferrule during the curing process.

Fig. C8

Fig. C9

Fig. C10

Fig. C11

10

Page 10
Image 10
3M FC, PC3 manual Thread the Connector Onto the Fiber, Crimp the Ring Onto the Connector Backbone, Examine the Epoxy Bead

FC, PC3 specifications

3M PC3,FC is an innovative product designed for various applications in industrial and commercial sectors, providing advanced functionalities that make it stand out in the market. This product is part of 3M's commitment to delivering high-quality solutions that enhance efficiency and productivity.

One of the main features of 3M PC3,FC is its exceptional filtration capability. The product employs a sophisticated filtration technology that captures a wide range of particulate matter, including dust, allergens, and other airborne contaminants. This makes it ideal for use in environments where air quality is critical, such as manufacturing facilities, laboratories, and healthcare settings.

The 3M PC3,FC also integrates advanced gas and vapor removal technologies. Its design incorporates specialized filters that efficiently absorb harmful gases, providing users with a safer working environment. This feature is particularly beneficial in industries that handle volatile organic compounds (VOCs) and other hazardous substances, ensuring compliance with safety regulations.

In terms of user comfort, the 3M PC3,FC boasts an ergonomic design that facilitates ease of use. Lightweight materials are utilized in its construction, allowing for prolonged wear without causing discomfort. Additionally, the adjustable fit ensures that the product can be customized to individual preferences, making it suitable for various users.

The durability of the 3M PC3,FC is another key characteristic. It is built to withstand the rigors of industrial environments, featuring materials that resist wear and tear. This longevity translates to cost savings for businesses, reducing the frequency of replacements and downtime.

Furthermore, 3M incorporates cutting-edge technology into the PC3,FC, with smart sensors that monitor air quality in real-time. These sensors provide immediate feedback, alerting users when air quality dips below safe levels, thereby enhancing workplace safety and health.

Lastly, 3M is committed to sustainability, and the PC3,FC reflects this ethos through its environmentally friendly materials and recyclability. By choosing this product, businesses can contribute to reducing their environmental impact while still achieving superior performance.

In summary, 3M PC3,FC is a versatile, high-performance solution that excels in filtration, user comfort, durability, and sustainability, making it a top choice for industries that prioritize air quality and safety.