Professional Monitor Loudspeakers
LS-77Reference Class
Page
WARNINGS
Running-In
Precautions
Contents
Appendix A - Adjustment of tonal balance
LS-77Professional
Section 1 - Unpacking
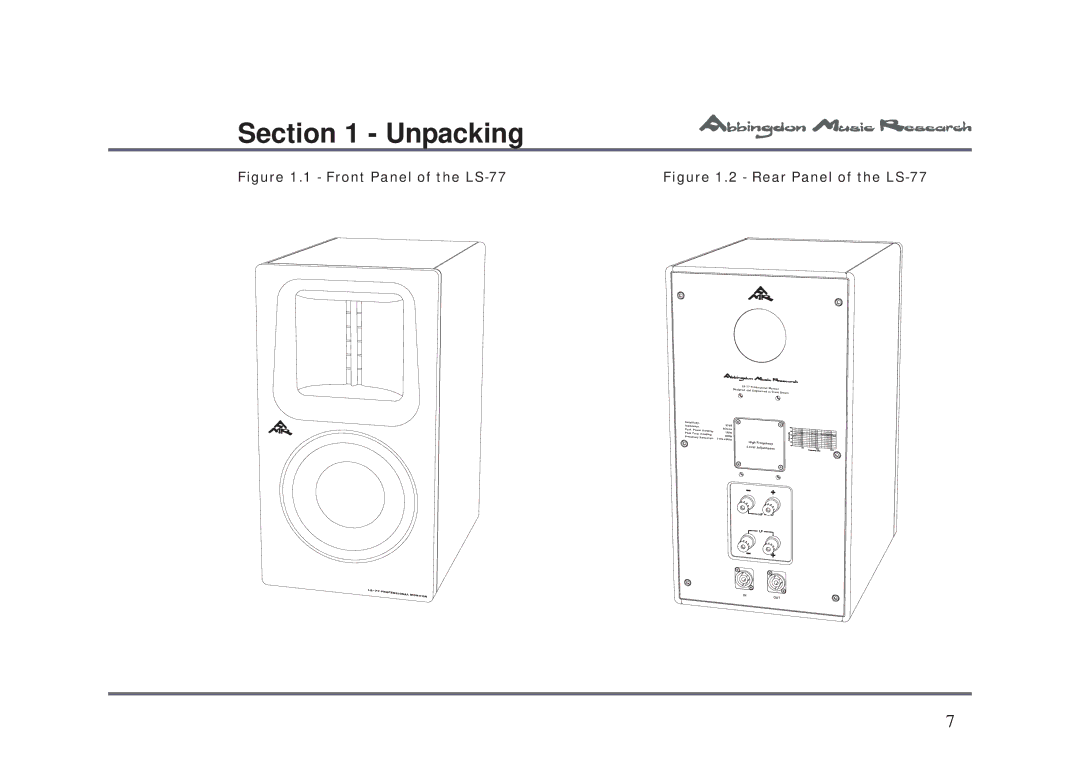
Figure 1.1 - Front Panel of the LS-77
Figure 1.2 - Rear Panel of the LS-77
Upon unpacking, please find in each package
Figure 2.1 - LS-77Front Fascia
Section 2 - Component Overview
contact with the chassis
ensure no speaker con- nector is in
Figure 2.2 - LS-77Rear Panel
3.1 Connecting the loudspeakers
Section 3 - Setup
Speaker L
LS-77
LS-77
Speaker R
Warning ensure
3.1.2 Using Binding Posts
Speaker Cable
Level Adjustment HF LF INOUT
Speaker Cable
3.3 Multi-channelset up
3.2. Connecting the amplifier
3.4 Choice of loudspeaker cable
4.1 Symmetry and room modes
Section 4 -Positioning
4.2 Distance between the loudspeakers
4.4 Distance to back and side walls
4.3 Distance to the loudspeakers
4.5 Levelling/Speaker Support
4.7 Room and furniture influence
4.6 Loudspeaker Toe-in
5.1 Care and maintenance
Section 5-Care& Maintainance
5.2 Running-inthe loudspeakers
5.3 Power rating
Section 6-LS- 77 Technical Features
Section 7 - Troubleshooting
Section 8.1 - Specifications
Appendix A - Adjustment of tonal balance
1.5dB
Placement Suggestions
HF Level
15 R
Placement
HF Level R1
+1.5dB
AppendixB - Abbingdon Acoustic Setup Regime
With the person speaking and continuing to walk toward the listening position while talking at the same level, listen for the next change in the voices tonal quality. This will be the first interaction of the opposite wall and should sound like a loss of focus that seems to resonate because of the side and rear wall reflections. Again, mark the position on the floor when the artifact first appeared with tape. You now have the front and back borders of the ZOLI
Figure B.1 - AASR illustrated
~100″/254cm
~115″/290cm
~115″/290cm
Position each speaker in the center of each ZOLI, pointing directly at the listening position. This may seem like an extreme amount of toe-in,but it is in most cases the best initial point. You should just be able to see either the inside walls or outside walls of the speakers
Page
Appendix C - Biamplifying the LS-77
Speaker L
LS-77
LS-77
Speaker R
Speaker Cable
Speaker Cable
Speaker Cable
Speaker Cable
D.1 - The AM-77Control Center Edition CCE
AppendixD - The AMR Active System
AM-77CCE
D.2 - Setting up the AMR Active System
Line Level Connection
Scenario
AM-77CCE
Speaker Connection
AM-77CCE
ÆAM-77CCE s Left Channel Speakon socket
Page
LS-77 Speaker R
D.4 - AMR Active System Configuration Diagram
LS-77 Speaker L
AppendixE - LS-77in OptiArray configurations
While one can and should add acoustical treatment to large spaces, these are only effective to a certain degree and not at really low frequencies. To effectively damp the reflection of a 350Hz tone the layer of damping material applied to the wall would have to be at least 25cm thick! Instead of damping the reverbrations, using speakers that exhibit a significant increase in directivity at all frequencies over traditional systems attains an equal or greater improvement
AMR recommends the following OptiArray Setups
From AMP
Epsilon/Zeta
Iota/Zappa
Omicron/Sigma
In from Amplifier
Epsilon/Zeta System wiring
Speaker Cable
G.3 Reverberation time
Appendix G - Acoustics Background Information
G.1 Acoustics
G.2 Good acoustics
Why do we have reverberation? The speed of the propagating sound wave is very slow - at least compared to light approx. 1130ft. or 340m per sec
G.4.2.1 Membrane absorbers
G.4 Diffusers
G.4.1 Absorption or Diffusion ?
G.4.2 Absorbers
G.4.2.2 Porous absorbers
G.5 Standing Waves
G 6 Room modes
0,0,162Hz 2.8m 6.7m Desirable Listening Positions
1,0,025Hz 2,0,050Hz 3,0,075Hz 4,0,0100Hz
0,0,162Hz 6.7m Undesirable Listening Positions
1,0,025Hz 2,0,050Hz 3,0,075Hz 4,0,0100Hz
Tel +44 0 870 420 5505 Fax +44