Manuals
/
Acer
/
Computer Equipment
/
Projector
Acer
H5350 Ceiling Mount Installation, English, Ceiling Mount Base Screw Type A, Tightening Screw
Models:
H5350
1
41
53
53
Download
53 pages
50.89 Kb
38
39
40
41
42
43
44
45
Troubleshooting
Specifications
Install
LED & Alarm Definition Listing
Password
Acer eTimer Management
Warning indicators
Connecting the Projector
Problems with the Projector
Caution for Accessibility
Page 41
Image 41
Page 40
Page 42
Page 41
Image 41
Page 40
Page 42
Contents
H5350 Series Users Guide
Acer Projector
Copyright 2007. Acer Incorporated All Rights Reserved
Acer Projector H5350 Series Users Guide Original Issue 12/2007
Acer Projector H5350 Series Model number Serial number
Date of purchase Place of purchase
Turning the product off before cleaning
Information for your safety and comfort
Caution for plug as disconnecting device
Caution for Accessibility
Using electrical power
Product servicing
Additional safety information
Do not face the projector lens to the sun. It can lead to fire
Medical devices
Operating environment for using wireless function Optional
Caution for Listening
Vehicles
Potentially explosive environments
Mercury advisory
Disposal instructions
Usage notes
Precautions
First thing first
Introduction
Information for your safety and comfort First thing first
Getting Started
User Controls
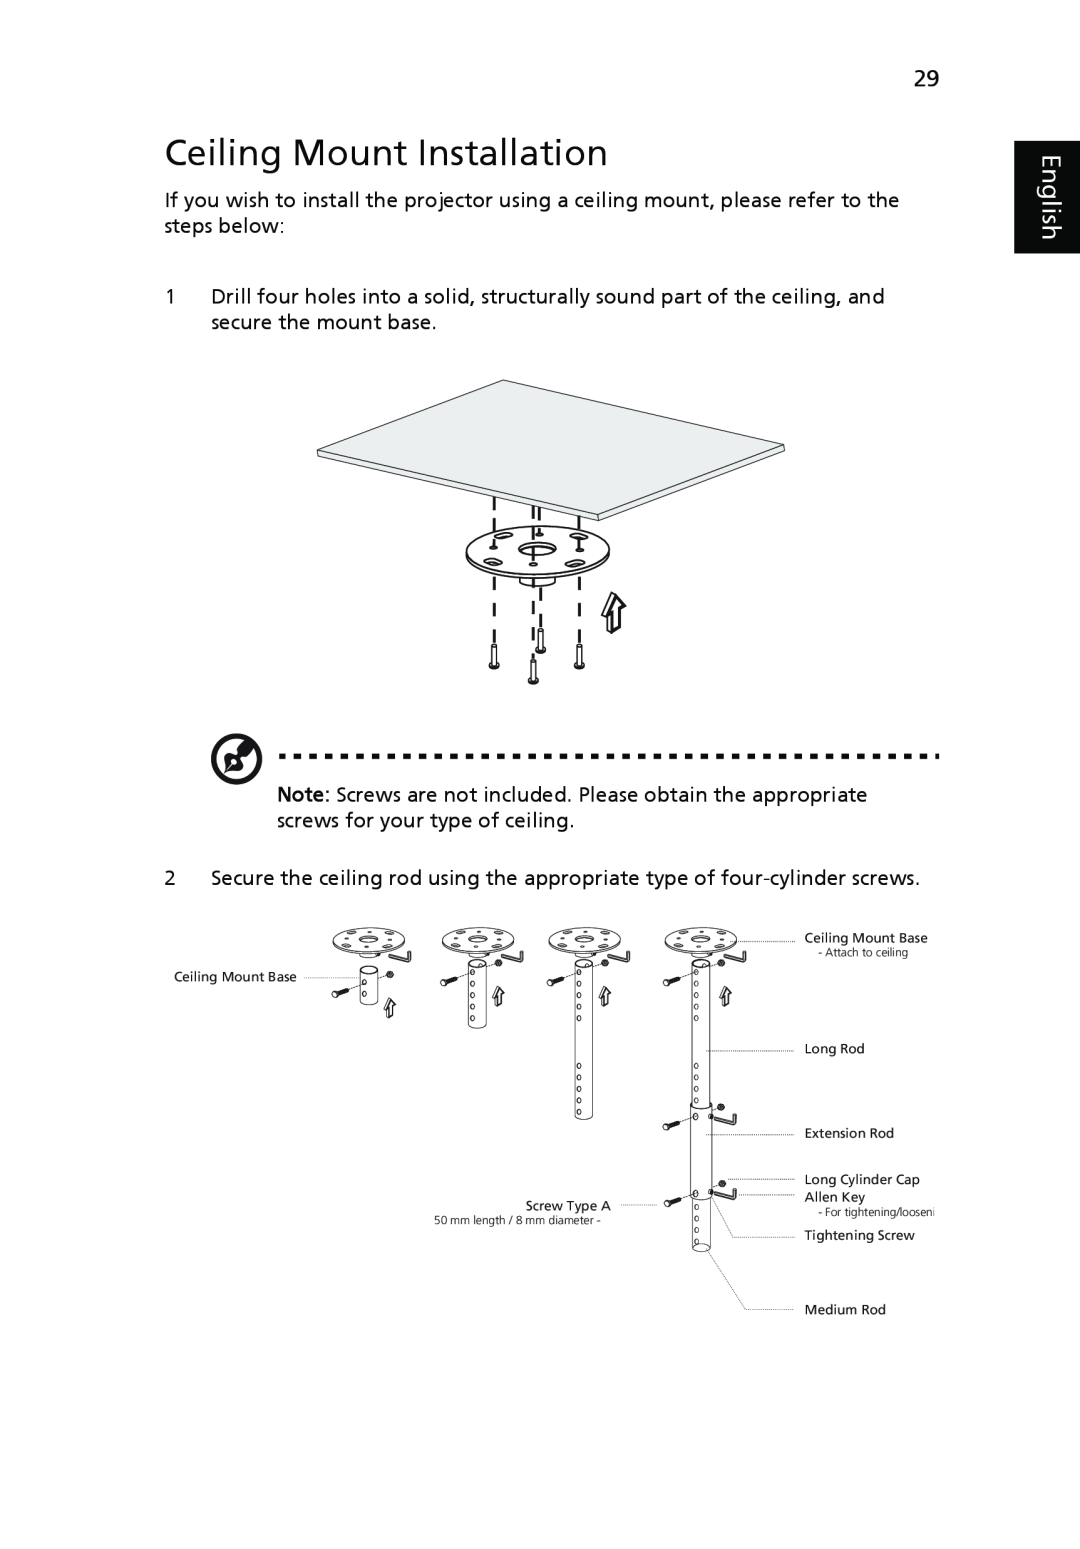
Ceiling Mount Installation
Regulations and safety notices
Specifications
Replacing the Lamp
English
Product Features
Introduction
CR2025 3V
Package Overview
Acer Projector
Quick Start Guide
Projector Outlook
Projector Overview
Front / upper side
Rear side
# Icon
Remote Control and Control Panel Layout
Function
Refer to the Turning the Projector On/Off section
Icon
Remote Control Placement
Getting Started
Connecting the Projector
R B G
D-Sub
Turning on the Projector
Turning the Projector On/Off
Please press power button again to complete the shutdown process
Turning off the Projector
Warning Do not turn on the projector immediately after powering off
Warning indicators
To raise/lower the image
Adjusting the Projected Image
Adjusting the Height of Projected Image
screen
How to optimize image size and distance
English
How to get a preferred image size by adjusting distance and zoom
English
Empowering Key
Acer Empowering Technology
Acer eTimer Management
User Controls
Onscreen Display OSD Menus
Using the OSD menus
Color setting
Tint
Image setting
English
Security
Management setting
TimeoutMin
Disable Power button
User password
Administrator Password
Timer setting
Audio setting
Language setting
Appendices
Troubleshooting
Image Problems and Solutions
English
Problems with the Projector
Fan Fail - the system fan is not working
OSD Messages
Message
LED Messages
LED & Alarm Definition Listing
Replacing the Lamp
Ceiling Mount Base Screw Type A
Ceiling Mount Installation
Ceiling Mount Base
Long Rod Extension Rod Long Cylinder Cap Allen Key
Allen Key
Allen Key Allen Key Tightening Screw
5 Adjust the angle and positioning as necessary Tightening Screw
SCREW SPEC. M3 x 20 mm 82,30 mm
110,00 mm
NTSC 3.58/4.43, PAL B/D/G/H/I/M/N, SECAM B/D/G
Specifications
Native 720P 1280 x 720, Maximum UXGA 1600 x
Standard package contents
Design and specifications are subject to change without notice
AC power cord
VGA cable Composite video cable Remote control
A. VGA Analog
Compatibility modes
2 VGA Analog - Extended Wide timing
B. HDMI Digital
1 HDMI - PC Signal same as DVI
2 HDMI - Extended Wide timing same as DVI
3 HDMI - Video Signal
For TWN/USA SKU
For EMEA SKU
FCC notice
Regulations and safety notices
Notice Shielded cables
Notice Peripheral devices
Remarque à lintention des utilisateurs canadiens
Canada - Low-power license-exempt radio communication devices RSS-210
Declaration of Conformity for EU countries
Radio device regulatory notice
List of applicable countries
European Union EU
Federal Communications Commission Declaration of Conformity
Declaration of Conformity
Top
Page
Image
Contents