Manuals
/
Acnodes
/
Computer Equipment
/
Computer Hardware
Acnodes
FES7611
user manual
Save & Exit Setup, Fanless Embedded Controller comes with
Models:
FES7611
1
62
82
82
Download
82 pages
3.55 Kb
59
60
61
62
63
64
65
66
Specifications
A.9 Exploded Diagram For PC104
Password
B.4 Timer & DMA Channels Map
z LED INDICATOR
Dimension
Hardware Configuration
Entering Setup
COM Port Connector
Award BIOS Setup
Page 62
Image 62
Page 61
Page 63
Page 62
Image 62
Page 61
Page 63
Contents
Fanless Embedded Controller comes with
FES7611
FES-7611 Fanless Embedded Controller Intel Celeron M ULV Processor
Intel Celeron M ULV 1.0GHz Processor
CE NOTICE
COPYRIGHT NOTICE
ACKNOWLEDGEMENTS
FCC NOTICE
Chapter 1 Introduction
Contents
Chapter 2 Hardware Configuration
Chapter 4 Award BIOS Setup
Chapter 3 Software Utilities
Appendix A Programming The Watchdog Timer
Appendix B Technical Summary
Introduction
CHAPTER
Appendix A System Assembly
Chapter 2 Hardware Configuration
Chapter 4 Award BIOS Setup
1-1. ABOUT THIS MANUAL
1-2 Case Illustration
z KEYBOARD/MOUSE CONNECTOR
1-3. SYSTEM SPECIFICATION
z BIOS
z CPU
z IDE INTERFACE
z LED INDICATOR
z DISPLAY
z LAN INTERFACE
z SYSTEM DIMENSION
1-4. SAFETY PRECAUTIONS
z INPUT POWER REQUIREMENT
z SYSTEM NET WEIGHT
Hardware Configuration
2-1. JUMPER & CONNECTOR QUICK REFERENCE TABLE
2-2 Component Locations
2-3. HOW TO SET THE JUMPERS
JUMPERS AND CAPS
Copyright 2009 Acnodes, Inc
2-4 COM Port Connector
2-5. RS-232/422/485 COM2 Selection
2.8 Power LED Connector
2.6 Keyboard/ Mouse Connector
2.7 Hard Disk Drive LED Connector
2.9 VGA Connector
2.10 Hard Disk Drive Connector
2.11 Universal Serial Bus Connector
2.12 LAN Connector
2.13 Clear CMOS Data Selection
2.14. Power Requirement Selection
2.15 AT Power Connector
2.16 Reset/ NMI Watchdog Selection
2.17 Sound Connector
2.18 LAN LED
Software Utilities
CHPATER
3.1 Introduction
3-2-1. Installation of VGA Driver
3.2 VGA Driver Utility
3-3-2. To update VGA BIOS for LCD Flat Panel Display
3-3. FLASH BIOS UPDATE
3-3-1. System BIOS Update
Select Y, and the BIOS will be renewed. When you are refreshing the BIOS, do not turn off or reset the system, or you will damage the BIOS. After you have completed all the programming, the screen displays the table below
3-4. LAN DRIVER UTILITY
3-4-1. Introduction
3-5-1. Introduction
3-5-2. Installation Procedure for Windows 9x/NT/2000/XP
3-5. SOUND DRIVER UTILITY
3-6-1. Introduction
3-6. INTEL CHIPSET SOFTWARE INSTALLATION UTILITY
3-6-2. Installation of Utility for Windows 98SE/ME/2000/XP
3.7 USB2.0 Software Installation Utility
3-7-1. Installation of Utility for Windows 98SE/ 2000/XP
2 Configurate the configuration registers
3.8 Watchdog Timer Configuration
Configuration Sequence
1 Enter the extended function mode
Example Program
Award BIOS Setup
4-1. INTRODUCTION
4-2. ENTERING SETUP
Date
4-3. THE STANDARD CMOS FEATURES
CMOS Setup screen
Time
IDE Primary Master / Slave IDE Secondary Master / Slave
BASE MEMORY
VIDEO
HALT ON
EXTENDED MEMORY
HARD DISK ATTRIBUTES
Capacity
Intel Celeron M ULV 1.0GHz Processor
4-4. THE ADVANCED BIOS FEATURES
Copyright 2009 Acnodes, Inc
4-5. ADVANCED CHIPSET FEATURES
Advanced Chipset Features Chipset Features Setup Screen
DRAM TIMING BY SELECTABLE
SYSTEM BIOS CACHEABLE
VIDEO BIOS CACHEABLE
CAS LATENCY TIME
AGP APERTURE SIZE
BOOT DISPLAY depend on chipset
DELAYED TRANSACTION
ON-CHIP VGA
4.6 INTEGRATED PERIPHERALS
Copyright 2009 Acnodes, Inc
All rights reserved. Product description and product specifications
FES7611
661 Brea Canyon Rd., Suite
Copyright 2009 Acnodes, Inc
1. Onboard FDC Controller
7. Use IR Pins
SUPER IO DEVICE
2. Onboard Serial Port 1/2
POWER MANAGEMENT
4.7 POWER MANAGEMENT SETUP
Power Management Setup Screen
MODEM USE IRQ
RESET CONFIGURATION DATA
4.8 PNP/PCI Configuration
PNP/PCI Configuration Setup Screen
1. IRQ-n Assigned to
RESOURCE CONTROLLED BY
IRQ RESOURCES
CURRENT WARNING TEMPERATURE
PC Health Status Setup Screen
4.9 PC HEALTH STATUS
CURRENT CPU TEMPERATURE
AUTO DETECT PCI CLK
Frequency Control Setup Screen
4.10 Frequency Control
SPREAD SPECTRUM
4-11. LOAD FAIL-SAFE DEFAULTS
4-12. LOAD OPTIMIZED DEFAULTS
TO DISABLE THE PASSWORD
4-13. Set Supervisor Password/ Set User Password
TO SET A PASSWORD
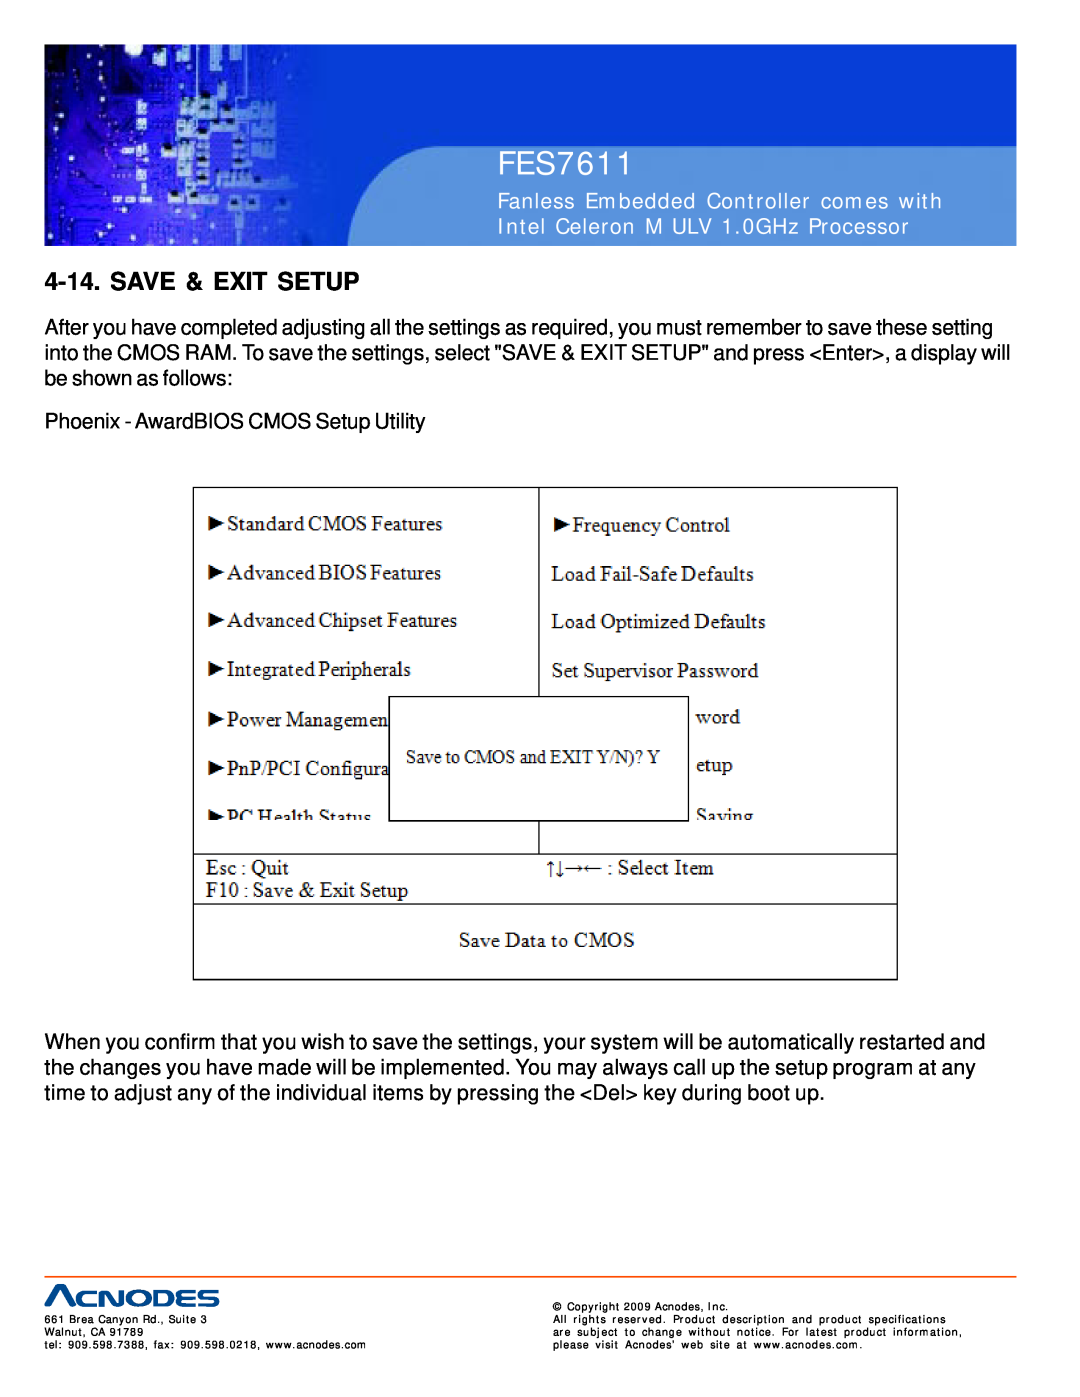
4-14. SAVE & EXIT SETUP
4-15. EXIT WITHOUT SAVING
System Assembly
APPENDIX
A.1 Exploded Disgram For Rack Mount Holder
A.2 Exploded Diagram For System Heat Sink
A.3 Exploded Diagram For 3.5” Hard Disk Drive
A.4 Exploded Diagram For 2.5” Hard Disk Drive Holder
A.5 Exploded Diagram For Hard Disk Drive Holder
A.6 Exploded Diagram For DC to DC Power
A.7 Exploded Diagram For LED Indicator
A.8 Exploded Diagram For System I/O Ports
A.9 Exploded Diagram For PC104
A.10 Exploded Diagram For Motherboard
A.11 Exploded Diagram For Installing DDR RAM
A.12 Exploded Diagram For Removing Hard Disk Drive
I/O Information
B.1 Block Diagram
B.2 Interrupt Map
B.3 RTC & CMOS RAM Map
B.4 Timer & DMA Channels Map
B.5 I/O Memory Map
Top
Page
Image
Contents