i | EN | Starter Pack for PlayStation®3 system Quick Start Guide |
FR | Pack de démarrage pour système PlayStation®3 Guide de Démarrage Rapide | |
ES | Pack de inicio para el sistema PlayStation®3 Guía de Inicio Rápido | |
IT | Pacchetto base per il sistema PlayStation®3 Guida Introduttiva | |
| DE |
|
1
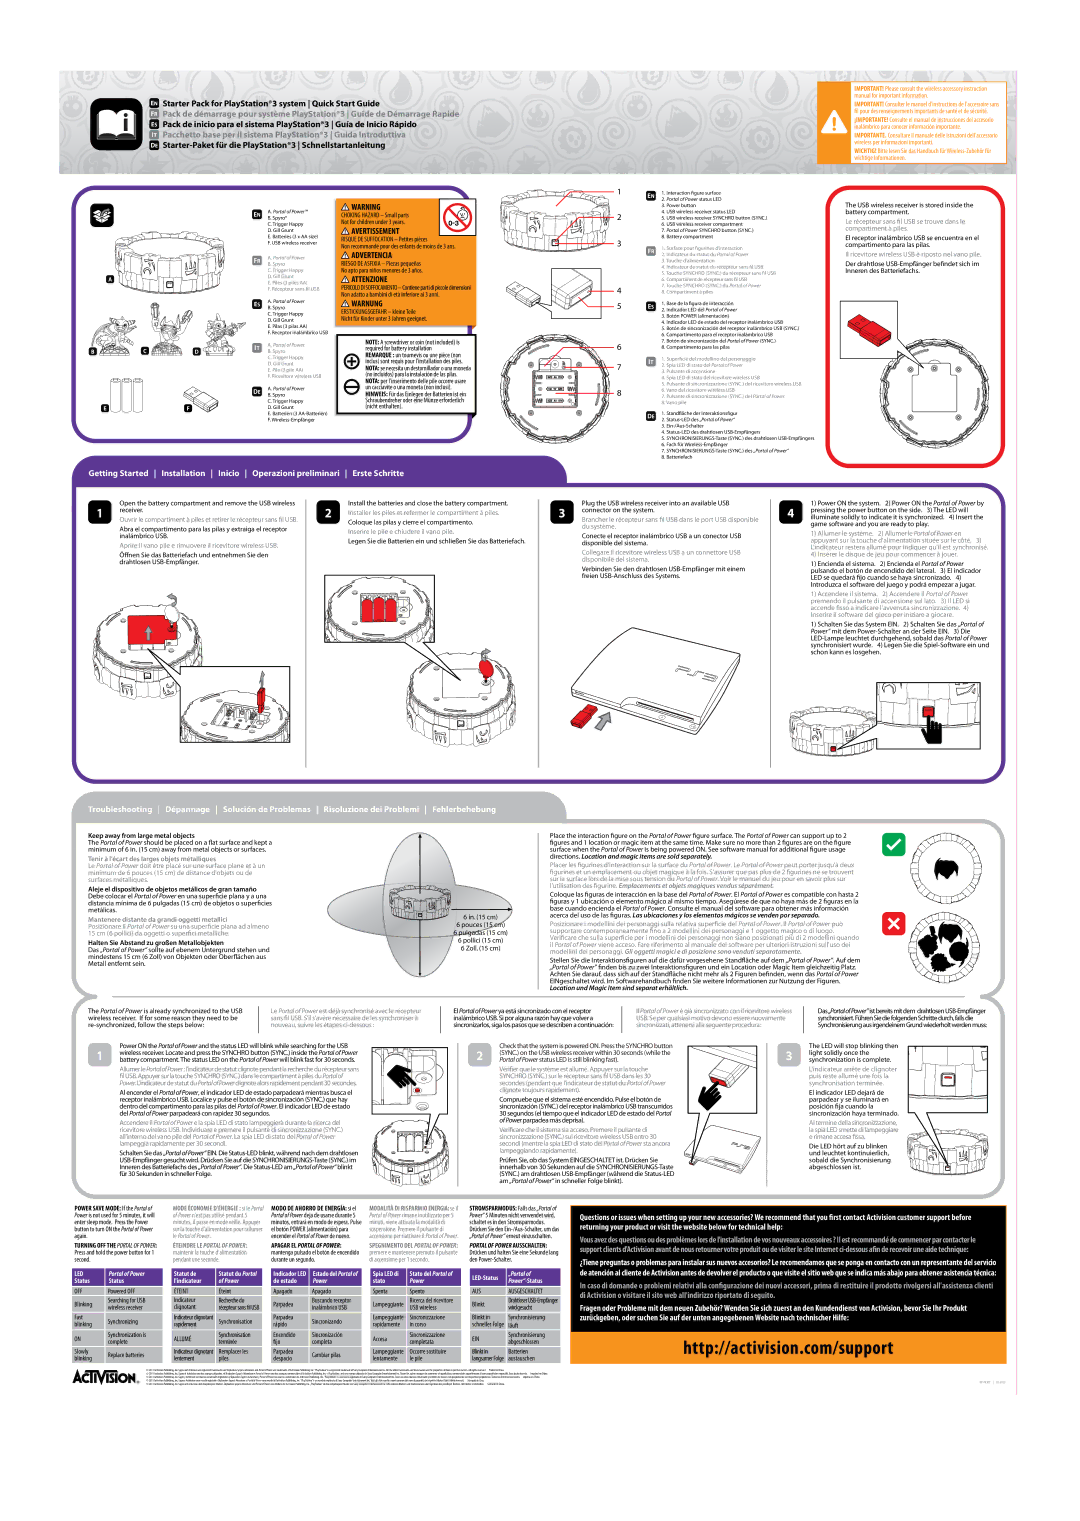
EN | 1. Interaction figure surface | |
2. Portal of Power status LED | ||
|
IMPORTANT! Please consult the wireless accessory instruction manual for important information.
IMPORTANT! Consulter le manuel d'instructions de l'accessoire sans fil pour des renseignements importants de santé et de sécurité.
¡IMPORTANTE! Consulte el manual de instrucciones del accesorio inalámbrico para conocer información importante.
IMPORTANTE. Consultare il manuale delle istruzioni dell'accessorio wireless per informazioni importanti. ![]()
WICHTIG! Bitte lesen Sie das Handbuch für ![]()
EN
FR
A
ES
B  C
C  D
D  IT
IT
A.Portal of Power™
B.Spyro®
C.Trigger Happy
D.Gill Grunt
E.Batteries (3 x AA size)
F.USB wireless receiver
A.Portal of Power
B.Spyro
C.Trigger Happy
D.Gill Grunt
E.Piles (3 piles AA)
F.Récepteur sans fil USB
A.Portal of Power
B.Spyro
C.Trigger Happy
D.Gill Grunt
E.Pilas (3 pilas AA)
F.Receptor inalámbrico USB
A.Portal of Power
B.Spyro
C.Trigger Happy
D.Gill Grunt
E.Pile (3 pile AA)
F.Ricevitore wireless USB
X WARNING
CHOKING HAZARD – Small parts
Not for children under 3 years.
AVERTISSEMENT
RISQUE DE SUFFOCATION – Petites pièces
Non recommandé pour des enfants de moins de 3 ans.
XX ADVERTENCIA
RIESGO DE ASFIXIA – Piezas pequeñas
No apto para niños menores de 3 años.
ATTENZIONE
PERICOLO DI SOFFOCAMENTO – Contiene parti di piccole dimensioni Non adatto a bambini di età inferiore ai 3 anni.
XWARNUNG
ERSTICKUNGSGEFAHR – kleine Teile
Nicht für Kinder unter 3 Jahren geeignet.
XX | NOTE: A screwdriver or coin (not included) is | |
required for battery installation | ||
|
REMARQUE : un tournevis ou une pièce (non inclus) sont requis pour l'installation des piles.
NOTA: se necesita un destornillador o una moneda (no incluidos) para la instalación de las pilas.
NOTA: per l'inserimento delle pile occorre usare
2
3
4
![]()
![]()
![]()
![]() 5
5
6
7 |
3.Power button
4.USB wireless receiver status LED
5.USB wireless receiver SYNCHRO button (SYNC.)
6.USB wireless receiver compartment
7.Portal of Power SYNCHRO button (SYNC.)
8.Battery compartment
FR | 1. Surface pour figurines d'interaction | |
2. Indicateur du statut du Portal of Power | ||
|
3.Touche d'alimentation
4.Indicateur de statut du récepteur sans fil USB
5.Touche SYNCHRO (SYNC.) du récepteur sans fil USB
6. Compartiment de récepteur sans fil USB
7.Touche SYNCHRO (SYNC.) du Portal of Power
8.Compartiment à piles
ES | 1. Base de la figura de interacción | |
2. Indicador LED del Portal of Power | ||
|
3.Botón POWER (alimentación)
4.Indicador LED de estado del receptor inalámbrico USB
5.Botón de sincronización del receptor inalámbrico USB (SYNC.)
6.Compartimento para el receptor inalámbrico USB
7.Botón de sincronización del Portal of Power (SYNC.)
8.Compartimento para las pilas
IT | 1. Superficie del modellino del personaggio | |
2. Spia LED di stato del Portal of Power | ||
|
3. Pulsante di accensione |
4. Spia LED di stato del ricevitore wireless USB |
5. Pulsante di sincronizzazione (SYNC.) del ricevitore wireless USB |
The USB wireless receiver is stored inside the battery compartment.
Le récepteur sans fil USB se trouve dans le compartiment à piles.
El receptor inalámbrico USB se encuentra en el compartimento para las pilas.
Il ricevitore wireless USB è riposto nel vano pile.
Der drahtlose
|
| DE | A. Portal of Power |
|
| B. Spyro | |
|
|
| |
|
|
| C. Trigger Happy |
E | F |
| D. Gill Grunt |
|
|
| E. Batterien (3 |
|
|
| F. |
Xun cacciavite o una moneta (non inclusi). HINWEIS: Für das Einlegen der Batterien ist ein Schraubendreher oder eine Münze erforderlich (nicht enthalten).
8 |
6. Vano del ricevitore wireless USB |
7. Pulsante di sincronizzazione (SYNC.) del Portal of Power |
8. Vano pile |
DE | 1. Standfläche der Interaktionsfigur | |
2. | ||
|
3.
4.
5.
6.Fach für
7.
8.Batteriefach
Getting Started Installation Inicio Operazioni preliminari | Erste Schritte | ||||
1 | Open the battery compartment and remove the USB wireless |
| 2 | Install the batteries and close the battery compartment. | |
| |||||
receiver. |
|
| Installer les piles et refermer le compartiment à piles. | ||
Ouvrir le compartiment à piles et retirer le récepteur sans fil | USB. |
| |||
|
|
| Coloque las pilas y cierre el compartimento. | ||
| Abra el compartimento para las pilas y extraiga el receptor |
|
|
| |
|
|
|
| Inserire le pile e chiudere il vano pile. | |
| inalámbrico USB. |
|
|
| |
|
|
|
| Legen Sie die Batterien ein und schließen Sie das Batteriefach. | |
| Aprire il vano pile e rimuovere il ricevitore wireless USB. |
|
|
| |
|
|
|
|
| |
| Öffnen Sie das Batteriefach und entnehmen Sie den |
|
|
|
|
| drahtlosen |
|
|
|
|
|
|
|
|
|
|
3 | Plug the USB wireless receiver into an available USB | |
connector on the system. | ||
Brancher le récepteur sans fil USB dans le port USB disponible | ||
| ||
| du système. | |
| Conecte el receptor inalámbrico USB a un conector USB | |
| disponible del sistema. | |
| Collegare il ricevitore wireless USB a un connettore USB | |
| disponibile del sistema. | |
| Verbinden Sie den drahtlosen | |
| freien |
1) Power ON the system. 2) Power ON the Portal of Power by
4 pressing the power button on the side. 3) The LED will illuminate solidly to indicate it is synchronized. 4) Insert the game software and you are ready to play.
1)Allumer le système. 2) Allumer le Portal of Power en appuyant sur la touche d'alimentation située sur le côté. 3) L'indicateur restera allumé pour indiquer qu'il est synchronisé.
4)Insérer le disque de jeu pour commencer à jouer.
1)Encienda el sistema. 2) Encienda el Portal of Power pulsando el botón de encendido del lateral. 3) El indicador LED se quedará fijo cuando se haya sincronizado. 4) Introduzca el software del juego y podrá empezar a jugar.
1)Accendere il sistema. 2) Accendere il Portal of Power premendo il pulsante di accensione sul lato. 3) Il LED si accende fisso a indicare l’avvenuta sincronizzazione. 4) Inserire il software del gioco per iniziare a giocare.
1)Schalten Sie das System EIN. 2) Schalten Sie das „Portal of Power” mit dem
Troubleshooting Dépannage Solución de Problemas Risoluzione dei Problemi Fehlerbehebung
Keep away from large metal objects
The Portal of Power should be placed on a flat surface and kept a minimum of 6 in. (15 cm) away from metal objects or surfaces.
Tenir à l'écart des larges objets métalliques
Le Portal of Power doit être placé sur une surface plane et à un minimum de 6 pouces (15 cm) de distance d'objets ou de surfaces métalliques.
Aleje el dispositivo de objetos metálicos de gran tamaño Debe colocar el Portal of Power en una superficie plana y a una
distancia mínima de 6 pulgadas (15 cm) de objetos o superficies metálicas.
Mantenere distante da grandi oggetti metallici
Posizionare il Portal of Power su una superficie piana ad almeno 15 cm (6 pollici) da oggetti o superfici metalliche.
Halten Sie Abstand zu großen Metallobjekten
Das „Portal of Power“ sollte auf ebenem Untergrund stehen und mindestens 15 cm (6 Zoll) von Objekten oder Oberflächen aus Metall entfernt sein.
6 in. (15 cm)
6 pouces (15 cm)
6 pulgadas (15 cm)
6 pollici (15 cm)
6 Zoll. (15 cm)
Place the interaction figure on the Portal of Power figure surface. The Portal of Power can support up to 2
figures and 1 location or magic item at the same time. Make sure no more than 2 figures are on the figure surface when the Portal of Power is being powered ON. See software manual for additional figure usage
directions. Location and magic items are sold separately.
Placer les figurines d'interaction sur la surface du Portal of Power. Le Portal of Power peut porter jusqu'à deux
figurines et un emplacement ou objet magique à la fois. S'assurer que pas plus de 2 figurines ne se trouvent sur la surface lors de la mise sous tension du Portal of Power. Voir le manuel du jeu pour en savoir plus sur
l'utilisation des figurine. Emplacements et objets magiques vendus séparément.
Coloque las figuras de interacción en la base del Portal of Power. El Portal of Power es compatible con hasta 2 figuras y 1 ubicación o elemento mágico al mismo tiempo. Asegúrese de que no haya más de 2 figuras en la base cuando encienda el Portal of Power. Consulte el manual del software para obtener más información acerca del uso de las figuras. Las ubicaciones y los elementos mágicos se venden por separado.
Posizionare i modellini dei personaggi sulla relativa superficie del Portal of Power. Il Portal of Power può supportare contemporaneamente fino a 2 modellini dei personaggi e 1 oggetto magico o di luogo. Verificare che sulla superficie per i modellini dei personaggi non siano posizionati più di 2 modellini quando il Portal of Power viene acceso. Fare riferimento al manuale del software per ulteriori istruzioni sull'uso dei modellini dei personaggi. Gli oggetti magici e di posizione sono venduti separatamente.
Stellen Sie die Interaktionsfiguren auf die dafür vorgesehene Standfläche auf dem „Portal of Power”. Auf dem „Portal of Power” finden bis zu zwei Interaktionsfiguren und ein Location oder Magic Item gleichzeitig Platz.
Achten Sie darauf, dass sich auf der Standfläche nicht | mehr als 2 Figuren befinden, wenn das Portal of Power |
EINgeschaltet wird. Im Softwarehandbuch finden Sie | weitere Informationen zur Nutzung der Figuren. |
Location und Magic Item sind separat erhältlich. |
|
The Portal of Power is already synchronized to the USB | Le Portal of Power est déjà synchronisé avec le récepteur |
wireless receiver. If for some reason they need to be | sans fil USB. S'il s'avère nécessaire de les synchroniser à |
nouveau, suivre les étapes |
El Portal of Power ya está sincronizado con el receptor | Il Portal of Power è già sincronizzato con il ricevitore wireless | Das„PortalofPower” istbereitsmitdem |
inalámbrico USB. Si por alguna razón hay que volver a | USB. Se per qualsiasi motivo devono essere nuovamente | synchronisiert.FührenSiediefolgendenSchrittedurch,fallsdie |
sincronizarlos, siga los pasos que se describen a continuación: | sincronizzati, attenersi alla seguente procedura: | SynchronisierungausirgendeinemGrundwiederholtwerdenmuss: |
Power ON the Portal of Power and the status LED will blink while searching for the USB
1 wireless receiver. Locate and press the SYNCHRO button (SYNC.) inside the Portal of Power battery compartment. The status LED on the Portal of Power will blink fast for 30 seconds.
Allumer le PortalofPower ; l'indicateur de statut clignote pendant la recherche du récepteur sans fil USB. Appuyer sur la touche SYNCHRO (SYNC.) dans le compartiment à piles duPortalof
Power. L'indicateur de statut duPortalofPower clignote alors rapidement pendant 30 secondes. Al encender el Portal of Power, el indicador LED de estado parpadeará mientras busca el
receptor inalámbrico USB. Localice y pulse el botón de sincronización (SYNC.) que hay dentro del compartimento para las pilas del Portal of Power. El indicador LED de estado del Portal of Power parpadeará con rapidez 30 segundos.
Accendere il Portal of Power e la spia LED di stato lampeggierà durante la ricerca del
ricevitore wireless USB. Individuare e premere il pulsante di sincronizzazione (SYNC.) all'interno del vano pile del Portal of Power. La spia LED di stato del Portal of Power
lampeggia rapidamente per 30 secondi.
Schalten Sie das „Portal of Power“ EIN. Die
für 30 Sekunden in schneller Folge.
Check that the system is powered ON. Press the SYNCHRO button
2 (SYNC.) on the USB wireless receiver within 30 seconds (while the Portal of Power status LED is still blinking fast).
Vérifier que le système est allumé. Appuyer sur la touche SYNCHRO (SYNC.) sur le récepteur sans fil USB dans les 30 secondes (pendant que l'indicateur de statut du Portal of Power clignote toujours rapidement).
Compruebe que el sistema esté encendido. Pulse el botón de
sincronización (SYNC.) del receptor inalámbrico USB transcurridos 30 segundos (el tiempo que el indicador LED de estado del Portal of Power parpadea más deprisa).
Verificare che il sistema sia acceso. Premere il pulsante di
sincronizzazione (SYNC.) sul ricevitore wireless USB entro 30 secondi (mentre la spia LED di stato del Portal of Power sta ancora
lampeggiando rapidamente).
Prüfen Sie, ob das System EINGESCHALTET ist. Drücken Sie innerhalb von 30 Sekunden auf die
(SYNC.) am drahtlosen
The LED will stop blinking then
3 light solidly once the synchronization is complete.
L'indicateur arrête de clignoter puis reste allumé une fois la synchronisation terminée.
El indicador LED dejará de parpadear y se iluminará en posición fija cuando la sincronización haya terminado.
Al termine della sincronizzazione, la spia LED smette di lampeggiare e rimane accesa fissa.
Die LED hört auf zu blinken und leuchtet kontinuierlich, sobald die Synchronisierung abgeschlossen ist.
POWER SAVE MODE: If the Portal of | MODE ÉCONOMIE D'ÉNERGIE : si le Portal | MODO DE AHORRO DE ENERGÍA: si el | MODALITÀ DI RISPARMIO ENERGIA: se il | STROMSPARMODUS: Falls das „Portal of |
Power is not used for 5 minutes, it will | of Power n'est pas utilisé pendant 5 | Portal of Power deja de usarse durante 5 | Portal of Power rimane inutilizzato per 5 | Power“ 5 Minuten nicht verwendet wird, |
enter sleep mode. Press the Power | minutes, il passe en mode veille. Appuyer | minutos, entrará en modo de espera. Pulse | minuti, viene attivata la modalità di | schaltet es in den Stromsparmodus. |
button to turn ON the Portal of Power | sur la touche d'alimentation pour rallumer | el botón POWER (alimentación) para | sospensione. Premere il pulsante di | Drücken Sie den |
again. | le Portal of Power. | encender el Portal of Power de nuevo. | accensione per riattivare il Portal of Power. | „Portal of Power“ erneut einzuschalten. |
TURNING OFF THE PORTAL OF POWER: | ÉTEINDRE LE PORTAL OF POWER: | APAGAR EL PORTAL OF POWER: | SPEGNIMENTO DEL PORTAL OF POWER: | PORTAL OF POWER AUSSCHALTEN: | |||||||
Press and hold the power button for 1 | maintenir la touche d'alimentation | mantenga pulsado el botón de encendido | premere e mantenere premuto il pulsante | Drücken und halten Sie eine Sekunde lang | |||||||
second. |
|
|
| pendant une seconde. | durante un segundo. | di accensione per 1 secondo. | den | ||||
OFF |
| Powered OFF | ÉTEINT | Éteint | Apagado | Apagado | Spenta | Spento | AUS | AUSGESCHALTET | |
Blinking |
| Searching for USB | Indicateur | Recherchedu | Parpadea | Buscando receptor | Lampeggiante | Ricerca del ricevitore | Blinkt | ||
| wireless receiver | clignotant | récepteursansfil USB | inalámbrico USB | USB wireless | wirdgesucht | |||||
Fast |
| Synchronizing | Indicateurclignotant | Synchronisation | Parpadea | Sincronizando | Lampeggiante | Sincronizzazione | Blinkt in | Synchronisierung | |
blinking |
|
|
| rapidement |
| rápido |
| rapidamente | in corso | schneller Folge | läuft |
ON |
| Synchronization is | ALLUMÉ | Synchronisation | Encendido | Sincronización | Accesa | Sincronizzazione | EIN | Synchronisierung | |
| complete | terminée | fijo | completa | completata | abgeschlossen | |||||
|
|
|
|
| |||||||
Slowly |
| Replace batteries | Indicateurclignotant | Remplacer les | Parpadea | Cambiar pilas | Lampeggiante | Occorre sostituire | Blinktin | Batterien | |
blinking |
| lentement | piles | despacio | lentamente | le pile | langsamerFolge | austauschen | |||
|
|
|
| ||||||||
|
|
| © 2011 Activision Publishing, Inc. Spyro and Activision are registered trademarks and Skylanders Spyro’s Adventure and Portal of Power are trademarks of Activision Publishing, Inc. “PlayStation”is a registered trademark of Sony Computer Entertainment Inc. All the other trademarks and trade names are the properties of their respective owners. All rights reserved. Printed in China. |
| |||||||
|
|
| © 2011 Activision Publishing, Inc. Spyro et Activision sont des marques déposées, et Skylanders Spyro's Adventure et Portal of Power sont des marques commerciales d'Activision Publishing, Inc. « PlayStation » est une marque déposée de Sony Computer Entertainment Inc. Toutes les autres marques de commerce et appellations commerciales appartiennent à leurs propriétaires respectifs. Tous droits réservés. Imprimé en Chine. | ||||||||
|
|
| © 2011 Activision Publishing, Inc. Spyro y Activision son marcas comerciales registradas y Skylanders Spyro’s Adventure y Portal of Power son marcas comerciales de Activision Publishing, Inc. “PlayStation”es una marca registrada de Sony Computer Entertainment Inc. Todas las otras marcas comerciales y nombres de marcas son propiedad de sus respectivos propietarios. Todos los derechos reservados. Impreso en China. | ||||||||
|
|
| © 2011 Activision Publishing, Inc. Spyro e Activision sono marchi registrati e Skylanders Spyro’s Adventure e Portal of Power sono marchi di Activision Publishing, Inc. “PlayStation”è un marchio registrato di Sony Computer Entertainment Inc. Tutti gli altri marchi e nomi commerciali sono di proprietà dei rispettivi titolari. Tutti i diritti riservati. | Stampato in Cina. |
| ||||||
|
|
| © 2011 Activision Publishing, Inc. Spyro und Activision sind eingetragene Marken, Skylanders Spyro’s Adventure und Portal of Power sind Marken der Activision Publishing, Inc.„PlayStation”ist eine eingetragene Marke von Sony Computer Entertainment Inc. Alle anderen Marken und Markennamen sind Eigentum der jeweiligen Besitzer. Alle Rechte vorbehalten. Gedruckt in China. |
| |||||||
Vous avez des questions ou des problèmes lors de l'installation de vos nouveaux accessoires ? Il est recommandé de commencer par contacter le support clients d'Activision avant de nous retourner votre produit ou de visiter le site Internet
In caso di domande o problemi relativi alla configurazione dei nuovi accessori, prima di restituire il prodotto rivolgersi all'assistenza clienti di Activision o visitare il sito web all'indirizzo riportato di seguito.
http://activision.com/support
84148301 R2.00QP