Placement for Maximum Accuracy
AcuRite sensors are sensitive to surrounding environmental conditions. Proper placement of both the display unit and the sensor are critical to the accuracy and performance of this product.
Display Unit Placement
Place the display unit in a dry area free of dirt and dust. To ensure accurate temperature measurement, place out of direct sunlight and away from heat sources or vents. Display unit stands upright for tabletop use or is
5-in-1 Installation Guidelines
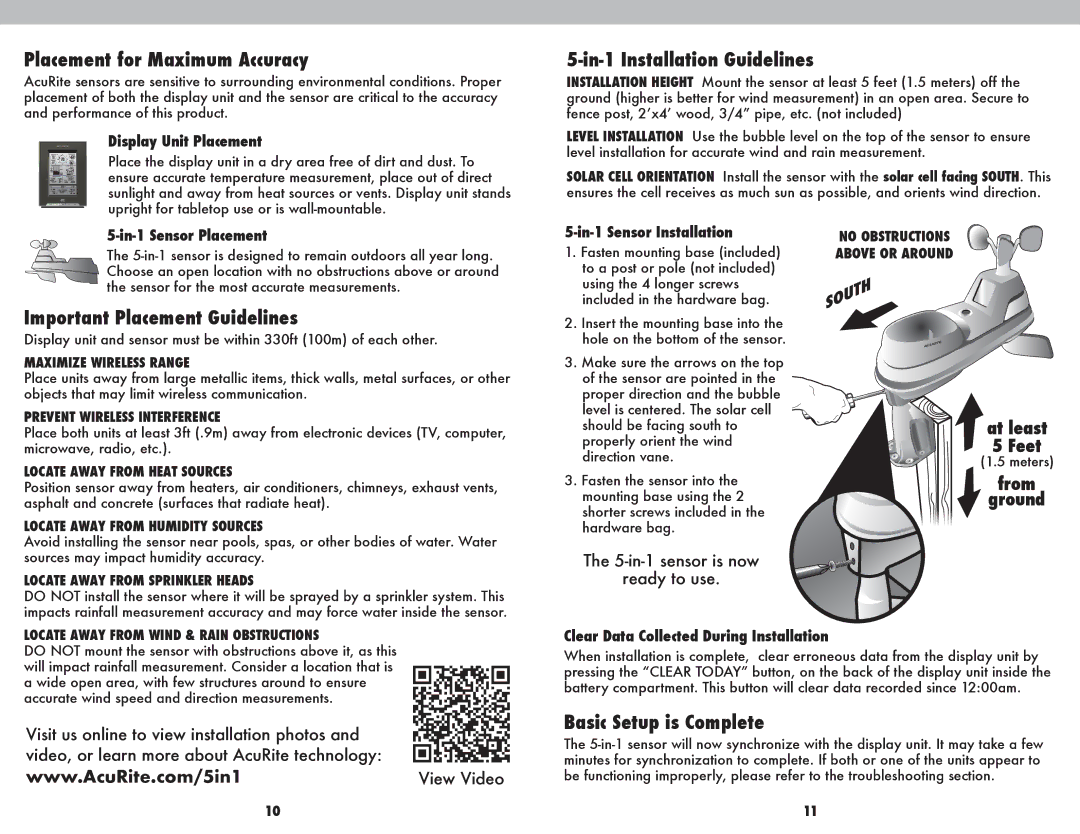
INSTALLATION HEIGHT Mount the sensor at least 5 feet (1.5 meters) off the ground (higher is better for wind measurement) in an open area. Secure to fence post, 2ʼx4ʼ wood, 3/4” pipe, etc. (not included)
LEVEL INSTALLATION Use the bubble level on the top of the sensor to ensure level installation for accurate wind and rain measurement.
SOLAR CELL ORIENTATION Install the sensor with the solar cell facing SOUTH. This ensures the cell receives as much sun as possible, and orients wind direction.
5-in-1 Sensor Placement
The
Important Placement Guidelines
Display unit and sensor must be within 330ft (100m) of each other.
MAXIMIZE WIRELESS RANGE
Place units away from large metallic items, thick walls, metal surfaces, or other objects that may limit wireless communication.
PREVENT WIRELESS INTERFERENCE
Place both units at least 3ft (.9m) away from electronic devices (TV, computer, microwave, radio, etc.).
LOCATE AWAY FROM HEAT SOURCES
Position sensor away from heaters, air conditioners, chimneys, exhaust vents, asphalt and concrete (surfaces that radiate heat).
LOCATE AWAY FROM HUMIDITY SOURCES
Avoid installing the sensor near pools, spas, or other bodies of water. Water sources may impact humidity accuracy.
LOCATE AWAY FROM SPRINKLER HEADS
DO NOT install the sensor where it will be sprayed by a sprinkler system. This impacts rainfall measurement accuracy and may force water inside the sensor.
5-in-1 Sensor Installation
1.Fasten mounting base (included) to a post or pole (not included) using the 4 longer screws included in the hardware bag.
2.Insert the mounting base into the hole on the bottom of the sensor.
3.Make sure the arrows on the top of the sensor are pointed in the proper direction and the bubble
level is centered. The solar cell should be facing south to properly orient the wind direction vane.
3.Fasten the sensor into the mounting base using the 2 shorter screws included in the hardware bag.
The 5-in-1 sensor is now
ready to use.
NO OBSTRUCTIONS
ABOVE OR AROUND
(1.5 meters)
LOCATE AWAY FROM WIND & RAIN OBSTRUCTIONS
DO NOT mount the sensor with obstructions above it, as this will impact rainfall measurement. Consider a location that is a wide open area, with few structures around to ensure accurate wind speed and direction measurements.
Visit us online to view installation photos and |
|
video, or learn more about AcuRite technology: |
|
www.AcuRite.com/5in1 | View Video |
Clear Data Collected During Installation
When installation is complete, clear erroneous data from the display unit by pressing the “CLEAR TODAY” button, on the back of the display unit inside the battery compartment. This button will clear data recorded since 12:00am.
Basic Setup is Complete
The
10 | 11 |