3 If indicators for the programme buttons are lit, a dishwashing cycle is activated. The cycle must be deactivated:
Press function buttons 2 and 3 simultaneously for approx. 2 seconds. All additional wash programme button indicators will go out.
2.Press function buttons 2 and 3 simultaneously and keep them pressed. The LED indicators for function buttons 1 to 3 will flash.
3.Press function button 1.
The LED indicator for function button 1 will flash.
The LED indicator for the end of the dishwashing cycle will flash simul- taneously:
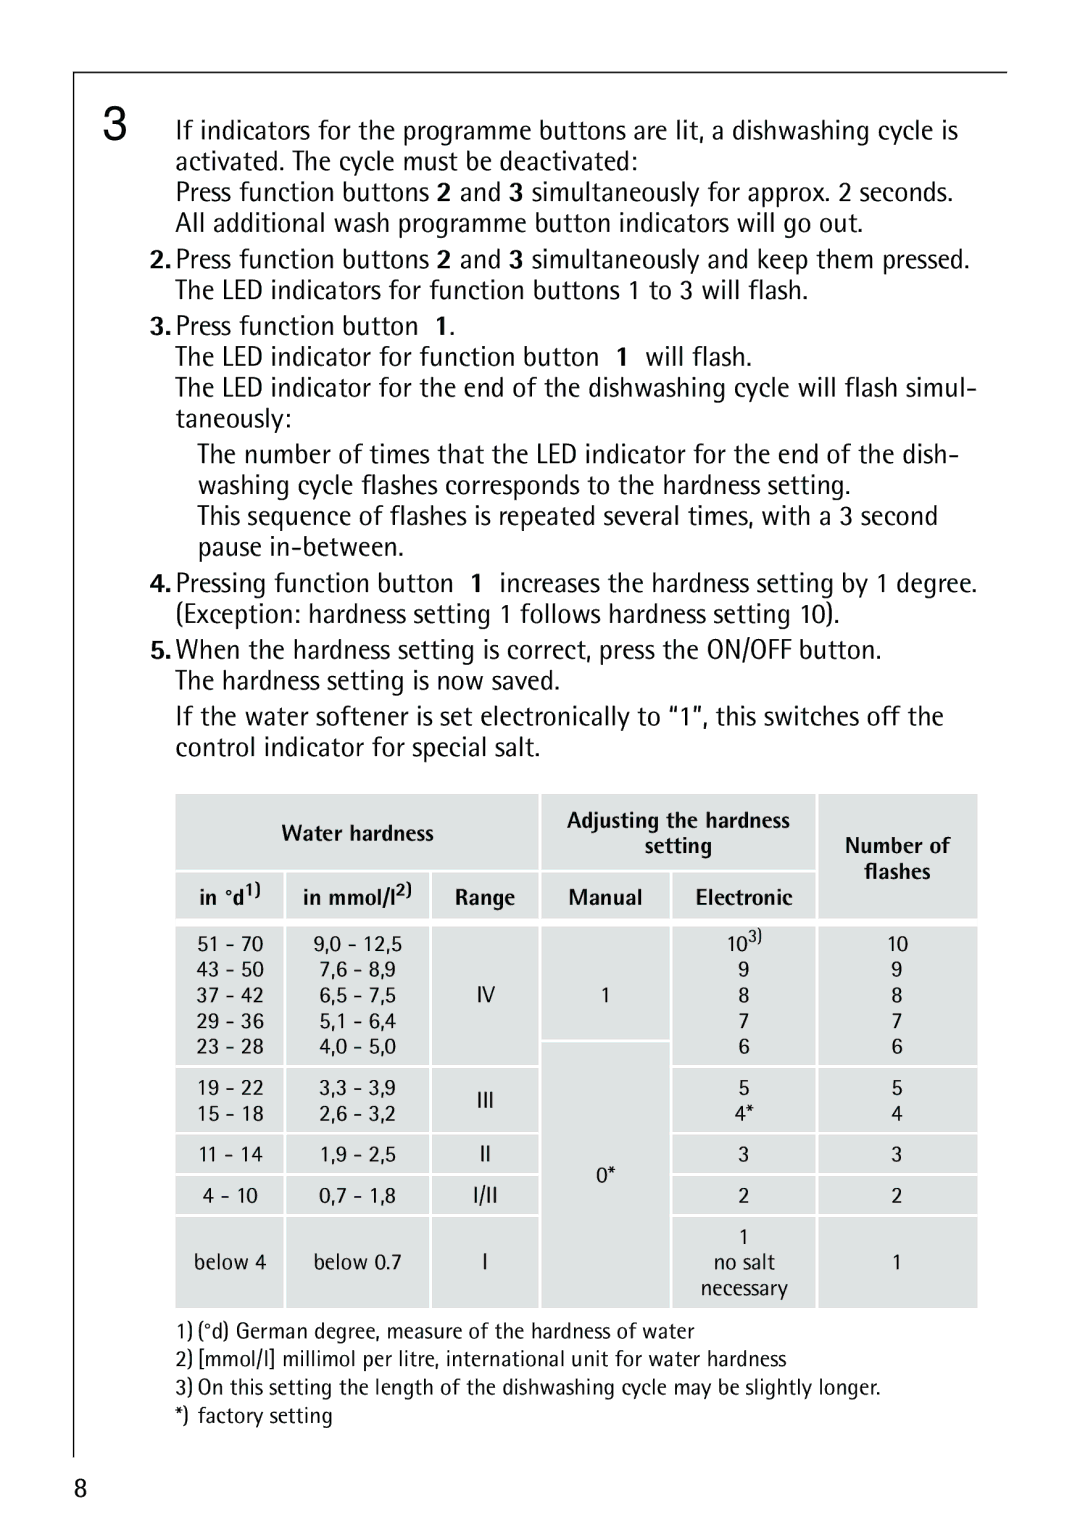
–The number of times that the LED indicator for the end of the dish- washing cycle flashes corresponds to the hardness setting.
–This sequence of flashes is repeated several times, with a 3 second pause
4.Pressing function button 1 increases the hardness setting by 1 degree. (Exception: hardness setting 1 follows hardness setting 10).
5.When the hardness setting is correct, press the ON/OFF button. The hardness setting is now saved.
If the water softener is set electronically to “1”, this switches off the control indicator for special salt.
| Water hardness |
| Adjusting the hardness |
| ||||
|
|
| setting | Number of | ||||
|
|
|
|
|
| |||
in °d1) |
| in mmol/l2) | Range | Manual |
| Electronic | flashes | |
|
| |||||||
|
|
| ||||||
51 - 70 |
| 9,0 - 12,5 |
|
|
|
| 103) | 10 |
43 - 50 |
| 7,6 - 8,9 |
|
|
|
| 9 | 9 |
37 - 42 |
| 6,5 - 7,5 |
| IV | 1 |
| 8 | 8 |
29 - 36 |
| 5,1 - 6,4 |
|
|
|
| 7 | 7 |
23 - 28 |
| 4,0 - 5,0 |
|
|
|
| 6 | 6 |
19 - 22 |
| 3,3 - 3,9 |
| III |
|
| 5 | 5 |
15 - 18 |
| 2,6 - 3,2 |
|
|
| 4* | 4 | |
|
|
|
|
| ||||
11 - 14 |
| 1,9 - 2,5 |
| II | 0* |
| 3 | 3 |
|
|
|
|
|
|
|
| |
4 - 10 |
| 0,7 - 1,8 |
| I/II |
| 2 | 2 | |
|
|
|
| |||||
below 4 |
| below 0.7 | I |
|
| 1 | 1 | |
|
|
| no salt | |||||
|
|
|
|
|
|
| necessary |
|
|
|
|
|
|
|
|
|
|
1)(°d) German degree, measure of the hardness of water
2)[mmol/l] millimol per litre, international unit for water hardness
3)On this setting the length of the dishwashing cycle may be slightly longer. *) factory setting
8
