MODELO 3C614C/9166C
OPERATING INSTRUCTIONS & PARTS MANUAL
MÉTODO B (POR ADENTRO DE LAS MOLDURAS)
4. Instale el Ventilador en la ventana |
enganchando las Ranuras en los Tornillos |
Tornillo |
1. | Marque la posición de los |
| agujeros para los Tornillos en |
| los bordes interiores del marco |
| de la ventana utilizando el Patrón |
| suministrado. (Figura 2) |
2. | Instale los 4 Tornillos en el |
| marco. NO LOS APRIETE DEL |
| TODO. Deje 1/8" (3,2 mm) entre |
1/8" (3,2 mm) |
en el marco de la ventana. Deslice el |
Ventilador hacia abajo en los Tornillos |
hasta que descanse sobre la parte inferior |
del marco. (Figura 3) |
5. Apriete los Tornillos para Paneles de |
Extensión para asegurario en esa posición. |
Ranura |
Figura 3 |
la superficie del marco y la |
Cabeza de los Tornillos. |
3. Aflojelos4TornillosparaPaneles |
de Extensión (Figura 1) y |
extienda los Paneles Laterales |
hasta que el Ventilador quede |
bien ajustado entre los lados del |
marco de la ventana. |
PLANTILLA |
Figura 2 |
OPERACIÓN
Este Ventilador AirKing para Toda la Casa tiene un duradero motor eléctrico reversible de 3 velocidades con arranque por capacitor. Tiene tres velocidades: Alta (Hi), Media (Medium) y Baja (Low) tanto para uso de Ventilador como de extactor. El interuptor de control está convenientemente ubicado en la parte inferior derecha del cuerpo del Ventilador. Ajuste la Perilla a la dirección y Velocidad deseadas.
|
|
| 10 | 11 |
|
|
|
|
|
| |
|
| 8 | 9 |
|
|
|
| 5 | 33 |
|
|
| 3 |
| 26 | 10 | |
|
|
| |||
| 4 |
| 10 |
|
|
|
|
|
|
| |
|
|
| 6 |
|
|
|
|
| 7 |
|
|
36 |
|
|
| 33 |
|
|
|
|
|
| |
2 |
|
|
|
|
|
1 |
|
| 35 |
|
|
|
| 34 |
|
| |
|
|
|
|
| |
|
| 36 | 36 |
|
|
|
|
|
|
| |
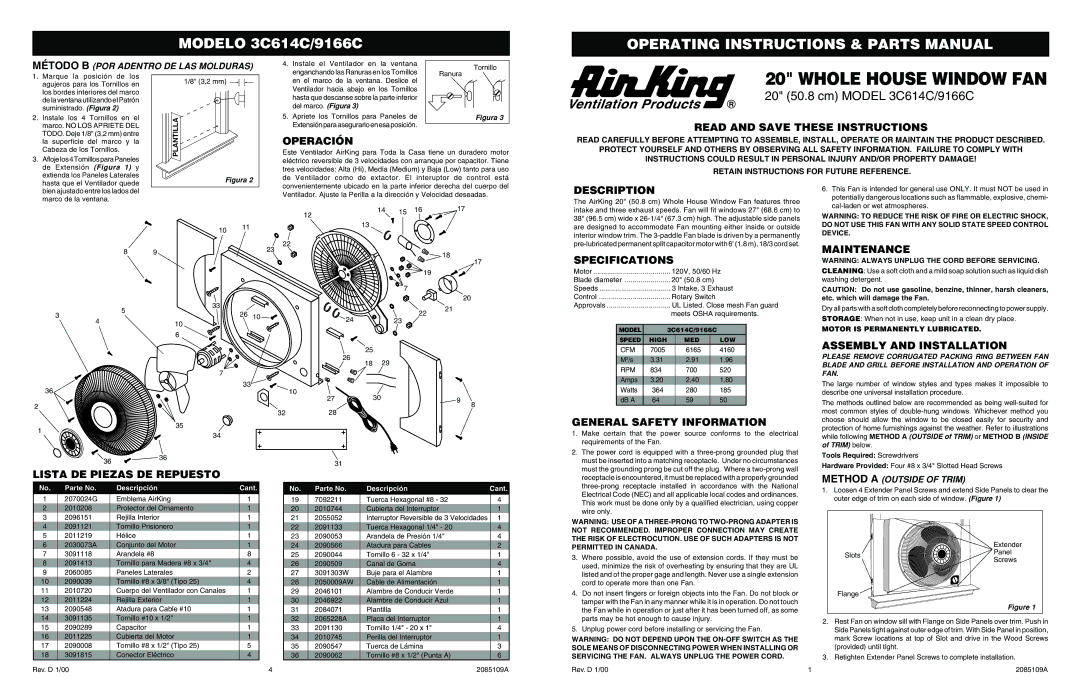
LISTA DE PIEZAS DE REPUESTO |
|
| |||
No. | Parte No. | Descripción | Cant. | ||
1 | 2070024G | Emblema AirKing | 1 |
| |
2 | 2010208 | Protector del Ornamento | 1 |
| |
3 | 2096151 | Rejilla Interior | 1 |
| |
4 | 2091121 | Tornillo Prisionero | 1 |
| |
5 | 2011219 | Hélice |
| 1 |
|
6 | 2030073A | Conjunto del Motor | 1 |
| |
7 | 3091118 | Arandela #8 | 8 |
| |
8 | 2091413 | Tornillo para Madera #8 x 3/4" | 4 |
| |
9 | 2060085 | Paneles Laterales | 2 |
| |
10 | 2090039 | Tornillo #8 x 3/8" (Tipo 25) | 4 |
| |
11 | 2010720 | Cuerpo del Ventilador con Canales | 1 |
| |
12 | 2011224 | Rejilla Exterior | 1 |
| |
13 | 2090548 | Atadura para Cable #10 | 1 |
| |
14 | 3091135 | Tornillo #10 x 1/2" | 1 |
| |
15 | 2090289 | Capacitor |
| 1 |
|
16 | 2011225 | Cubierta del Motor | 1 |
| |
17 | 2090008 | Tornillo #8 x 1/2" (Tipo 25) | 5 |
| |
18 | 3091815 | Conector Eléctrico | 4 |
| |
Rev. D 1/00
| 12 | 14 | 15 | 16 | 17 |
|
|
|
|
|
|
| |
| 13 |
|
|
|
|
|
22 |
|
|
|
|
|
|
23 |
|
|
|
| 18 |
|
|
|
|
|
| 17 | |
|
|
|
|
|
| |
|
|
|
| 19 |
|
|
|
|
| 7 |
|
|
|
|
|
|
|
| 20 |
|
|
|
|
| 22 | 21 |
|
| 24 |
| 23 |
|
| |
|
|
|
|
| ||
| 25 |
|
|
|
| |
| 26 | 29 |
|
|
|
|
| 18 |
|
|
|
| |
10 | 27 | 30 |
|
|
|
|
|
|
| 9 | 8 | ||
| 28 |
|
|
|
| |
32 |
|
|
|
|
| |
31
| No. | Parte No. | Descripción | Cant. |
| 19 | 7092211 | Tuerca Hexagonal #8 - 32 | 4 |
| 20 | 2010744 | Cubierta del Interruptor | 1 |
| 21 | 2055052 | Interruptor Reversible de 3 Velocidades | 1 |
| 22 | 2091133 | Tuerca Hexagonal 1/4" - 20 | 4 |
| 23 | 2090053 | Arandela de Presión 1/4" | 4 |
| 24 | 2090566 | Atadura para Cables | 2 |
| 25 | 2090044 | Tornillo 6 - 32 x 1/4" | 1 |
| 26 | 2090509 | Canal de Goma | 4 |
| 27 | 3091303W | Buje para el Alambre | 1 |
| 28 | 2050009AW | Cable de Alimentación | 1 |
| 29 | 2046101 | Alambre de Conducir Verde | 1 |
| 30 | 2046922 | Alambre de Conducir Azul | 1 |
| 31 | 2084071 | Plantilla | 1 |
| 32 | 2065228A | Placa del Interruptor | 1 |
| 33 | 2091130 | Tornillo 1/4" - 20 x 1" | 4 |
| 34 | 2010745 | Perilla del Interruptor | 1 |
| 35 | 2090547 | Tuerca de Lámina | 3 |
| 36 | 2090062 | Tornillo #8 x 1/2" (Punta A) | 6 |
4 |
|
| 2085109A | |
20" WHOLE HOUSE WINDOW FAN
20" (50.8 cm) MODEL 3C614C/9166C
READ AND SAVE THESE INSTRUCTIONS
READ CAREFULLY BEFORE ATTEMPTING TO ASSEMBLE, INSTALL, OPERATE OR MAINTAIN THE PRODUCT DESCRIBED.
PROTECT YOURSELF AND OTHERS BY OBSERVING ALL SAFETY INFORMATION. FAILURE TO COMPLY WITH
INSTRUCTIONS COULD RESULT IN PERSONAL INJURY AND/OR PROPERTY DAMAGE!
RETAIN INSTRUCTIONS FOR FUTURE REFERENCE.
DESCRIPTION
The AirKing 20" (50.8 cm) Whole House Window Fan features three intake and three exhaust speeds. Fan will fit windows 27" (68.6 cm) to 38" (96.5 cm) wide x
6.This Fan is intended for general use ONLY. It must NOT be used in potentially dangerous locations such as flammable, explosive, chemi-
WARNING: TO REDUCE THE RISK OF FIRE OR ELECTRIC SHOCK, DO NOT USE THIS FAN WITH ANY SOLID STATE SPEED CONTROL DEVICE.
MAINTENANCE
SPECIFICATIONS
Motor | 120V, 50/60 Hz |
Blade diameter | 20" (50.8 cm) |
Speeds | 3 Intake, 3 Exhaust |
Control | Rotary Switch |
Approvals | UL Listed. Close mesh Fan guard |
| meets OSHA requirements. |
WARNING: ALWAYS UNPLUG THE CORD BEFORE SERVICING.
CLEANING: Use a soft cloth and a mild soap solution such as liquid dish washing detergent.
CAUTION: Do not use gasoline, benzine, thinner, harsh cleaners, etc. which will damage the Fan.
Dry all parts with a soft cloth completely before reconnecting to power supply.
STORAGE: When not in use, keep unit in a clean dry place.
|
| MODEL | 3C614C/9166C |
| MOTOR IS PERMANENTLY LUBRICATED. |
|
| |||||
|
| SPEED | HIGH |
| MED | LOW |
| ASSEMBLY AND INSTALLATION | ||||
|
| CFM | 7005 |
| 6165 | 4160 |
| |||||
|
|
|
| PLEASE REMOVE CORRUGATED PACKING RING BETWEEN FAN | ||||||||
|
|
|
|
|
|
|
| |||||
|
| M3/s | 3.31 |
| 2.91 | 1.96 |
| |||||
|
| RPM | 834 |
| 700 | 520 |
| BLADE AND GRILL BEFORE INSTALLATION AND OPERATION OF | ||||
|
|
|
| FAN. |
|
| ||||||
|
|
|
|
|
|
|
|
|
| |||
|
| Amps | 3.20 |
| 2.40 | 1.80 |
| The large number of window styles and types makes it impossible to | ||||
|
| Watts | 364 |
| 280 | 185 |
| |||||
|
|
|
| describe one universal installation procedure. |
|
| ||||||
|
|
|
|
|
|
|
|
|
| |||
|
| dB A | 64 |
| 59 | 50 |
| The methods outlined below are recommended as being | ||||
|
|
|
|
|
|
|
| most common styles of | ||||
GENERAL SAFETY INFORMATION | choose should allow the window to be closed easily for security and | |||||||||||
protection of home furnishings against the weather. Refer to illustrations | ||||||||||||
1. | Make certain that | the power | source | conforms to the electrical | ||||||||
while following METHOD A (OUTSIDE of TRIM) or METHOD B (INSIDE | ||||||||||||
| requirements of the Fan. |
|
|
| ||||||||
|
|
|
| of TRIM) below. |
|
| ||||||
2. The power cord is equipped with a |
|
| ||||||||||
Tools Required: Screwdrivers |
|
| ||||||||||
| must be inserted into a matching receptacle. Under no circumstances |
|
| |||||||||
| Hardware Provided: Four #8 x 3/4" Slotted Head Screws | |||||||||||
| must the grounding prong be cut off the plug. Where a | |||||||||||
| METHOD A (OUTSIDE OF TRIM) |
|
| |||||||||
| receptacle is encountered, it must be replaced with a properly grounded |
|
| |||||||||
| 1. Loosen 4 Extender Panel Screws and extend Side Panels to clear the | |||||||||||
| Electrical Code (NEC) and all applicable local codes and ordinances. | |||||||||||
|
| outer edge of trim on each side of window. (Figure 1) | ||||||||||
| This work must be done only by a qualified electrician, using copper |
| ||||||||||
|
|
|
|
| ||||||||
| wire only. |
|
|
|
|
|
|
|
|
| ||
|
|
|
|
|
|
|
|
|
| |||
WARNING: USE OF A |
|
|
|
| ||||||||
NOT RECOMMENDED. IMPROPER CONNECTION MAY CREATE |
|
|
|
| ||||||||
THE RISK OF ELECTROCUTION. USE OF SUCH ADAPTERS IS NOT |
|
| Extender |
| ||||||||
PERMITTED IN CANADA. |
|
|
|
|
|
| ||||||
|
|
|
| Slots | Panel |
| ||||||
3. Where possible, avoid the use of extension cords. If they must be |
|
| ||||||||||
| Screws |
| ||||||||||
|
|
| ||||||||||
| used, minimize the risk of overheating by ensuring that they are UL |
|
|
| ||||||||
|
|
|
|
| ||||||||
| listed and of the proper gage and length. Never use a single extension |
|
|
|
| |||||||
| cord to operate more than one Fan. |
|
|
|
|
|
| |||||
4. | Do not insert fingers or foreign objects into the Fan. Do not block or |
| Flange |
|
| |||||||
| tamper with the Fan in any manner while it is in operation. Do not touch |
|
| Figure 1 |
| |||||||
| the Fan while in operation or just after it has been turned off, as some |
|
|
| ||||||||
|
|
|
|
| ||||||||
| parts may be hot enough to cause injury. | 2. Rest Fan on window sill with Flange on Side Panels over trim. Push in | ||||||||||
5. | Unplug power cord before installing or servicing the Fan. | |||||||||||
| Side Panels tight against outer edge of trim. With Side Panel in position, | |||||||||||
WARNING: DO NOT DEPEND UPON THE |
| mark Screw locations at top of Slot and drive in the Wood Screws | ||||||||||
SOLE MEANS OF DISCONNECTING POWER WHEN INSTALLING OR |
| (provided) until tight. |
|
| ||||||||
SERVICING THE FAN. ALWAYS UNPLUG THE POWER CORD. | 3. Retighten Extender Panel Screws to complete installation. | |||||||||||
Rev. D 1/00 |
|
|
| 1 |
|
| 2085109A | |||||