MODELO 4C523K/9154K
OPERATING INSTRUCTIONS & PARTS MANUAL
ENSAMBLAJE
(Ilustración para Ensamble - Pagina 1)
1.Alinea la REJILLA TRASERA con el pasador localizado en la TAPA DE PLASTICO DEL MOTOR. Dejando los dos agujeros del centro asi abajo.
2.Asiente la REJILLA y sujetela con la TUERCA DE PLÁSTICO.
3.Para evitar lastimar el HELICE, instalela empujando firmemente en el
centro hacia el EJE del MOTOR.
4.Coloque el GANCHO en la REJILLA DELANTERA sobre el alambre central superior en la REJILLA TRASERA.
5.Torciendo suavemente quitar del sujetador los GANCHOS de la REJILLA y colocarlos uniformemente alrededor del ventilador. Fijar los GANCHOS en la REJILLA. Hacer que la cola del gancho agarre un alambre redondo de la REJILLA TRASERA. Hacer que el cuerpo del gancho agarre los bordes planos de ambas rejillas. (Figura a y b pagina 1)
R | 9 INCH OSCILLATING FAN |
| |
| MODEL 4C523K/9154K |
READ AND SAVE THESE INSTRUCTIONS
READ CAREFULLY BEFORE ATTEMPTING TO ASSEMBLE, INSTALL, OPERATE OR MAINTAIN THE PRODUCT DESCRIBED.
Centro
EJE
a) Jalé el boton de oscilacion asi |
arriba para desenganchar el |
mecanismo de oscilacion. |
b) Usé un objecto como un mango |
de un destornillador y |
gentilmente pegé un golpecito |
1a | UP |
| ARRIBA |
OPERACIÓN
1. | VELOCIDAD: Las velocidades se controlan mediante el conjuntor |
| rotatorio localizado en la base del ventilador. |
2. | OSCILACIÓN: Para hacer oscilar el ventilador, oprima el botón que se |
PROTECT YOURSELF AND OTHERS BY OBSERVING ALL SAFETY INFORMATION. FAILURE TO COMPLY WITH
INSTRUCTIONS COULD RESULT IN PERSONAL INJURY AND/OR PROPERTY DAMAGE!
RETAIN INSTRUCTIONS FOR FUTURE REFERENCE.
a la parte delantera de la helice. |
No golpear el eje de la helice |
asi adentro del motor. |
c) Delé vuelta a la helice con la |
mano. Si la helice no davuelta |
2b |
GOLPEAR |
LIGERAMENTE |
EJE |
encuentra sobre la cubierta del motor. Para que el ventilador deje de |
oscilar, tire del botón hacia afuera. |
3. AJUSTE DEL ÁNGULO: Se puede cambiar el ángulo del conjunto |
superior del ventilador, aflojando primero el tornillo de elevación. Coloque |
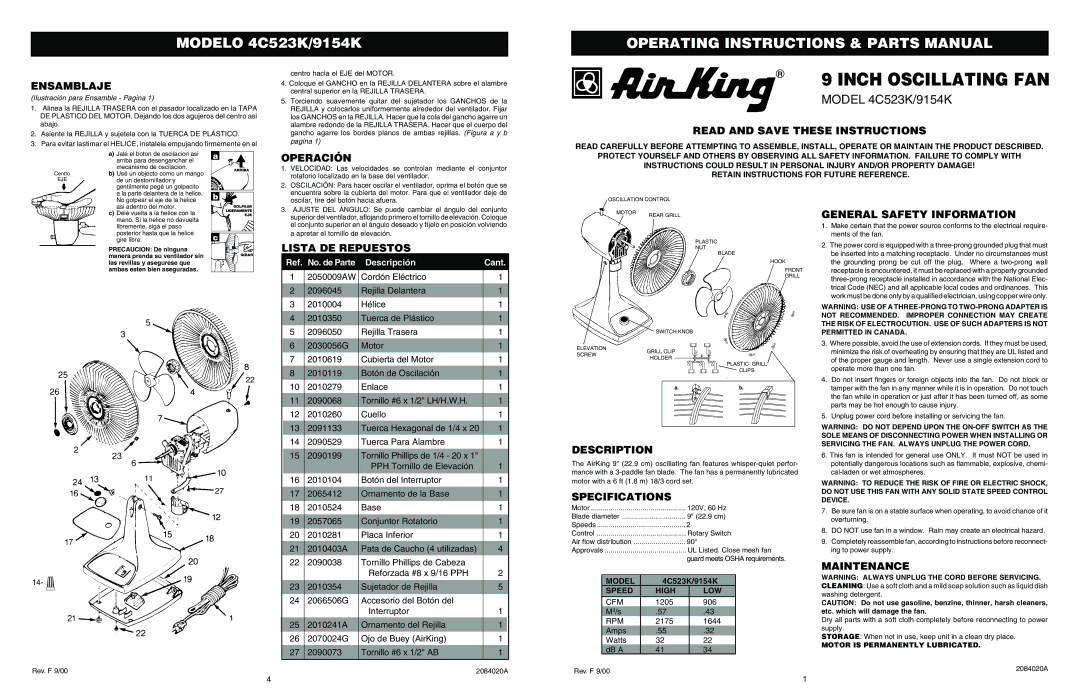
OSCILLATION CONTROL
MOTOR | REAR GRILL |
|
GENERAL SAFETY INFORMATION
libremente, sigá el paso |
posterior hasta que la helice |
gire libre. |
PRECAUCION: De ninguna manera prenda su ventilador sin las revillas y asegurese que ambas esten bien aseguradas.
3c |
SPINGIRAR
el conjunto superior en el ángulo deseado y fíjelo en posición volviendo |
a apretar el tornillo de elevación. |
LISTA DE REPUESTOS
| Ref. | No. de Parte | Descripción | Cant. |
|
|
| ||||
|
|
|
|
| |
1 | 2050009AW | Cordón Eléctrico | 1 |
| |
|
|
|
|
| |
2 | 2096045 | Rejilla Delantera | 1 |
| |
3 | 2010004 | Hélice | 1 |
| |
|
|
|
|
|
|
4 | 2010350 | Tuerca de Plástico | 1 |
| |
5 | 2096050 | Rejilla Trasera | 1 |
| |
|
|
|
|
| |
| 6 | 2030056G | Motor | 1 |
|
|
|
|
|
|
|
ELEVATION
PLASTIC
NUT
BLADE
HOOK
FRONT
GRILL
SWITCH KNOB
GRILL CLIP
1.Make certain that the power source conforms to the electrical require- ments of the fan.
2.The power cord is equipped with a
WARNING: USE OF A
3. Where possible, avoid the use of extension cords. If they must be used, |
minimize the risk of overheating by ensuring that they are UL listed and |
7 | 2010619 | Cubierta del Motor | 1 |
8 | 2010119 | Botón de Oscilación | 1 |
SCREW HOLDER
PLASTIC GRILL
CLIPS
.
of the proper gauge and length. Never use a single extension cord to |
operate more than one fan. |
22
11
27
14- ![]()
| 10 | 2010279 | Enlace | 1 |
|
| 11 | 2090068 | Tornillo #6 x 1/2" LH/H.W.H. | 1 |
|
| 12 | 2010260 | Cuello | 1 |
|
|
|
|
|
|
|
| 13 | 2091133 | Tuerca Hexagonal de 1/4 x 20 | 1 |
|
| 14 | 2090529 | Tuerca Para Alambre | 1 |
|
|
|
|
|
|
|
| 15 | 2090199 | Tornillo Phillips de 1/4 - 20 x 1" |
|
|
|
|
| PPH Tornillo de Elevación | 1 |
|
| 16 | 2010104 | Botón del Interruptor | 1 |
|
|
|
|
|
|
|
| 17 | 2065412 | Ornamento de la Base | 1 |
|
| 18 | 2010524 | Base | 1 |
|
|
|
|
|
|
|
| 19 | 2057065 | Conjuntor Rotatorio | 1 |
|
| 20 | 2010281 | Placa Inferior | 1 |
|
|
|
|
|
|
|
| 21 | 2010403A | Pata de Caucho (4 utilizadas) | 4 |
|
| 22 | 2090038 | Tornillo Phillips de Cabeza |
|
|
|
|
| Reforzada #8 x 9/16 PPH | 2 |
|
|
|
|
|
|
|
| 23 | 2010354 | Sujetador de Rejilla | 5 |
|
| 24 | 2066506G | Accesorio del Botón del |
|
|
|
|
| Interruptor | 1 |
|
|
|
|
|
|
|
| 25 | 2010241A | Ornamento del Rejilla | 1 |
|
| 26 | 2070024G | Ojo de Buey (AirKing) | 1 |
|
|
|
|
|
|
|
| 27 | 2090073 | Tornillo #6 x 1/2" AB | 1 |
|
|
|
|
|
|
|
a.b.
DESCRIPTION
The AirKing 9" (22.9 cm) oscillating fan features
SPECIFICATIONS
Motor |
| 120V, 60 Hz | |||
Blade diameter |
| 9" (22.9 cm) | |||
Speeds |
| 2 |
| ||
Control |
| Rotary Switch | |||
Air flow distribution |
| 90° |
| ||
Approvals |
| UL Listed. Close mesh fan | |||
|
|
| guard meets OSHA requirements. | ||
|
|
|
|
| |
| MODEL | 4C523K/9154K |
| ||
| SPEED | HIGH |
| LOW |
|
| CFM | 1205 |
| 906 |
|
| M3/s | .57 |
| .43 |
|
| RPM | 2175 |
| 1644 |
|
| Amps | .55 |
| .32 |
|
| Watts | 32 |
| 22 |
|
| dB A | 41 |
| 34 |
|
4. | Do not insert fingers or foreign objects into the fan. Do not block or |
| tamper with the fan in any manner while it is in operation. Do not touch |
| the fan while in operation or just after it has been turned off, as some |
| parts may be hot enough to cause injury. |
5. | Unplug power cord before installing or servicing the fan. |
WARNING: DO NOT DEPEND UPON THE
6.This fan is intended for general use ONLY. It must NOT be used in potentially dangerous locations such as flammable, explosive, chemi-
WARNING: TO REDUCE THE RISK OF FIRE OR ELECTRIC SHOCK, DO NOT USE THIS FAN WITH ANY SOLID STATE SPEED CONTROL DEVICE.
7.Be sure fan is on a stable surface when operating, to avoid chance of it overturning.
8.DO NOT use fan in a window. Rain may create an electrical hazard.
9.Completely reassemble fan, according to instructions before reconnect- ing to power supply.
MAINTENANCE
WARNING: ALWAYS UNPLUG THE CORD BEFORE SERVICING.
CLEANING: Use a soft cloth and a mild soap solution such as liquid dish washing detergent.
CAUTION: Do not use gasoline, benzine, thinner, harsh cleaners, etc. which will damage the fan.
Dry all parts with a soft cloth completely before reconnecting to power supply.
STORAGE: When not in use, keep unit in a clean dry place.
MOTOR IS PERMANENTLY LUBRICATED.
Rev. F 9/00 | 2084020A |
4
Rev. F 9/00
1
2084020A