REMOTE CONTROL

Inserting batteries

Detach the battery cover on the rear of the remote control and insert two R6 (size AA) batteries.

When to replace the batteries

The maximum operational distance between the remote control and the sensor on the main unit should be approximately 5 meters (16 feet). When this distance decreases, replace the batteries with new ones.

To use SHIFT on the remote control

Buttons 1 have two different functions. One of these functions is indicated on the button, and the other on the plate above the button.

To use the function on the button, simply press the button.

To use the function on the plate above the button, press the button while pressing SHIFT.

To use FUNCTION on the remote control

FUNCTION substitutes for the function buttons (TAPE DECK 1/2, TUNER BAND, VIDEO/AUX, CD) on the main unit.

Each time FUNCTION is pressed, the next function is selected cyclically. When tapes are inserted in both decks, each deck is selected with FUNCTION.

4” and “5” of DISC DIRECT PLAY on the remote control cannot be used on this system.

If the remote control is not going to be used for an extended period of time, remove the batteries to prevent possible electrolyte leakage.

The remote control may not operate correctly when:

-The line of sight between the remote control and the remote sensor inside the display window is exposed to intense light, such as direct sunlight

-Other remote controls are used nearby (those of a television, etc.)

SETTING THE CLOCK

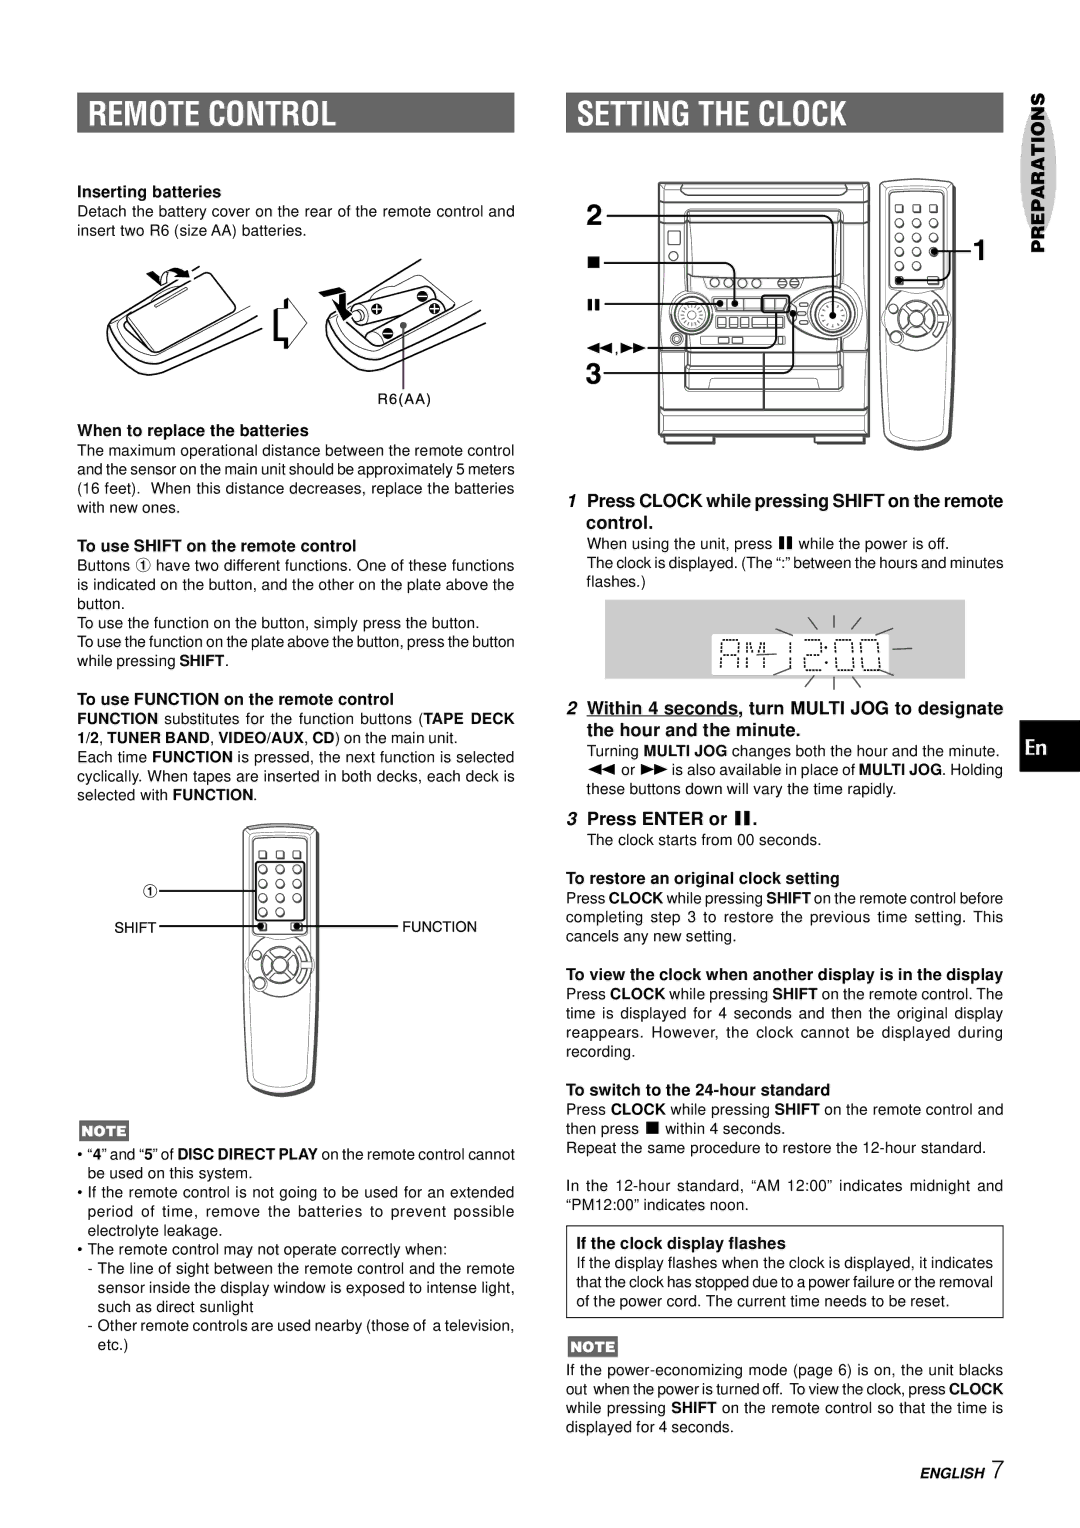
1Press CLOCK while pressing SHIFT on the remote

control.

When using the unit, press a while the power is off.

The clock is displayed. (The “:” between the hours and minutes flashes.)

2Within 4 seconds, turn MULTI JOG to designate

the hour and the minute.

Turning MULTI JOG changes both the hour and the minute. for gis also available in place of MULTI JOG. Holding these buttons down will vary the time rapidly.

3Press ENTER or a.

The clock starts from 00 seconds.

To restore an original clock setting

Press CLOCK while pressing SHIFT on the remote control before completing step 3 to restore the previous time setting. This cancels any new setting.

To view the clock when another display is in the display

Press CLOCK while pressing SHIFT on the remote control. The time is displayed for 4 seconds and then the original display reappears. However, the clock cannot be displayed during recording.

To switch to the 24-hour standard

Press CLOCK while pressing SHIFT on the remote control and then press s within 4 seconds.

Repeat the same procedure to restore the 12-hour standard.

In the 12-hour standard, “AM 12:00” indicates midnight and “PM12:00” indicates noon.

If the clock display flashes

If the display flashes when the clock is displayed, it indicates that the clock has stopped due to a power failure or the removal of the power cord. The current time needs to be reset.

If the power-economizing mode (page 6) is on, the unit blacks out when the power is turned off. To view the clock, press CLOCK while pressing SHIFT on the remote control so that the time is displayed for 4 seconds.

PREPARATIONS

En

ENGLISH 7

Page 7
Image 7
Aiwa NSX-AJ22 Remote Control, Setting the Clock, Press Clock while pressing Shift on the remote Control, Press Enter or a

NSX-AJ22 specifications

The Aiwa NSX-AJ22 is a mini stereo system that represents a blend of classic design and advanced audio technologies. Compact yet powerful, it has garnered attention for its robust sound performance, making it a popular choice among music enthusiasts who value both quality and space efficiency.

One of the standout features of the NSX-AJ22 is its dual cassette deck, which provides the ability to play and record tapes, a nostalgic element that appeals to those who cherish analog sound. This feature is complemented by a high-speed dubbing function, allowing users to create copies of their favorite tapes easily. The deck supports both normal and metal tapes, ensuring versatility in playback quality.

The system also includes a CD player that supports CD-R and CD-RW discs, ensuring compatibility with a range of media formats. Its digital audio processing technology enhances sound clarity and detail, offering an immersive listening experience. The player comes with various playback options, including random and repeat modes, which add to the overall convenience of use.

In terms of audio output, the NSX-AJ22 boasts a powerful amplifier, capable of delivering impressive sound across a wide frequency range. The inclusion of dual 3-way speakers further enriches the audio experience with deep bass and clear highs. Additionally, the adjustable equalizer allows users to tailor the sound profile to their liking, making it suitable for different music genres.

The design of the Aiwa NSX-AJ22 is both stylish and functional. Its sleek dimensions make it an ideal fit for smaller spaces, while the intuitive controls provide ease of use. The system also comes equipped with a remote control, giving users the convenience of adjusting settings from a distance.

Connectivity options are also a highlight, with inputs for external devices like smartphones and MP3 players, allowing users to expand their listening options beyond traditional media. The headphone jack further ensures private listening experiences.

Overall, the Aiwa NSX-AJ22 captures the essence of a classic stereo system with modern enhancements, making it a versatile and enjoyable audio solution for both nostalgic listeners and contemporary music lovers alike. Its combination of powerful performance, user-friendly features, and elegant design ensures it remains a favored choice in the realm of mini stereo systems.