WALLMOUNTING THE PHONE
Your telephone may also be mounted on the wall (wall plate not included).
NOTE: To prevent the handset from falling out of the cradle while the phone is hanging on the wall, you must reverse the handset hook (located on the base).
1. Push the handset hook up and out with your thumb, turn it over, and replace it in the slot on the base.
2. Feed the line cord through the groove and wrap the cord around the track on the bottom of the base.
3.Feed the line cord through the groove on the opposite side of the track, and plug the end into the modular telephone jack.
4.Slip the mounting holes (on the bottom of the base) over the wall
plate posts and firmly slide the unit down into place.
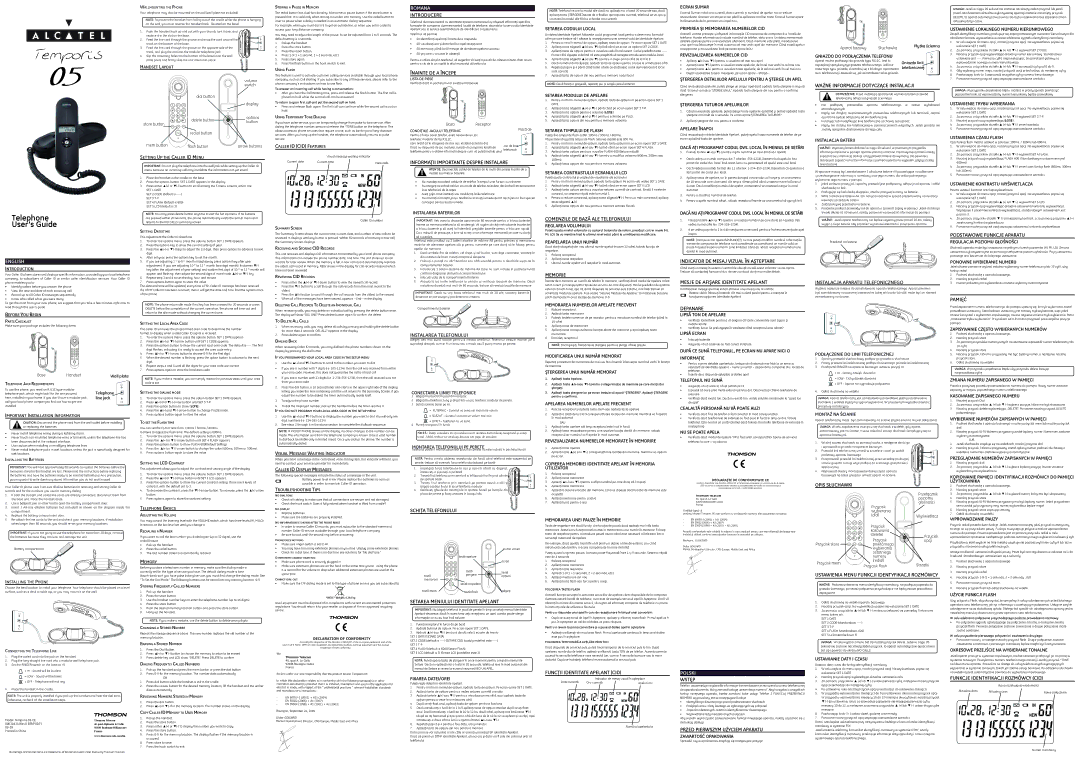
HANDSET LAYOUT
volume |
switch |
STORING A PAUSE IN MEMORY
The redial button has dual functionality. It becomes a pause button if the store button is pressed first. It is valid only when storing a number into memory. Use the redial button to insert a pause when a delay is needed in an automatic dialing sequence.
For example, when you must dial a 9 to get an outside line, or when you enter codes to access your long distance company.
You may need to adjust the length of the pause. It can be adjusted from 1 to 9 seconds. The default setting is 4 seconds.
1.Pickup the handset.
2.Press the store button.
3.Press the redial button.
4.Press
5.Press store again.
6.Press the flash button or the hook switch to exit.
USING FLASH
This feature is used to activate customer calling services available through your local phone company, such as Call Waiting. If you subscribe to any of these services, please refer to the phone company’s instructions on how to use flash.
To answer an incoming call while having a conversation:
Romana
INTRODUCERE
Telefonul dumneavoastră cu identitate apelant memorează şi afişează informaţii specifice, furnizate de compania dumneavoastră locală de telefonie, abonaţilor la serviciului Identitate Apelant sau la servicii asemănătoare de identificare a apelantului.
Telefonul vă permite:
•Să identificaţi apelanţii înainte de a răspunde.
•Să vizualizaţi ora şi data fiecărui apel recepţionat.
•Să memoraţi până la 60 mesaje de identitate apelant succesiv.
•Să ştiţi cine
Pentru a utiliza din plin telefonul, vă sugerăm să luaţi o pauză de câteva minute chiar acum pentru a citi de la un capăt la altul manualul utilizatorului.
ÎNAINTE DE A ÎNCEPE
LISTA DE PIESE
Verificaţi dacă în pachetul livrat există următoarele:
NOTĂ: Telefonul revine la modul idle dacă nu apăsaţi nici o tastă 20 secunde sau, dacă apăsaţi tasta ŞTERGERE înainte de a finaliza operaţiunea curentă, telefonul se va opri şi va reveni la modul idle fără a schimba ora curentă.
SETAREA CODULUI LOCAL
Unitatea Identitate Apelant foloseşte codul programat local pentru a determina formatul cifrei pe care trebuie
1.Pentru a intra în meniul de opţiuni, apăsaţi tasta de opţiuni. Pe ecran apare SET 1 DATE.
2.Apăsaţi tasta săgeată ▲(+) sau
3.Apăsaţi tasta de opţiuni pentru a vizualiza codul local curent. Codul predefinit este
4.Apăsaţi tasta săgeată ▲(+) sau
5.Dacă numărul dorit clipeşte, apăsaţi tasta de opţiuni pentru a trece la următoarea cifră.
6.Repetaţi paşii 4 şi 5 până când toate cifrele ce alcătuiesc codul dumneavoastră local sunt corecte.
7.Apăsaţi tasta de opţiuni din nou pentru a memora codul local.
NOTĂ: Dacă faceţi o greşeală, repetaţi pur şi simplu pasul anterior.
ECRAN SUMAR
Ecranul Sumar indică ora curentă, data curentă, şi numărul de apeluri noi ce trebuie revizualizate. Acestea vor sta pe ecran până la apăsarea oricărei taste. Ecranul Sumar apare în 60 secunde de la primirea unui apel nou,.
PRIMIREA ŞI MEMORAREA NUMERELOR CID
Această unitate primeşte şi afişează informaţiile CID transmise de compania dvs. locală de telefonie. Aceste informaţii pot include numărul de telefon, data şi ora. Unitatea memorează detaliile apelului pentru o revizualizare ulterioară. Dacă memoria este plină, introducerea unui apel nou înlocuieşte în mod automat cel mai vechi apel din memorie. Când există apeluri
recepţionate şi nevizualizate încă pe ecran apare NOU.
REVIZUALIZAREA NUMERELOR CID
•Apăsaţi ▲(+) sau
•Apăsaţi tasta
•Apăsaţi tasta ▲(+) pentru a vizualiza toate apelurile, de la cel mai vechi la cel mai nou.
•După vizualizarea tuturor mesajelor, pe ecran apare
ŞTERGEREA DETALIILOR APELULUI PENTRU A ŞTERGE UN APEL
Când revizualizaţi apelurile, puteţi şterge un singur apel dacă apăsaţi tasta ştergere o singură dată. Ecranul va indica “ŞTERGE UNUL”. Apăsaţi tasta ştergere din nou pentru a confirma
Aparat bazowy | Słuchawka | Płytka ścienna |
|
GNIAZDO DO PODŁĄCZENIA TELEFONU |
| |
Aparat można podłączyć do gniazda typu RJ11C. Jest to | Gniazdo linii | |
najczęściej spotykany typ gniazda telefonicznego. Jeśli nie | ||
telefonicznej | ||
masz tego typu gniazda, skontaktuj się z lokalnym operatorem | ||
sieci telefonicznej i dowiedz się, jak zainstalować takie gniazdo. |
|
WAŻNE INFORMACJE DOTYCZĄCE INSTALACJI
UWAGA: Jeżeli w ciągu 20 sekund nie zostanie naciśnięty żaden przycisk lub jeżeli przed zakończeniem aktualnie wykonywanej operacji zostanie naciśnięty przycisk DELETE, to aparat automatycznie powróci do trybu oczekiwania bez zapisania zmian aktualnej daty i czasu.
USTAWIENIE LOKALNEGO NUMERU KIERUNKOWEGO
Zespół identyfikacji rozmówcy posługuje się zaprogramowanym numerem kierunkowym dla określenia formatu wyświetlania w czasie odebrania sygnału identyfikacji rozmówcy.
1.W celu wejścia do menu opcji, naciśnij przycisk opcji. Na wyświetlaczu pojawi się wskazanie SET 1 DATE.
2.Za pomocą przycisków strzałki ▲ (+) lub ▼
3.Naciśnij przycisk opcji wyświetlając aktualny numer kierunkowy. Standardowo ustawione jest
4.Za pomocą przycisków strzałki ▲ (+) lub ▼
5.Gdy wybrany numer miga, naciśnij przycisk opcji przechodząc do następnej cyfry.
6.Powtarzając kroki 4 i 5 wprowadź wszystkie cyfry numeru kierunkowego.
7.Ponownie naciśnij przycisk opcji zapisując wprowadzone wartości.
UWAGA: W przypadku popełnienia błędu, możesz w prosty sposób powtórzyć
Telephone
User’s Guide
ENGLISH
INTRODUCTION
Your Caller ID phone stores and displays specific information, provided by your local telephone company, to subscribers of Caller ID or similar caller identification services. Your Caller ID phone enables you to:
•Identify callers before you answer the phone.
•View the time and date of each incoming call.
•Record up to 60 Caller ID messages sequentially.
•Know who called while you were away.
To get the most from your new phone, we suggest that you take a few minutes right now to read through this user’s guide.
BEFORE YOU BEGIN
PARTS CHECKLIST
Make sure your package includes the following items:
| dial button |
| |
|
| display | |
| delete button | options | |
store button | button | ||
| |||
|
| ||
| redial button |
| |
mem button | flash button | arrow buttons |
SETTING UP THE CALLER ID MENU
IMPORTANT: Do not plug the telephone into the wall jack while setting up the Caller ID menu because an incoming call may invalidate the information not yet saved.
1.Place the handset in the cradle on the base.
2.Press the options button. SET 1 DATE appears in the display.
3.Press either ▲(+) or
SET 1 DATE
SET 2 CODE (default is
SET 4 FLASH (default is 600) SET 5 LCD (default is 3)
NOTE: You may press delete button anytime to exit the Set Up menu. If no buttons are pressed within 20 seconds, the phone automatically exists the Set Up menu and returns to the NO CALLS summary screen.
SETTING DATE/TIME
This adjustment the Caller ID date/time.
1.To enter the options menu, press the options button. SET 1 DATE appears.
2.Press the options key to show the current setting of year.
3.Press the ▲(+) or
4.After set year, press the options key to set the month.
5.If you are adjusting 1 st to 9 th month straightaway press options key after year adjustment. If you are adjusting 10 th to 12 th month (two digit month), first press
6.Repeat step 3 and 4 to set the day, hour and minute.
7.Press options button again to store the value.
The date and time will be updated, every time a FSK Caller ID message has been received
If a DTMF Caller ID has been received, then it will get the date and time fromthe system clock of the phone.
NOTE: The phone return idle mode if no key has been pressed for 20 seconds or press DELETE before the completion of the current operation, the phone will time out and return to the idle mode without changing the current time.
SETTING THE LOCAL AREA CODE
The Caller ID unit uses the programmed area code to determine the number format to display when a valid Caller ID signal is received.
1. | To enter the options menu, press the options button. SET 1 DATE appears. |
2. | Press the ▲(+) or |
3. | Press the options button to show the current local area code. The default |
| digit flashes, indicating it is ready to accept the area code entry. |
4. | Press ▲(+) or |
• After you hear the Call Waiting tone, press and release the flash button. The first call is |
placed on hold while the second call can be answered. |
To return to your first call and put the second call on hold:
•Press and release flash again. The first call can continue while the second call is put on hold.
USING TEMPORARY TONE DIALING
If you have pulse service, you can temporarily change from pulse to tone service. After dialing the telephone number, press and release the *TONE button on the telephone. This allows access to phone services that require a tone, such as banking and
CALLER ID (CID) FEATURES
| Visual message waiting indicator |
|
Current date | Current time | New calls |
|
|
Caller ID number
SUMMARY SCREEN
The Summary Screen shows the current time, current date, and number of new calls to be reviewed. It displays until any button is pressed. Within 60 seconds of receiving a new call, the Summary Screen displays.
RECEIVING AND STORING CID RECORDS
This unit receives and displays CID information transmitted by your local phone company. This information can include the phone number, date, and time. The unit stores up to call records for later review. When the memory is full, a new call record automatically replaces the oldest call record in memory. NEW shows in the display for call records received which have not been reviewed.
REVIEWING CID RECORDS
•Press either the ▲(+) or
•Press the
•Press the ▲(+) button to scroll through the call records from the oldest to the newest.
•When all of the messages have been viewed, appears
DELETING CALL RECORDS TO DELETE AN INDIVIDUAL CALL
When reviewing calls, you may delete an individual call by pressing the delete button once. The display will show “DEL ONE” Press delete button again fo confirm the delete.
TO DELETE ALL CALLS
1.When reviewing calls, you may delete all calls by pressing and holding the delete button for more than 4 seconds. DEL ALL? appears in the display.
2.Press delete again to confirm.
DIALING BACK
When reviewing Caller ID records, you may dialback the phone numbers shown on the display by pressing the dial button.
Baza 


 Receptor
CONDIŢIILE JACULUI TELEFONIC |
| Placă de |
|
| |
Pentru a folosi acest telefon, aveţi nevoie de un jac |
|
|
telefonic modular de tip RJ11C, |
|
|
care arată ca în imaginea de mai sus, instalat acasă la dvs. | Jac de linie |
|
Dacă nu dispuneţi de jac modular, |
| |
|
| |
telefonie pentru a obţine informaţii despre cum vă puteţi instala unul. telefonică |
| |
INFORMAŢII IMPORTANTE DESPRE INSTALARE
ATENŢIE: Deconectaţi cablul de telefon de la mufa din perete înainte de a instala sau înlocui bateriile.
•Nu instalaţi niciodată cablurile de telefon în timpul unei furtuni cu trăsnete.
•Nu atingeţi niciodată cabluri sau mufe de telefon neizolate, decât dacă aţi deconectat linia telefonică de la reţea.
•Aveţi grijă când instalaţi sau modificaţi liniile telefonice.
•Nu montaţi niciodată jacuri telefonice în locaţii umede decât dacă jacul a fost special conceput pentru locaţii umede.
INSTALAREA BATERIILOR
IMPORTANT: Veţi avea la dispoziţie aproximativ 60 secunde pentru a înlocui bateriile înainte ca memoria telefonului să se şteargă. Vă rugăm să citiţi instrucţiunile înainte de a înlocui bateriile şi să aveţi la îndemână pregătite bateriile pentru o înlocuire rapidă. Ca o măsură de precauţie, e bine să scrieţi orice informaţie memorată pe care nu doriţi să o pierdeţi.
Telefonul este prevăzut cu 3 baterii alcaline de mărime AA pentru primirea şi memorarea intrărilor de identitate apelant cât şi pentru numerele pe care doriţi să le folosiţi pentru apelări din memorie.
1.Dacă ambele fire de telefon, cel drept şi cel buclat, sunt deja conectate,
2. Folosiţi o peniţă cu vârf bombat sau altă unealtă pentru a deschide uşiţa de la compartimentul bateriei.
3.Introduceţi 3 baterii alcaline de mărime AA (care nu sunt incluse în pachetul livrat) conform diagramei dinăuntrul compartimentului.
4. Înlocuiţi uşiţa de la compartimentul bateriei.
5. Ataşaţi la loc liniile telefonice la unitate şi verificaţi locaţiile de memorie. Dacă instalarea durează mai mult de 60 secunde, trebuie să resetaţi locaţiile de memorie.
IMPORTANT: Dacă nu veţi folosi telefonul mai mult de 30 zile, scoateţi bateriile deoarece se pot scurge şi pot deteriora unitatea.
Compartimentul bateriei
INSTALAREA TELEFONULUI
Alegeţi cea mai bună locaţie pentru a instala telefonul. Telefonul trebuie montat pe o suprafaţă dreaptă, cum ar fi un birou sau o masă, sau îl puteţi monta pe perete.
SETAREA MODULUI DE APELARE
1.Pentru a intra în meniul de opţiuni, apăsaţi tasta de opţiuni iar pe ecran apare SET 1 DATE.
2.Apăsaţi tasta săgeată ▲(+) şi
3.Apăsaţi tasta opţiuni pentru a vizualiza (![]() )
)
4.Apăsaţi tasta săgeată ▲(+) şi
5.Apăsaţi tasta opţiuni din nou pentru a memora valoarea.
SETAREA TIMPULUI DE FLASH
Puteţi fixa timpul de flash astfel: 100ms / 300ms / 600ms .
Vă permite să ajustaţi timpul de flash. Setarea iniţială este 600 ms.
1.Pentru a intra în meniul de opţiuni, apăsaţi tasta opţiuni iar pe ecran apare SET 1 DATE.
2.Apăsaţi tasta săgeată ▲(+) sau
3.Apăsaţi tasta opţiuni pentru a vizualiza FLASH 600 (Setare iniţială).
4.Apăsaţi tasta săgeată ▲(+) sau
5.Apăsaţi tasta opţiuni din nou pentru a memora valoarea.
SETAREA CONTRASTULUI ECRANULUI LCD
Puteţi ajusta contrastul şi unghiul de vizualizare ale ecranului.
1.Pentru a intra în meniul opţiuni, apăsaţi tasta opţiuni. Pe ecran veţi vedea SET 1 DATE.
2.Apăsaţi tasta săgeată ▲(+) sau
3.Apăsaţi tasta opţiuni pentru a vizualiza setarea curentă de contrast. Există 5 nivele de contrast, iar setarea iniţială este la nivelul 3.
4.Pentru a reduce contrastul, apăsaţi tasta
5.Apăsaţi tasta opţiuni din nou pentru a memora setarea făcută.
COMENZILE DE BAZĂ ALE TELEFONULUI
REGLAREA VOLUMULUI
Puteţi ajusta nivelul volumului cu ajutorul butonului de volum, prevăzut cu trei nivele (HI, MI, LO). Se va menţine însă la ultimul nivel setat până la următoarea modificare.
REAPELAREA UNUI NUMĂR
Dacă doriţi să apelaţi din nou ultimul număr apelat (maxim 32 cifre), folosiţi funcţia de reapelare.
1.Ridicaţi receptorul.
2.Apăsaţi tasta reapelare.
3.Ultimul număr apelat va fi reapelat în mod automat.
MEMORIE
Înainte de a memora un număr de telefon în memorie, verificaţi dacă modul de apelare a fost setat corect şi corespunzător tipului de serviciu de care dispuneţi. Modul predefinit de apelare este ton
MEMORAREA NUMERELOR APELATE FRECVENT
1.Ridicaţi receptorul.
2.Apăsaţi tasta memorare.
3.Folosiţi tastele numerice de pe receptor pentru a introduce numărul de telefon (până la 16 cifre).
4.Apăsaţi tasta de memorare.
5.Apăsaţi tasta corespunzătoare locaţiei dorite din memorie şi apoi apăsaţi tasta memorare.
6.Închideţi receptorul.
NOTĂ: Dacă greşiţi, folosiţi tasta ştergere pentru a şterge cifrele greşite.
ştergerea.
ŞTERGEREA TUTUROR APELURILOR
1.Când revizualizaţi apelurile, puteţi şterge toate apelurile apăsând şi ţinând apăsată tasta ştergere mai mult de 4 secunde. Pe ecran apare ŞTERGEREA TUTUROR?.
2.Apăsaţi ştergere din nou pentru a confirma.
APELARE ÎNAPOI
Când revizualizaţi intrările Identitate Apelant, puteţi apela înapoi numerele de telefon de pe ecran apăsând tasta de apelare.
DACĂ AŢI PROGRAMAT CODUL DVS. LOCAL ÎN MENIUL DE SETĂRI
1.Folosiţi tastele ▲(+) şi
•Dacă vedeţi un număr compus din 7 cifre (ex.
•Dacă vedeţi un număr format din 11 cifre (ex.
2.Apăsaţi tasta de apelare, iar în partea dreaptă a ecranului va începe şi un cronometru de 10 secunde care vă anunţă cât timp a rămas până când unitatea revine la Ecranul Sumar. Dacă modificaţi numărul de apelat, cronometrul se resetează singur în mod automat.
3.Pentru a modifica numărul de telefon.
4.Pentru a apela numărul afişat, ridicaţi receptorul înainte ca cronometrul să ajungă la 0.
DACĂ NU AŢI PROGRAMAT CODUL DVS. LOCAL ÎN MENIUL DE SETĂRI
1.Folosiţi tastele ▲(+) şi
2.A se vedea paşii de la 2 la 4 din secţiunea anterioară pentru a încheia secvenţa de apel înapoi.
NOTĂ: Dacă pe ecran apare RĂSPUNDEŢI, nu mai puteţi modifica numărul. Informaţiile trimise de compania de telefonie sunt considerate ca constituind un număr valid ce poate fi apelat înapoi (numai în zone limitate). Când aţi ridicat receptorul numărul este
apelat în mod automat.
INDICATOR DE MESAJ VIZUAL ÎN AŞTEPTARE
Când aveţi un mesaj în sistemul central de căsuţă vocală acest indicator va sta aprins. Trebuie să contactaţi furnizorul dvs. de servicii dacă doriţi mai multe detalii.
MESJE DE AFIŞARE IDENTITATE APELANT
Următoarele mesaje speciale indică statusul unui mesaj sau al unităţii:
Baterie slabă. Înlocuiţi bateriile cât mai curând posibil pentru a menţine în funcţiunea opţiunea Identitate Apelant.
DEPANARE
LIPSĂ TON DE APELARE
•Verificaţi toate firele pentru a vă asigura că toate conexiunile sunt sigure şi nedeteriorate.
•Verificaţi furca: Se prelungeşte în totalitate când receptorul este ridicat?
LIPSĂ ECRAN
•Înlocuiţi bateriile.
•
DUPĂ CE SUNĂ TELEFONUL, PE ECRAN NU APARE NICI O
OSTRZEŻENIE: Przed instalacją aparatu lub wymianą baterii przewód telefoniczny odłącz od gniazda ściennego.
•Nie podłączaj przewodów aparatu telefonicznego w czasie wyładowań atmosferycznych.
•Nigdy nie dotykaj niezaizolowanych przewodów telefonicznych lub terminali, dopóki aparat nie będzie odłączony od linii telefonicznej.
•Instalując lub modyfikując linię telefoniczną zachowaj ostrożność.
•Nigdy nie instaluj linii telefonicznej w pomieszczeniach wilgotnych. Jeżeli gniazda nie zostały specjalnie dostosowane do tego celu.
INSTALACJA BATERII
WAŻNE: Wymiany baterii dokonać w ciągu 60 sekund, w przeciwnym przypadku informacje zapisane w pamięci aparatu zostaną utracone. Przed wymianą baterii należy zapoznać się z instrukcją obsługi i przygotować baterie do wymiany. Dla pewności, dobrze jest zapisać na kartce informacje z pamięci aparatu na wypadek, gdyby zostały one utracone.
W aparacie muszą być zainstalowane 3 alkaliczne baterie AA pozwalające na odbieranie i przechowywanie informacji o rozmówcy oraz jego numeru dla celów późniejszego wybierania tego numeru z pamięci.
1.jeżeli zarówno prosty jak i spiralny przewód jest podłączony, odłącz je od aparatu i odłóż słuchawkę na bok.
2.Posługując się końcówką długopisu, otwórz pokrywę komory na baterie .
3.Włóż 3 alkaliczne baterie AA. (Do nabycia osobno) w sposób prezentowany na ilustracji wewnątrz przedziału baterii.
4.Załóż pokrywę przedziału na baterie.
5.Ponownie podłącz przewody linii do aparatu i sprawdź zapisy w pamięci. Jeżeli instalacja trwała dłużej niż 60 sekund, należy ponownie wprowadzić informacje do pamięci.
WAŻNE: Jeżeli aparat telefoniczny nie będzie używany przez ponad 30 dni, należy wyjąć z niego baterie aby zapobiec wyciekowi elektrolitu i zniszczeniu aparatu.
Przedział na baterie
INSTALACJA APARATU TELEFONICZNEGO
Wybierz najlepsze miejsce do zainstalowania aparatu telefonicznego. Aparat powinien być zainstalowany na poziomej powierzchni takiej jak biurko lub stół, może być on również zamontowany na ścianie.
poprzednie kroki, aż wprowadzony numer kierunkowy będzie prawidłowy.
USTAWIENIE TRYBU WYBIERANIA
1.W celu wejścia do menu opcji, naciśnij przycisk opcji. Na wyświetlaczu pojawi się wskazanie SET 1 DATE.
2.Za pomocą przycisków strzałki ▲ (+) lub ▼
3.Naciśnij przycisk opcji wyświetlając (![]() ).
).
4.Za pomocą przycisków strzałki ▲ (+) lub ▼
5.Ponownie naciśnij przycisk opcji zapisując wprowadzone wartości.
USTAWIENIA CZASU FLASH
Czas funkcji flash można ustawić w zakresie: 100ms. / 300ms lub 600ms.
1.W celu wejścia do menu opcji, naciśnij przycisk opcji. Na wyświetlaczu pojawi się wskazanie SET 1 DATE.
2.Za pomocą przycisków strzałki ▲ (+) lub ▼
3.Naciśnij przycisk opcji wyświetlając FLASH 600. (Standardowym ustawieniem jest 600ms).
4.Za pomocą przycisków strzałki ▲ (+) lub ▼
5.Ponownie naciśnij przycisk opcji zapisując wprowadzone wartości.
USTAWIENIE KONTRASTU WYŚWIETLACZA
Można ustawić kontrast oraz kąt wyświetlacza.
1.W celu wejścia do menu opcji, naciśnij przycisk opcji. Na wyświetlaczu pojawi się wskazanie SET 1 DATE.
2.Za pomocą przycisków strzałki ▲ (+) lub ▼
3.Naciśnij przycisk opcji wyświetlając aktualne ustawienia kontrastu wyświetlacza. Występuje 5 poziomów kontrastu wyświetlacza, standardowym ustawieniem jest poziom 3.
4.Za pomocą przycisku strzałki ▼
5.Ponownie naciśnij przycisk opcji zapisując ustawienia kontrastu wyświetlacza.
PODSTAWOWE FUNKCJE APARATU
REGULACJA POZIOMU GŁOŚNOŚCI
Głośność aparatu może być ustawiona na jednym z trzech poziomów (HI, MI, LO). Zmiana ustawienia wykonywana jest za pomocą przełączenia poziomu głośności. Po jej ustawieniu pozostaje ona bez zmian do kolejnego ustawienia.
PONOWNE WYBIERANIE NUMERU
Jeżeli chcesz ponownie wybrać ostatnio wybierany numer telefoniczny (do 32 cyfr), użyj funkcji redial.
1.Podnieś słuchawkę z aparatu bazowego.
2.Naciśnij przycisk redial.
3.Numer pokazany na wyświetlaczu zostanie wybrany automatycznie.
PAMIĘĆ
Przed zapisaniem numeru telefonicznego do pamięci upewnij się, że tryb wybierania został prawidłowo ustawiony. Standardowo ustawiony jest tonowy tryb wybierania, więc jeżeli chcesz korzystać z wybierania impulsowego, musisz najpierw zmienić tryb wybierania. Patrz „Ustawienie trybu wybierania”. Przyciskom od
ZAPISYWANIE CZĘSTO WYBIERANYCH NUMERÓW
1. | Podnieś słuchawkę z aparatu bazowego. |
2. | Naciśnij przycisk store. |
3. | Za pomocą przycisków numerycznych na słuchawce wprowadź numer telefoniczny (do |
| 16 cyfr). |
4. | Naciśnij przycisk store. |
Base | Handset | Wall plate |
TELEPHONE JACK REQUIREMENTS |
|
|
To use this phone, you need an RJ11C type modular | Telephone | |
telephone jack, which might look like the one pictured | ||
here, installed in your home. If you don’t have a modular jack, | line jack | |
call your local phone company to find out how to get one |
| |
installed.
IMPORTANT INSTALLATION INFORMATION
CAUTION: Disconnect the phone cord from the wall outlet before installing or replacing the batteries.
•Never install telephone wiring during a lightning storm.
•Never touch
•Use caution when installing or modifying telephone lines.
•Never install telephone jacks in wet locations unless the jack is specifically designed for wet locations.
INSTALLING THE BATTERIES
IMPORTANT: You will have approximately 60 seconds to replace the batteries before the memories stored in the handset are lost. Please read the instructions before replacing the batteries and have the batteries ready to be inserted beforehand. As a precaution, you may want to write down any stored information you do not want erased.
Your Caller ID phone uses 3
1.If both the straight and coiled line cords are already connected, disconnect them from the base unit. Place the handset aside.
2.Use a ballpoint pen or other tool to open the battery compartment door.
3.Insert 3
4.Replace the battery compartment door.
5.
IMPORTANT: If you’re not going to use the telephone for more than 30 days, remove the batteries because they can leak and damage the unit.
Battery compartment
INSTALLING THE PHONE
Choose the best location to install your telephone. Your telephone should be placed on a level surface, such as a desk or table top, or you may mount it on the wall.
CONNECTING THE TELEPHONE LINE
1.Plug the coiled cord into the jack on the handset.
2.Plug the long straight line cord into a modular wall telephone jack.
3.Set the RINGER switch on the base to HI.
=HI - Sound will be loudest.
![]() = LOW - Sound will be lower.
= LOW - Sound will be lower.
![]() = OFF - Telephone will not ring.
= OFF - Telephone will not ring.
4.Place the handset in the cradle.
NOTE: The unit is properly installed if you pick up the handset and hear the dial tone. Otherwise, recheck all the installation steps.
Model Temporis | Thomson Telecom |
00030414 (Rev.0 E/R/P/G/F) | 46 quai Alphonse le Gallo |
| 92100 Boulogne Billancourt |
Printed in China | France |
|
Alcatel logo and Alcatel name are trademarks of Alcatel and used under license by Thomson Telecom.
5. | When the desired number is flashing, press the option button to advance to the next |
| digit. |
6. | Repeat steps 4 and 5 until all the digits for your area code are correct. |
7. | Press options again to store the local area code. |
NOTE: If you make a mistake, you can simply repeat the previous steps until your area code is set.
SETTING THE DIALING MODE
1.To enter the options menu, press the option button SET 1 DATE appears.
2.Press ▲(+) and
3.Press the option button to show (![]() )
)
4.Press the ▲(+) and
5.Press options button again to store the value.
TO SET THE FLASH TIME
You can set the FLASH time from: 100ms / 300ms / 600ms .
It allows to adjust the flash time. The default setting is 600ms.
1.To enter the options menu, press the options button, SET 1 DATE appears.
2.Press the ▲(+) or
3.Press the options button to show FLASH 600(Default Selfing).
4.Press the ▲(+) or
5.Press options button again to store the value.
SETTING THE LCD CONTRAST
This adjustment allows you to adjust the contrast and viewing angle of the display.
1.To enter the options menu, press the options button. SET 1 DATE appears.
2.Press the ▲(+) or
3.Press the options button to show the current contrast setting. There are 5 levels of contrast, with the default set to 3.
4.To decrease the contrast, press the
5.Press options again to store the contrast setting.
TELEPHONE BASICS
ADJUSTING THE VOLUME
You may control the listening level with the VOLUME switch, which has three levels (HI, MI,LO). It remains at the last level set until you change it.
REDIALING A NUMBER
If you want to call the last number you dialed again (up to 32 digits), use the redial feature.
1.Pick up the handset.
2.Press the redial button.
3.The last number called is automatically redialed.
MEMORY
Before you store a telephone number in memory, make sure the dialing mode is correctly set for the type of service you have. The default dialing mode is tone
STORING FREQUENTLY CALLED NUMBERS
1.Pick up the handset.
2.Press the store button.
3.Use the handset number keys to enter the telephone number (up to 16 digits).
4.Press the store button.
5.Push the desired memory location button and press the store button.
6.Hang up the handset.
NOTE: If you make a mistake, use the delete button to delete wrong digits.
CHANGING A STORED NUMBER
Repeat the storage sequence above. The new number replaces the old number at the memory location.
ERASING A STORED NUMBER
1.Press the Dial Button.
2.Press ▲(+) or
3.Press delete key and LCD show “DELETE”. Press DELETE to confirm.
DIALING FREQUENTLY CALLED NUMBERS
1.Pick up the handset and press the mem button or press the dial button.
2.Press
OR
1.Press dial button while the handset is still in the cradle.
2.Press the review button for the desired memory location, lift the handset and the umber dials automatically.
REVIEWING NUMBERS STORED IN MEMORY
1.Press the dial button.
2.Press ▲(+) or
COPY CALLER ID MEMORY TO USER MEMORY
1.Pickup the handset.
2.Press the store button.
3.Press either ▲(+) or
4.Press the store button.
5.Press
6.Press store to save.
7.Press the hook switch to exit.
IF YOU PROGRAMMED YOUR LOCAL AREA CODE IN THE SETUP MENU
1.Use the ▲(+) and
•If you see a number with 7 digits (i.e.
•If you see a number with 11 digits (i.e.
2.Press the dial button, a 10 second timer also starts in the upper right side of the display, letting you know the time remaining until the unit returns to the Summary Screen. If you adjust the number to be dialed, the timer automatically resets itself.
3.To adjust the phone number.
4.To dial the displayed number, pick up the handset before the timer reaches 0.
IF YOU DID NOT PROGRAM YOUR LOCAL AREA CODE IN THE SETUP MENU
1.Use the ▲(+) and
2.See steps 2 through 4 in the above section to complete the dialback sequence.
NOTE: IF PICKUP PHONE shows on the display, no other changes to the number can be made. The information sent from the telephone company is known to be a valid number to dial back (available only in limited areas). Once you pickup the phone, the number is automatically dialed.
VISUAL MESSAGE WAITING INDICATOR
When you have a message in the centralized voice mail system, this indicator will be lit. you need to contact your services provider for more details.
CALLER ID DISPLAY MESSAGES
The following special messages indicate the status of a message or the unit:
Battery power level is low. Please replace the batteries as soon as possible in order to maintain Caller ID operation.
TROUBLESHOOTING TIPS
NO DIAL TONE
•Check all cabling to make sure that all connections are secure and not damaged.
•Check the hook switch: Does it fully extend when handset is lifted from cradle?
NO DISPLAY
•Replace batteries.
•Make sure the batteries are properly installed.
NO INFORMATION IS SHOWN AFTER THE PHONE RINGS
•In order to receive Caller ID records, you must subscribe to the standard name and number Caller ID service available through your local telephone company.
•Be sure to wait until the second ring before answering.
PHONE DOES NOT RING
•Make sure ringer switch is set to HI.
•You may have too many extension phones on your line. Unplug some extension phones.
•Check for a dial tone. If there is no dial tone see solutions for “No dial tone.”
OTHER PARTY CANNOT HEAR YOU
•Make sure phone cord is securely plugged in.
• Make sure extension phones are on the hook at the same time you’re using the phone. It is normal for the volume to drop when additional extension phones are used at the same time.
CANNOT DIAL OUT
•Make sure the T/P dialing mode is set to the type of phone service you are subscribed to.
“WEEE” Weight: 0.361 kg
Used equipment must be disposed of in compliance with current environmental protection regulations. You should return it to your reseller or dispose of it in an approved recycling centre.
CONECTAREA LINIEI TELEFONICE
1. Băgaţi firul buclat în jacul din receptor.
2. Băgaţi firul telefonic lung şi drept
3. Setaţi soneria bazei pe HI.
![]() = PUTERNIC – Sunetul va avea cel mai mare volum. = SCĂZUT – Sunetul va avea un volum mai mic.
= PUTERNIC – Sunetul va avea cel mai mare volum. = SCĂZUT – Sunetul va avea un volum mai mic.
=OPRIT – Telefonul nu va suna.
4.Puneţi receptorul în furcă.
NOTĂ: Puteţi considera că aţi instalat corect unitatea dacă ridicaţi receptorul şi auziţi tonul. Altfel, trebuie să verificaţi din nou toţi paşii de instalare.
MONTAREA TELEFONULUI PE PERETE
Telefonul poate fi montat pe perete (placa de perete nu este inclusă în pachetul livrat).
NOTĂ: Pentru a evita căderea receptorului din furcă când telefonul este suspendat pe perete, trebuie să inversaţi furca telefonului (situată pe bază).
1. Împingeţi furca telefonului în sus şi apoi în afară cu degetul,
2. Treceţi firul telefonic prin canelură şi înfăşuraţi firul în jurul căii de pe spatele bazei.
3. Treceţi firul telefonic prin canelură pe partea opusă a căii şi băgaţi capătul firului în jacul telefonic modular.
4. Desfaceţi găurile de montaj (de la spatele bazei) pe locaţiile din placa de perete şi fixaţi unitatea în locaşul său.
SCHIŢA TELEFONULUI
buton volum
| tastă apelare |
| |
|
| ecran | |
| tastă | tastă | |
tastă | ştergere | ||
opţiuni | |||
memorare |
|
| |
| tastă reapelare |
| |
tastă mem | tastă flash | săgeţi | |
|
|
SETAREA MENIULUI IDENTITATE APELANT
IMPORTANT: Nu băgaţi telefonul în jacul de perete în timp ce setaţi meniul Identitate Apelant deoarece, dacă în acest timp veţi recepţiona un apel, acesta poate şterge informaţiile ce nu au fost încă salvate.
1.Puneţi receptorul în furca de pe bază.
2.Apăsaţi butonul de opţiuni. Pe ecran apare SET 1 DATE.
3.Apăsaţi ▲(+) sau
SET 1 DATE (SETARE DATĂ)
SET 2 CODE (default is
SET 4 FLASH (default is 600) (Setare Flash)
SET 5 LCD (default is 3) (Setare LCD (predefinit este 3)
NOTĂ: Puteţi apăsa tasta de ştergere în orice moment pentru a ieşi din meniul de Setare. Dacă nu apăsaţi nici o tastă în 20 secunde, telefonul iese în mod automat din meniul de Setare şi revine la ecranul rezumat NICI UN APEL.
FIXAREA DATEI/OREI
Puteţi regla data/ora identitate apelant.
1.Pentru a intra în meniul de opţiuni, apăsaţi tasta de opţiuni. Pe ecran apare SET 1 DATE.
2.Apăsaţi tasta de opţiuni pentru a vedea setarea curentă a anului.
3.Apăsaţi tastele ▲(+) sau
4.După ce aţi fixat anul, apăsaţi tasta de opţiuni pentru a fixa luna.
5.Dacă introduceţi o lună de la 1 la 9 apăsaţi tasta de opţiuni imediat după ce aţi fixat anul. Dacă introduceţi o lună de la 10 la 12 (cu două cifre), apăsaţi mai întâi tasta
6.Repetaţi paşii 3 şi 4 pentru a fixa data, ora şi minutul.
7.Apăsaţi tasta de opţiuni din nou pentru a memora.
Data şi ora se vor actualiza ori de câte ori primiţi un mesaj FSK Identitate Apelant.
Dacă aţi primit un DTMF Identitate Apelant, atunci ora şi data vor fi cele din sistemul orar al telefonului.
MODIFICAREA UNUI NUMĂR MEMORAT
Repetaţi procedura de memorare de mai sus. Noul număr înlocuieşte numărul vechi în locaţia de memorie.
ŞTERGEREA UNUI NUMĂR MEMORAT
1.Apăsaţi tasta Apelare.
2.Apăsaţi tasta ▲(+) sau
3.Apăsaţi tasta ştergere iar pe ecran trebuie să apară “ŞTERGERE”. Apăsaţi ŞTERGERE pentru a confirma.
APELAREA NUMERELOR APELATE FRECVENT
1.Ridicaţi receptorul şi apăsaţi tasta mem sau apăsaţi tasta apelare.
2.Apăsaţi o tastă de la 0 la 9 corespunzătoare locaţiei din memorie. Numărul va fi apelat în mod automat.
SAU
1.Apăsaţi tasta apelare cât timp receptorul este încă în furcă.
2.Apăsaţi tasta revizualizare pentru a revizualiza locaţia dorită din memorie, ridicaţi receptorul iar numărul va fi apelat în mod automat.
REVIZUALIZAREA NUMERELOR MEMORATE ÎN MEMORIRE
1.Apăsaţi tasta apelare.
2.Apăsaţi tasta ▲(+) sau
COPIEREA MEMORIEI IDENTITATE APELANT ÎN MEMORIA UTILIZATOR
1.Ridicaţi receptorul.
2.Apăsaţi tasta memorare.
3.Apăsaţi ▲(+) sau
4.Apăsaţi tasta memorare.
5.Apăsaţi
6.Apăsaţi memorare pentru a salva.
7.Apăsaţi furca pentru a ieşi.
MEMORAREA UNEI PAUZE ÎN MEMORIE
Tasta de reapelare are două funcţii. Are funcţia de pauză dacă apăsaţi mai întâi tasta memorare. Acest lucru funcţionează numai la memorarea unui număr în memorie. Folosiţi tasta de reapelare pentru a introduce pauză atunci când este necesară o întârziere
De exemplu, dacă apelaţi mai întâi un 9 pentru a obţine o linie de exterior, sau când introduceţi codul pentru a acces compania de la mare distanţă.
Puteţi ajusta lungimea pauzei. Aceasta poate fi ajustată între 1 şi 9 secunde. Setarea iniţială este de 4 secunde.
1.Ridicaţi receptorul.
2.Apăsaţi tasta memorare.
3.Apăsaţi tasta reapelare.
4.Apăsaţi
5.Apăsaţi memorare din nou.
6.Apăsaţi tasta flash sau furca pentru a ieşi.
FOLOSIREA TASTEI FLASH
Această funcţie serveşte la activarea serviciilor de apelare client disponibile de la compania dumneavoastră locală de telefonie, cum este de exemplu serviciul Apel în Aşteptare. Dacă vă abonaţi la oricare din aceste servicii, vă rugăm să informaţi compania de telefonie cu privire la instrucţiunile de utilizare a flashului.
Pentru a răspunde unui apel în curs de recepţionare în timpul unei convorbiri:
•După ce auziţi tonul de Apel în Aşteptare, apăsaţi şi eliberaţi tasta flash. Primul apel va fi pus în aşteptare iar cel
Pentru a reveni la prima convorbire şi a pune al doilea apel în aşteptare:
•Apăsaţi şi eliberaţi din nou tasta flash. Primul apel poate continua în timp ce al doilea este pus în aşteptare.
FOLOSIREA TEMPORARĂ A APELĂRII PRIN TON
Dacă dispuneţi de serviciul puls, puteţi trece temporar de la serviciul puls la ton. După apelarea numărului de telefon, apăsaţi şi eliberaţi tasta TON de pe telefon. Aceasta permite accesul la serviciile telefonice care necesită ton, cum ar fi serviciile bancare sau la mare distanţă. După ce închideţi, telefonul revine automat la serviciul puls.
FUNCŢII IDENTITATE APELANT (CID)
Data curentă | Indicator de mesaj visual în aşteptare | |
Ora curentă | Apeluri noi | |
Numărul apelantului
INFORMAŢIE
•Pentru a primi detaliile apelantului, trebuie să vă abonaţi mai întâi la un serviciu standard de identitate apelant – nume şi număr – disponibil la compania dvs. locală de telefonie.
•Înainte de a răspunde aşteptaţi al doilea apel.
TELEFONUL NU SUNĂ
•
•E posibil să aveţi prea multe extensii pe linia dvs. Deconectaţi câteva telefoane de extensie.
•Verificaţi dacă există ton. Dacă nu există ton, vedeţi soluţiile menţionate la “Lipsă ton de apel”
CEALALTĂ PERSOANĂ NU VĂ POATE AUZI
•Verificaţi dacă firul de telefon a fost conectat în mod corespunzător.
•Verificaţi dacă telefoanele de extensie au fost puse în furcă în timp ce dvs. folosiţi telefonul. Este normal să cadă volumul dacă folosiţi mai multe telefoane de extensie în acelaşi timp.
NU SE POATE APELA
•Verificaţi dacă modul de apelare T/P a fost setat corespunzător tipului de serviciul telefonic la care
POLSKI
WSTĘP
Telefon zapamiętuje i wyświetla informacje transmitowane przez operatora sieci telefonicznej do aparatu abonenta, który zamówił usługę „prezentacja numeru”. Aby korzystać z wszystkich funkcji niniejszego aparatu, trzeba zamówić takie usługi. Telefon Z FUNKCJĄ PREZENTACJI NUMERU wyposażony jest w następujące funkcje:
•Identyfikacja dzwoniącego przed podniesieniem słuchawki.
•Podgląd czasu i daty każdego ze zgłaszających się połączeń.
•Zapis 60 odebranych ostatnio identyfikatorów dzwoniącego.
•Wyświetlanie listy nieodebranych połączeń.
Aby w pełni wykorzystać zaawansowane funkcje niniejszego aparatu, należy zapoznać się z instrukcją obsługi.
PRZED PIERWSZYM UŻYCIEM APARATU
ZAWARTOŚĆ OPAKOWANIA
Sprawdź, czy w opakowaniu znajdują się następujące pozycje:
PODŁĄCZENIE DO LINII TELEFONICZNEJ
1.Spiralny przewód słuchawkowy podłącz go gniazda w słuchawce.
2.Prosty przewód linii telefonicznej podłącz do ściennego gniazda linii telefonicznej.
3.Przełącznik RINGER na aparacie bazowym ustaw w pozycji HI.
=HI - Głośny dźwięk dzwonka.
![]() = LOW - Cichy dźwięk dzwonka.
= LOW - Cichy dźwięk dzwonka.
![]() = OFF - Aparat nie sygnalizuje połączenia.
= OFF - Aparat nie sygnalizuje połączenia.
4.Odłóż słuchawkę na widełki.
UWAGA: Aparat telefoniczny jest zainstalowany prawidłowo jeżeli po podniesieniu słuchawki z widełek słyszymy sygnał wybierania. W przeciwnym wypadku powtórz procedurę instalacyjną.
MONTAŻ NA ŚCIANIE
Aparat telefoniczny może być zamontowany na ścianie (płytka ścienna nie jest dołączona).
UWAGA: W celu zapobieżenia zsunięciu się słuchawki z widełek, gdy aparat zamontowany jest na ścianie, musisz odwrócić zaczep słuchawki (znajdujący się na aparacie bazowym).
1.Wciśnij zaczep słuchawki za pomocą kciuka, a następnie obróć go
i wprowadź w gniazdo na aparacie bazowym.
2. Przewód linii telefonicznej umieść w szczelinie i owiń go wokół podstawy aparatu bazowego.
3. Przeprowadź przewód linii telefonicznej przez szczelinę po drugiej stronie gniazda a drugi wtyk podłącz do ściennego gniazda sieci telefonicznej.
4.Naprowadź otwory montażowe (w dolnej części aparatu
bazowego) na bolce gniazda i umieść aparat na ścianie.
OPIS SŁUCHAWKI
|
| Przełącznik | |
|
| poziomu | |
| Przycisk | głośności | |
|
| ||
| wybierania |
| |
| (dial) | Wyświetlacz | |
| Przycisk |
| |
| kasowania |
| |
| (delete) | Przycisk | |
| Przycisk | ||
Przycisk store | opcji | ||
powtórnego |
| ||
| wybierania |
| |
| ostatniego |
| |
| numeru |
| |
Przycisk mem | (redial) | Strzałki | |
Przycisk flash | |||
|
USTAWIENIA MENU FUNKCJI IDENTYFIKACJI ROZMÓWCY
WAŻNE: Podczas ustawiania menu identyfikacji rozmówcy, nie podłączaj aparatu do gniazda ściennego, ponieważ połączenia przychodzące nie będą jeszcze prawidłowo zapisywane.
1.Odłóż słuchawkę na widełki aparatu bazowego.
2.Naciśnij przycisk opcji. Na wyświetlaczu pojawi się wskazanie SET 1 DATE.
3.Za pomocą przycisków ▲ (+) lub ▼
SET 1 DATE
SET 2 CODE (standardowo
SET 4 FLASH (standardowo 600) SET 5 LCD (standardowo 3)
UWAGA: W celu wyjścia z menu Set Up naciśnij przycisk delete. Jeżeli w ciągu 20 sekund nie zostanie naciśnięty żaden przycisk, to aparat automatycznie opuści menu Set Up i powróci do ekranu NO CALLS.
USTAWIANIE DATY I CZASU
Ustawia datę i czas dla funkcji identyfikacji rozmówcy.
1.W celu wejścia do menu opcji, naciśnij przycisk opcji. Na wyświetlaczu pojawi się wskazanie SET 1 DATE.
2.Naciśnij przycisk opcji wyświetlając aktualne ustawienia roku.
3.Za pomocą przycisków ▲ (+) lub ▼
4.Po ustawieniu roku naciśnij przycisk opcji przechodząc do ustawienia miesiąca.
5.W przypadku wprowadzania miesięcy 1 do 9 po ustawieniu roku naciśnij przycisk opcji. W przypadku wprowadzania miesięcy 10 do 12 (miesiące dwucyfrowe), naciśnij przycisk ▼
6.Powtarzając kroki 3 i 4 ustaw dzień, godzinę oraz minuty.
7.Ponownie naciśnij przycisk opcji zapisując wprowadzone wartości.
Data i czas będzie uaktualniana przy otrzymywaniu każdego z komunikatów identyfikacji rozmówcy w systemie FSK.
Jeżeli zostanie odebrany komunikat identyfikacji rozmówcy w systemie DTMF, wtedy komunikat identyfikacji rozmówcy przekazuje informacje dotyczące daty i czasu z zegara systemowego aparatu telefonicznego.
5. | Naciśnij przycisk, któremu przypisany ma być żądany numer, a następnie naciśnij |
| przycisk store. |
6. | Odłóż słuchawkę na widełki. |
UWAGA: W przypadku popełnienia błędu użyj przycisku delete kasując nieprawidłową cyfrę.
ZMIANA NUMERU ZAPISANEGO W PAMIĘCI
Powtórz powyższą procedurę wprowadzania numeru do pamięci. Nowy numer zostanie zapisany w miejscu poprzedniego numeru telefonicznego.
KASOWANIE ZAPISANEGO NUMERU
1.Naciśnij przycisk Dial.
2.Za pomocą przycisków ▲ (+) lub ▼
3.Naciśnij przycisk delete wyświetlając „DELETE”. Ponownie naciśnij przycisk DELETE potwierdzając.
WYBIERANIE NUMERÓW ZAPISANYCH W PAMIĘCI
1.Podnieś słuchawkę z aparatu bazowego i naciśnij przycisk mem lub naciśnij przycisk dial.
2.Naciśnij przycisk
LUB
1.Jeżeli słuchawka znajduje się na widełkach, naciśnij przycisk dial.
2.Naciśnij przycisk, któremu przypisany został żądany numer, podnieś słuchawkę z widełek a numer ten zostanie wybrany automatycznie.
PRZEGLĄDANIE NUMERÓW ZAPISANYCH W PAMIĘCI
1.Naciśnij przycisk dial.
2.Za pomocą przycisków ▲ (+) lub ▼
KOPIOWANIE PAMIĘCI IDENTYFIKACJI ROZMÓWCY DO PAMIĘCI UŻYTKOWNIKA
1.Podnieś słuchawkę z aparatu bazowego.
2.Naciśnij przycisk store.
3.Za pomocą przycisków ▲ (+) lub ▼
4.Naciśnij przycisk store.
5.Naciśnij przycisk
6.Naciśnij przycisk store zapisując zmiany.
7.Odłóż słuchawkę na widełki.
WPROWADZANIE PAUZY
Przycisk redial posiada dwie funkcje. Jeżeli zostanie naciśnięty jakiś przycisk numeryczny, to staje on się przyciskiem pauzy. Funkcja ta występuje jedynie w trakcie wprowadzania numeru do pamięci. Pauza wprowadzana jest za pomocą przycisku redial w celu wprowadzenia opóźnienia niezbędnego podczas automatycznego wybierania sekwencji cyfr.
Przykładowo, jeżeli wyjście na linię miejską uzyskuje się poprzez wybranie cyfry 9 lub też w przypadku stosowania usług telefonicznych.
Istnieje możliwość ustawiania długości pauzy. Może być ona regulowana w zakresie od 1 do 9 sekund. Standardowym ustawieniem są 4 sekundy.
1.Podnieś słuchawkę z aparatu bazowego.
2.Naciśnij przycisk store.
3.Naciśnij przycisk redial.
4.Naciśnij przycisk
5.Ponownie naciśnij przycisk store.
6.Naciśnij przycisk flash lub odłóż słuchawkę na widełki.
UŻYCIE FUNKCJI FLASH
Użyj przycisku Flash, aby skorzystać ze specjalnych usług udostępnianych przez lokalnego operatora sieci telefonicznej, jak np. informacja o oczekującym połączeniu. Usługi te zwykle udostępniane są za dodatkową opłatą. Dlatego też sposób ich udostępniania opisany jest w niezależnej instrukcji dostarczonej przez operatora sieci telefonicznej.
W celu odebrania połączenia przychodzącego podczas prowadzenia rozmowy:
•Po usłyszeniu sygnału zgłaszającego się połączenia naciśnij, a następnie zwolnij przycisk flash. Pierwsze połączenie zostanie zawieszone a drugie połączenie może zostać odebrane.
W celu przywołania pierwszego połączenia i zawieszenia drugiego:
•Ponownie naciśnij, a następnie zwolnij przycisk flash. Drugie połączenie zostanie zawieszone a rozmowa z pierwszym rozmówcą będzie mogła być kontynuowana.
OKRESOWE PRZEJŚCIE NA WYBIERANIE TONALNE
Jeżeli aparat pracuje w systemie impulsowym, można czasowo przełączyć go na pracę w systemie tonowym. Po wybraniu numeru telefonicznego naciśnij i zwolnij przycisk *TONE na klawiaturze aparatu. Pozwoli to na dostęp do usług telefonicznych wymagających wybierania w systemie tonowym, takich jak zdalne usługi bankowe. Po odłożeniu słuchawki na widełki aparat automatycznie powraca do wybierania impulsowego.
FUNKCJE IDENTYFIKACJI ROZMÓWCY (CID)
| Ikona oczekującej wiadomości |
|
Aktualna data | Aktualny czas | Nowe połączenie |
Numer rozmówcy