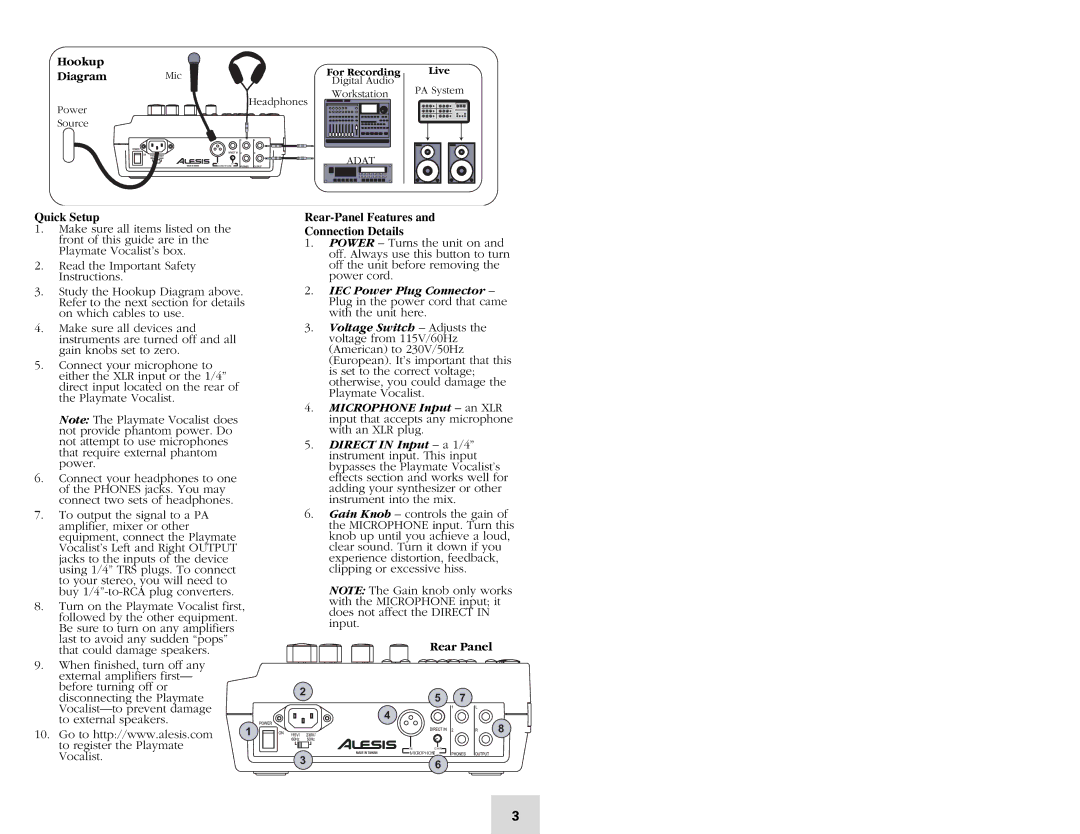
Hookup
Diagram Mic
Headphones
Power
Source
IN | GAIN |
MICROPHONE
For Recording
Digital Audio
Workstation
ADAT
Live
PA System
Quick Setup
1.Make sure all items listed on the front of this guide are in the Playmate Vocalist’s box.
2.Read the Important Safety Instructions.
3.Study the Hookup Diagram above. Refer to the next section for details on which cables to use.
4.Make sure all devices and instruments are turned off and all gain knobs set to zero.
5.Connect your microphone to either the XLR input or the 1/4” direct input located on the rear of the Playmate Vocalist.
Note: The Playmate Vocalist does not provide phantom power. Do not attempt to use microphones that require external phantom power.
6.Connect your headphones to one of the PHONES jacks. You may connect two sets of headphones.
7.To output the signal to a PA amplifier, mixer or other equipment, connect the Playmate Vocalist’s Left and Right OUTPUT jacks to the inputs of the device using 1/4” TRS plugs. To connect to your stereo, you will need to buy
8.Turn on the Playmate Vocalist first, followed by the other equipment. Be sure to turn on any amplifiers last to avoid any sudden “pops” that could damage speakers.
9.When finished, turn off any external amplifiers first— before turning off or disconnecting the Playmate
10. Go to http://www.alesis.com | 1 |
| |
to register the Playmate |
|
Vocalist. |
|
Rear-Panel Features and
Connection Details
1.POWER – Turns the unit on and off. Always use this button to turn off the unit before removing the power cord.
2.IEC Power Plug Connector – Plug in the power cord that came with the unit here.
3.Voltage Switch – Adjusts the voltage from 115V/60Hz (American) to 230V/50Hz (European). It’s important that this is set to the correct voltage; otherwise, you could damage the Playmate Vocalist.
4.MICROPHONE Input – an XLR input that accepts any microphone with an XLR plug.
5.DIRECT IN Input – a 1/4” instrument input. This input bypasses the Playmate Vocalist’s effects section and works well for adding your synthesizer or other instrument into the mix.
6.Gain Knob – controls the gain of the MICROPHONE input. Turn this knob up until you achieve a loud, clear sound. Turn it down if you experience distortion, feedback, clipping or excessive hiss.
NOTE: The Gain knob only works with the MICROPHONE input; it does not affect the DIRECT IN input.
Rear Panel
2
5 7
4
8
INGAIN
MICROPHONE
36
3