Basic Operation

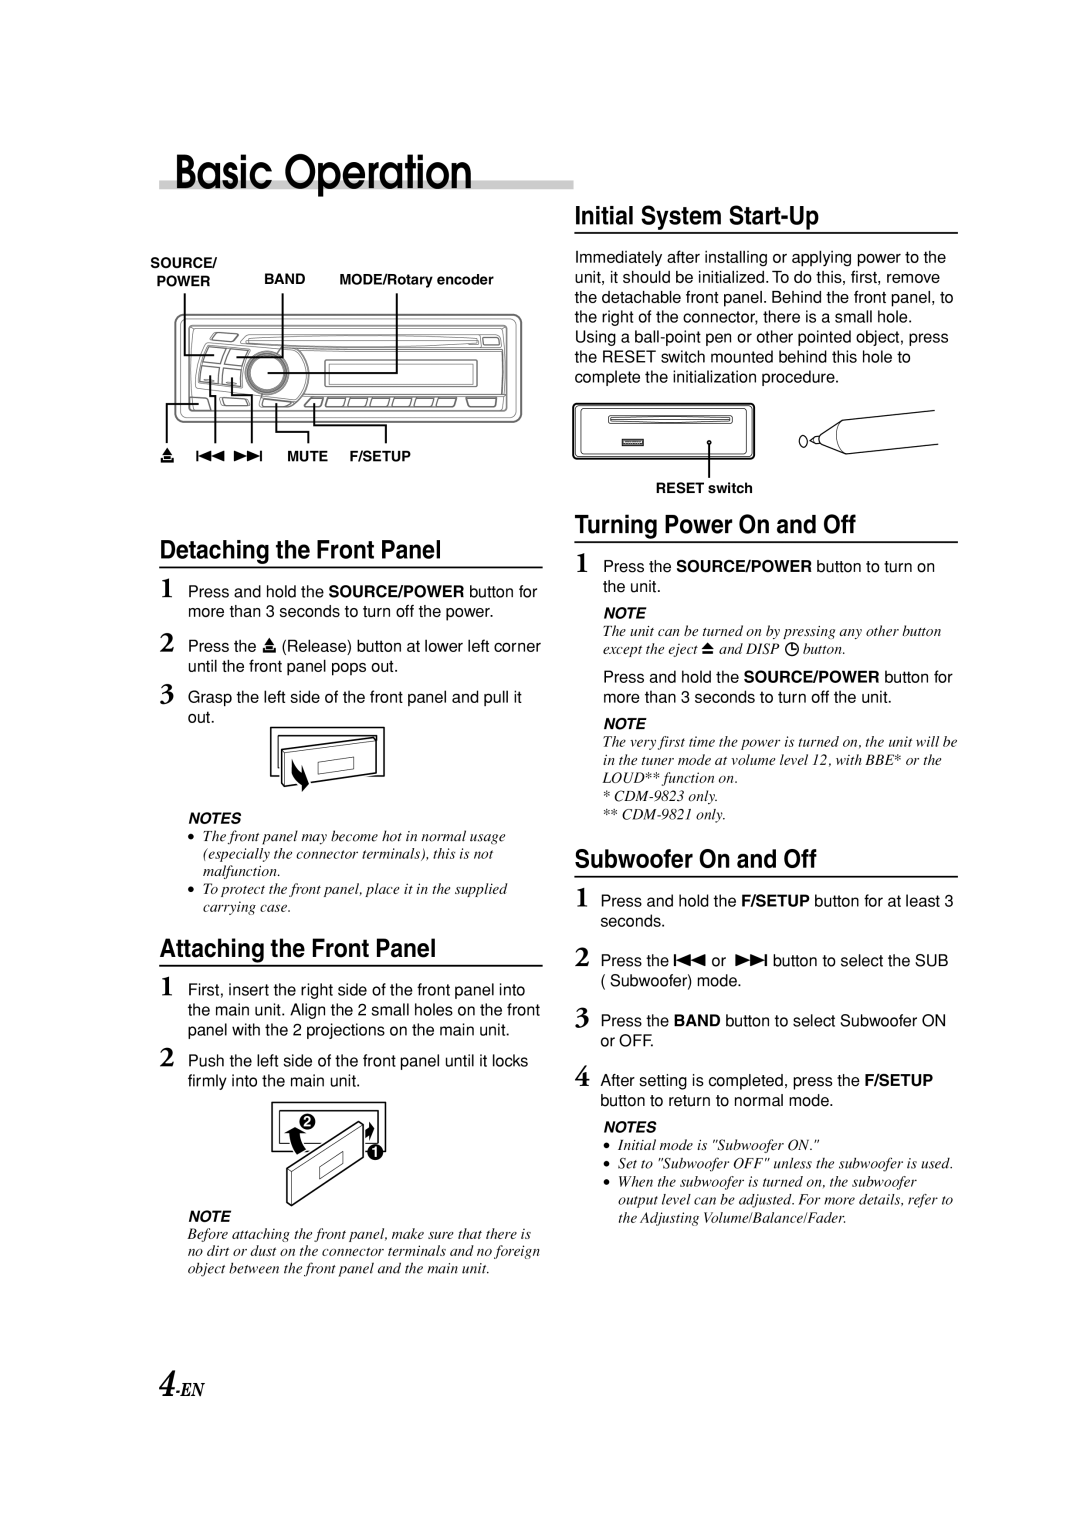
SOURCE/

POWER


BAND


MODE/Rotary encoder


g f MUTE F/SETUP

Detaching the Front Panel

1 Press and hold the SOURCE/POWER button for more than 3 seconds to turn off the power.

2 Press the (Release) button at lower left corner until the front panel pops out.

3 Grasp the left side of the front panel and pull it out.

NOTES

The front panel may become hot in normal usage (especially the connector terminals), this is not malfunction.

To protect the front panel, place it in the supplied carrying case.

Attaching the Front Panel

1 First, insert the right side of the front panel into the main unit. Align the 2 small holes on the front panel with the 2 projections on the main unit.

2 Push the left side of the front panel until it locks firmly into the main unit.

2

1

NOTE

Before attaching the front panel, make sure that there is no dirt or dust on the connector terminals and no foreign object between the front panel and the main unit.

Initial System Start-Up

Immediately after installing or applying power to the unit, it should be initialized. To do this, first, remove the detachable front panel. Behind the front panel, to the right of the connector, there is a small hole. Using a ball-point pen or other pointed object, press the RESET switch mounted behind this hole to complete the initialization procedure.

1

RESET switch

Turning Power On and Off

1 Press the SOURCE/POWER button to turn on the unit.

NOTE

The unit can be turned on by pressing any other button except the eject c and DISP button.

Press and hold the SOURCE/POWER button for more than 3 seconds to turn off the unit.

NOTE

The very first time the power is turned on, the unit will be in the tuner mode at volume level 12, with BBE* or the LOUD** function on.

*CDM-9823 only.

**CDM-9821 only.

Subwoofer On and Off

1 Press and hold the F/SETUP button for at least 3 seconds.

2 Press the g or f button to select the SUB ( Subwoofer) mode.

3 Press the BAND button to select Subwoofer ON or OFF.

4 After setting is completed, press the F/SETUP button to return to normal mode.

NOTES

Initial mode is "Subwoofer ON."

Set to "Subwoofer OFF" unless the subwoofer is used.

When the subwoofer is turned on, the subwoofer output level can be adjusted. For more details, refer to the Adjusting Volume/Balance/Fader.

4-EN

Page 6
Image 6
Alpine CDM-9823, CDM-9821 owner manual Basic Operation

CDM-9823, CDM-9821 specifications

The Alpine CDM-9823 and CDM-9821 are sophisticated car audio units that redefine the in-car listening experience, combining state-of-the-art technology with user-friendly features. Both models are a part of Alpine's commitment to high-quality sound and innovative design.

Starting with the Alpine CDM-9823, this model stands out due to its remarkable power and audio performance. It boasts an impressive 50 watts per channel peak power, driven by its high-efficiency amplifier. This means that even at high volumes, the sound remains clean and distortion-free, a characteristic highly sought after by audiophiles. One of its key features is the inclusion of a 24-bit DAC that ensures superior sound quality, allowing listeners to enjoy their favorite tracks with crystal clarity.

The CDM-9823 is equipped with a versatile media playback capability, supporting various formats including MP3 and WMA, which allows users to enjoy their digital music collections seamlessly. Additionally, the unit comes with a built-in tuner that supports RDS, enriching the radio listening experience with program information and song details. The user-friendly interface includes a vibrant display that provides easy navigation through different media options, enhancing overall usability.

On the other hand, the Alpine CDM-9821 shares many features with the 9823 but presents a more streamlined option for users who might not need all the advanced capabilities. It still maintains a robust power output and supports multiple audio formats. The CDM-9821 also features an auxiliary input, making it easy to connect external devices like smartphones or tablets.

Both models are designed with customization in mind, featuring a 3-band EQ that allows users to tweak their sound preferences to suit their taste. The built-in crossover settings further enhance audio fidelity, enabling users to optimize sound for different speakers in their vehicle.

In terms of technologies, both models utilize Alpine's proprietary technologies, such as their advanced noise reduction and sound enhancement features that ensure a superior listening experience even in noisy environments. Their compact design allows for easy installation in various vehicle types.

In conclusion, the Alpine CDM-9823 and CDM-9821 represent a fusion of quality craftsmanship, functionality, and advanced technology in car audio systems. With their impressive power, extensive media support, and superior sound quality, these units provide an exceptional audio experience for any journey. Whether you value advanced features or a simpler setup, Alpine caters to diverse needs while maintaining a commitment to excellence in car audio.