English | Français | Español |
Operation | Fonctionnement | Operación |
This Tuner is an HD Radio™ receiver. It is able to receive signals based on the terres- trial digital radio broadcasting standard.
When current AM/FM broadcasters are transmitting digital audio and data services, HD Radio is
Any HD radio compatible head unit can control this receiver. For operation details, refer to the Owner’s Manual of the Head unit.
•HD Radio™ Technology Manufactured Under License From iBiquity Digital Corpora- tion. iBiquity Digital and the HD Radio and HD Symbols are trademarks of iBiquity Digital Corporation. U.S. and Foreign Patents.
Ce tuner est un récepteur HD Radio™. Il peut capter des signaux conformes à la norme de diffusion radio numérique terrestre.
Lorsque des stations AM/FM diffusent du son numérique et des services de données, HD Radio est diffusé dans leur zone de service. Vous pouvez capter leurs émissions numériques et profiter d’un son de grande qualité.
Tout appareil principal compatible HD Radio peut commander ce récepteur. Pour plus d’informations sur le fonctionnement, consultez le mode d’emploi de l’appareil principal.
•La technologie HD Radio™ est fabriquée sous la licence d’iBiquity Digital Corpora- tion. iBiquity Digital, la radio HD et les symboles HD sont des marques d’iBiquity Digital Corporation, déposées aux
Este sintonizador es un receptor HD Radio™. Es capaz de recibir señales basadas en el estándar de emisión de la radio digital terrestre.
Cuando las emisoras AM/FM transmiten servicios de datos y audio digitales, HD Radio está en el aire en su área de servicio. Podrá recibir emisiones digitales y disfrutar de una gran calidad de sonido.
Cualquier unidad principal de HD radio compatible puede controlar este receptor. Para más información sobre el funcionamiento, consulte el Manual de usuario de la unidad principal.
•La tecnología HD RadioTM está fabricada bajo licencia de iBiquity Digital Corpora- tion. iBiquity Digital y los símbolos HD Radio y HD son marcas comerciales de iBiquity Digital Corporation. U.S. y patentes extranjeras.
Tuner Unit |
|
| Installation | |
|
|
| English | |
Unité de tuner |
|
|
| |
Unidad del |
|
| When mounting with Velcro fasteners | |
sintonizador |
|
| ||
|
| When mounting the tuner with the Velcro fasteners, be sure | ||
|
|
| ||
|
|
| to choose a flat location. | |
|
| Protective paper | Do not hang the unit from the bottom of the dashboard or | |
|
| rear deck with the Velcro fasteners. | ||
|
| Papier de protection | ||
|
|
|
| |
|
| Papel protector | 1. | Remove the Protective paper and attach two pieces of |
|
|
|
| Velcro fastener to the bottom of the Tuner. |
|
| Velcro Fasteners(Included) | 2. | Check the position, and then fix the Tuner to the floor |
Protective paper |
| Retenue Velcro (inclus) |
| carpet. |
| Sujeción de velcro (incluido) |
|
| |
Papier de protection |
|
| ||
|
|
| ||
Papel protector |
|
|
|
|
| Tuner Unit | When mounting with Screws | ||
| Unité de tuner | When mounting the tuner with the screws, be sure to | ||
| Unidad del sintonizador | choose a flat location. | ||
|
| Screw (Included) | When making holes, be careful not to scratch any pipes or | |
|
| wires. | ||
|
| Vis (inclus) | 1. Using the unit as a template, hold it at its mounting | |
|
| Tornillo (incluidos) | ||
|
|
| location and mark the holes to be drilled. Before drilling, | |
|
|
|
| |
|
|
|
| make sure that there are no objects that could be dam- |
|
|
|
| aged behind the mounting surface. |
|
|
| 2. Drill holes and secure the unit with | |
|
|
|
| (M4 x 14) supplied. |
Installation
Français
Fixation à l’aide de retenues Velcro
Quand vous fixez le tuner à l’aide de retenues Velcro, choisissez un endroit plat.
Ne suspendez pas l’appareil au bas du tableau de bord ou sur la plage arrière avec des retenues Velcro.
1.Détachez le papier de protection et fixez deux morceaux de Velcro sur le dessous du tuner.
2.Vérifiez la position, puis fixez le tuner à la moquette du plancher.
Fixation à l’aide de vis
Quand vous fixez le tuner à l’aide de vis, choisissez un endroit plat.
Quand vous percez des trous, veillez à ne pas rayer des tuyaux ou des câbles.
1.Utilisez l’appareil comme modèle,
2.Percez les trous et fixez l’appareil avec les vis auto- taraudeuses (M4 x 14) fournies.
Instalación
Español
Montaje con sujeciones de velcro
Al montar el sintonizador con las sujeciones de velcro, asegúrese de elegir una ubicación plana.
No cuelgue la unidad de la base del salpicadero ni del techo de la parte trasera con sujeciones de velcro.
1.Retire el papel protector y pegue dos piezas de las sujeciones de velcro en la base del sintonizador.
2.Compruebe la posición y fije el sintonizador al suelo.
Montaje con tornillos
Al montar el sintonizador con tornillos, asegúrese de elegir una ubicación plana.
Cuando haga los agujeros, tenga cuidado de no dañar ningún conducto o cable.
1.Utilice la unidad como plantilla, sujétela en su ubicación de montaje y marque los orificios que deban perforarse. Antes de perforar, asegúrese de que no hay objetos que puedan dañarse detrás de la superficie de montaje.
2.Perfore los orificios y asegure la unidad conlos tornillos autoenroscables (M4 x 14) suministrados.
Connections
English
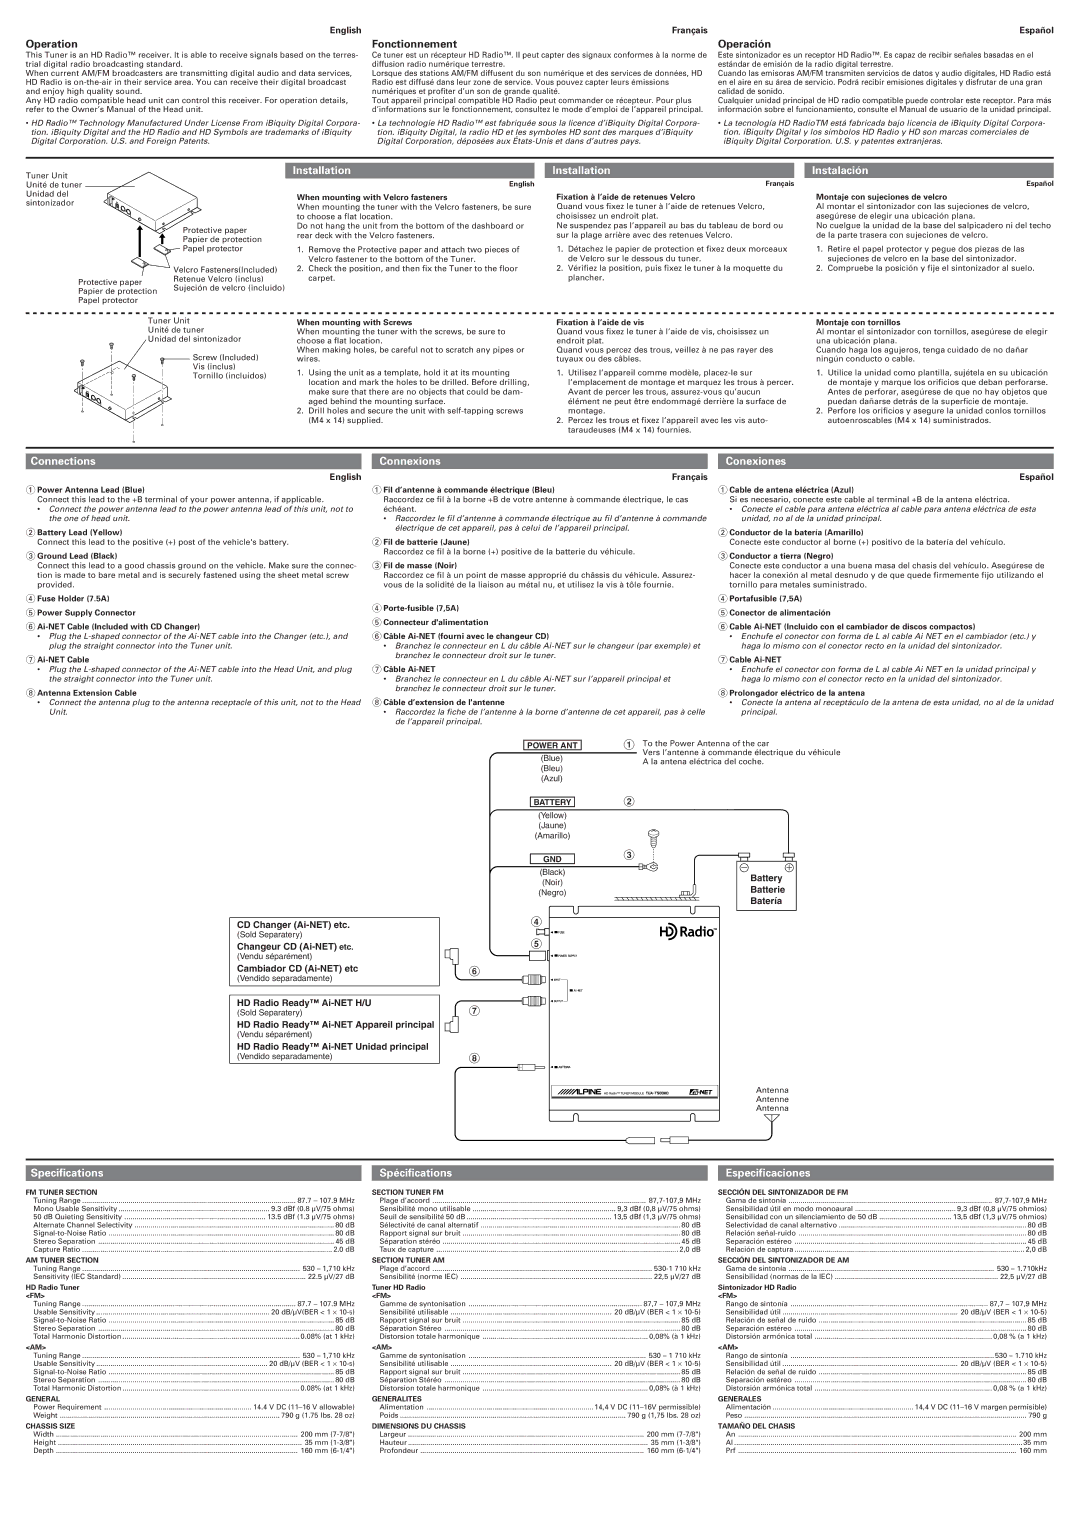
1Power Antenna Lead (Blue)
Connect this lead to the +B terminal of your power antenna, if applicable.
•Connect the power antenna lead to the power antenna lead of this unit, not to the one of head unit.
2Battery Lead (Yellow)
Connect this lead to the positive (+) post of the vehicle's battery.
3Ground Lead (Black)
Connect this lead to a good chassis ground on the vehicle. Make sure the connec- tion is made to bare metal and is securely fastened using the sheet metal screw provided.
4Fuse Holder (7.5A)
5Power Supply Connector
6
•Plug the
7Ai-NET Cable
•Plug the
8Antenna Extension Cable
•Connect the antenna plug to the antenna receptacle of this unit, not to the Head Unit.
Connexions
Français
1Fil d’antenne à commande électrique (Bleu)
Raccordez ce fil à la borne +B de votre antenne à commande électrique, le cas échéant.
•Raccordez le fil d’antenne à commande électrique au fil d’antenne à commande électrique de cet appareil, pas à celui de l’appareil principal.
2Fil de batterie (Jaune)
Raccordez ce fil à la borne (+) positive de la batterie du véhicule.
3Fil de masse (Noir)
Raccordez ce fil à un point de masse approprié du châssis du véhicule. Assurez- vous de la solidité de la liaison au métal nu, et utilisez la vis à tôle fournie.
4
5Connecteur d'alimentation
6Câble
•Branchez le connecteur en L du câble
7Câble Ai-NET
•Branchez le connecteur en L du câble
8Câble d’extension de l'antenne
•Raccordez la fiche de l’antenne à la borne d’antenne de cet appareil, pas à celle de l’appareil principal.
Conexiones
Español
1Cable de antena eléctrica (Azul)
Si es necesario, conecte este cable al terminal +B de la antena eléctrica.
•Conecte el cable para antena eléctrica al cable para antena eléctrica de esta unidad, no al de la unidad principal.
2Conductor de la batería (Amarillo)
Conecte este conductor al borne (+) positivo de la batería del vehículo.
3Conductor a tierra (Negro)
Conecte este conductor a una buena masa del chasis del vehículo. Asegúrese de hacer la conexión al metal desnudo y de que quede firmemente fijo utilizando el tornillo para metales suministrado.
4Portafusible (7,5A)
5Conector de alimentación
6Cable
•Enchufe el conector con forma de L al cable Ai NET en el cambiador (etc.) y haga lo mismo con el conector recto en la unidad del sintonizador.
7Cable Ai-NET
•Enchufe el conector con forma de L al cable Ai NET en la unidad principal y haga lo mismo con el conector recto en la unidad del sintonizador.
8Prolongador eléctrico de la antena
•Conecte la antena al receptáculo de la antena de esta unidad, no al de la unidad principal.
CD Changer
(Sold Separatery)
Changeur CD
Cambiador CD
(Vendido separadamente)
HD Radio Ready™
(Sold Separatery)
HD Radio Ready™
(Vendu séparément)
HD Radio Ready™ Ai-NET Unidad principal
(Vendido separadamente)
6
7
8
POWER ANT
(Blue)
(Bleu)
(Azul)
BATTERY
(Yellow)
(Jaune)
(Amarillo)
GND
(Black)
(Noir)
(Negro)
4
5
1To the Power Antenna of the car
Vers l’antenne à commande électrique du véhicule A la antena eléctrica del coche.
2
3
Battery
Batterie
Batería
Antenna
Antenne
Antenna
Specifications
FM TUNER SECTION |
|
Tuning Range | 87.7 – 107.9 MHz |
Mono Usable Sensitivity | 9.3 dBf (0.8 µV/75 ohms) |
50 dB Quieting Sensitivity | 13.5 dBf (1.3 µV/75 ohms) |
Alternate Channel Selectivity | 80 dB |
80 dB | |
Stereo Separation | 45 dB |
Capture Ratio | 2.0 dB |
AM TUNER SECTION |
|
Tuning Range | 530 – 1,710 kHz |
Sensitivity (IEC Standard) | 22.5 µV/27 dB |
HD Radio Tuner |
|
<FM> |
|
Tuning Range | 87.7 – 107.9 MHz |
Usable Sensitivity | 20 dB/µV(BER < 1 ⋅ |
85 dB | |
Stereo Separation | 80 dB |
Total Harmonic Distortion | 0.08% (at 1 kHz) |
<AM> |
|
Tuning Range | 530 – 1,710 kHz |
Usable Sensitivity | 20 dB/µV (BER < 1 ⋅ |
85 dB | |
Stereo Separation | 80 dB |
Total Harmonic Distortion | 0.08% (at 1 kHz) |
GENERAL |
|
Power Requirement | 14.4 V DC |
Weight | 790 g (1.75 lbs. 28 oz) |
CHASSIS SIZE |
|
Width | 200 mm |
Height | 35 mm |
Depth | 160 mm |
Spécifications
SECTION TUNER FM |
|
Plage d’accord | |
Sensibilité mono utilisable | 9,3 dBf (0,8 µV/75 ohms) |
Seuil de sensibilité 50 dB | 13,5 dBf (1,3 µV/75 ohms) |
Sélectivité de canal alternatif | 80 dB |
Rapport signal sur bruit | 80 dB |
Séparation stéréo | 45 dB |
Taux de capture | 2,0 dB |
SECTION TUNER AM |
|
Plage d’accord | |
Sensibilité (norme IEC) | 22,5 µV/27 dB |
Tuner HD Radio |
|
<FM> |
|
Gamme de syntonisation | 87,7 – 107,9 MHz |
Sensibilité utilisable | 20 dB/µV (BER < 1 ⋅ |
Rapport signal sur bruit | 85 dB |
Séparation Stéreo | 80 dB |
Distorsion totale harmonique | 0,08% (à 1 kHz) |
<AM> |
|
Gamme de syntonisation | 530 – 1 710 kHz |
Sensibilité utilisable | 20 dB/µV (BER < 1 ⋅ |
Rapport signal sur bruit | 85 dB |
Séparation Stéréo | 80 dB |
Distorsion totale harmonique | 0,08% (à 1 kHz) |
GENERALITES |
|
Alimentation | 14,4 V DC |
Poids | 790 g (1,75 lbs. 28 oz) |
DIMENSIONS DU CHASSIS |
|
Largeur | 200 mm |
Hauteur | 35 mm |
Profondeur | 160 mm |
Especificaciones
SECCIÓN DEL SINTONIZADOR DE FM |
|
Gama de sintonía | |
Sensibilidad útil en modo monoaural | 9,3 dBf (0,8 µV/75 ohmios) |
Sensibilidad con un silenciamiento de 50 dB | 13,5 dBf (1,3 µV/75 ohmios) |
Selectividad de canal alternativo | 80 dB |
Relación | 80 dB |
Separación estéreo | 45 dB |
Relación de captura | 2,0 dB |
SECCIÓN DEL SINTONIZADOR DE AM |
|
Gama de sintonía | 530 – 1.710kHz |
Sensibilidad (normas de la IEC) | 22,5 µV/27 dB |
Sintonizador HD Radio |
|
<FM> |
|
Rango de sintonía | 87,7 – 107,9 MHz |
Sensibilidad útil | 20 dB/µV (BER < 1 ⋅ |
Relación de señal de ruido | 85 dB |
Separación estéreo | 80 dB |
Distorsión armónica total | 0,08 % (a 1 kHz) |
<AM> |
|
Rango de sintonía | 530 – 1.710 kHz |
Sensibilidad útil | 20 dB/µV (BER < 1 ⋅ |
Relación de señal de ruido | 85 dB |
Separación estéreo | 80 dB |
Distorsión armónica total | 0,08 % (a 1 kHz) |
GENERALES |
|
Alimentación | 14,4 V DC |
Peso | 790 g |
TAMAÑO DEL CHASIS |
|
An | 200 mm |
Al | 35 mm |
Prf | 160 mm |