4.You can adjust the amount of sensitivity the fixture takes to react to the beat of music by turning the adjustment pot on the top of the unit in a clockwise or
Sound Active Synchronized Operation:
This operation is used to synchronize two or more fixtures to the built in programs. This operation will synchronize the programs via sound. Use this operation mode if; 1) You will not be using a DMX controller or 2) You wish to run your fixtures to sound or 3) You have more than one (1) Mighty Scan™ and you want to run them as a synchronized light show .
1.This operation will depend on a master unit to feed data instruction to other Mighty Scans.™
2.You may use 15 Mighty Scans as slaves without the use of a controller (Total of 16; one master and 15 slaves).
3.Any unit may act as a Slave or a Master.
4.Use XLR cable to link your fixtures together. These cables must be daisy chained and can not be “Y’ed” or split.
5.Remember that the Male XLR connection on the fixture is the input and the female is the out- put. With this in mind, your first fixture will not have anything connected to the male XLR and the last fixture will not have any thing connected the female XLR connector.
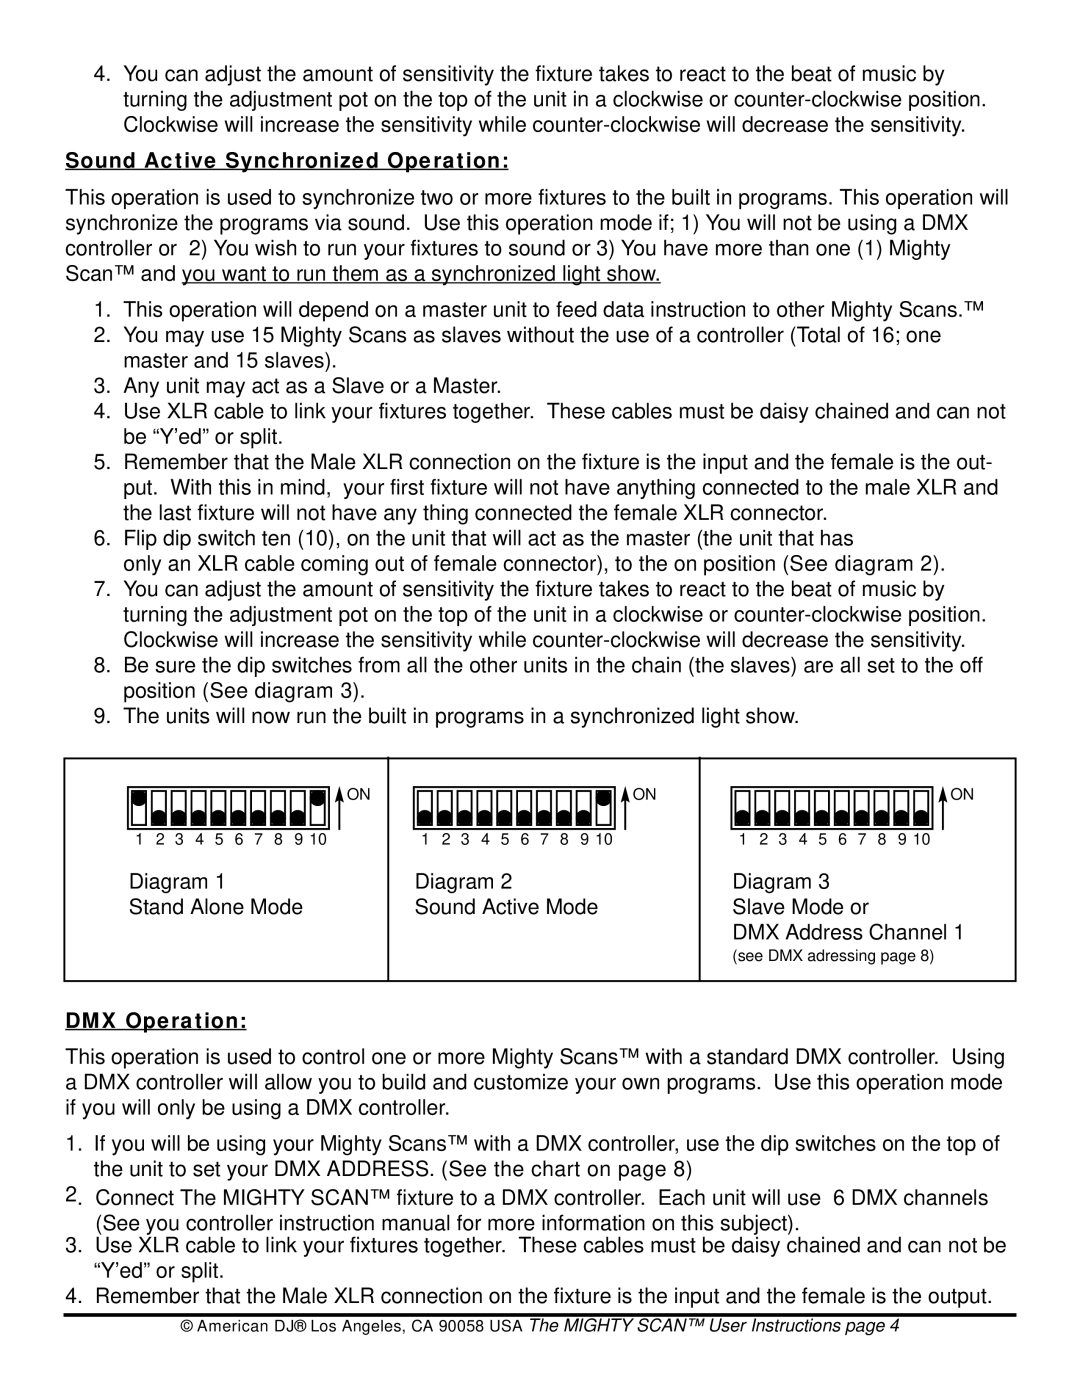
6.Flip dip switch ten (10), on the unit that will act as the master (the unit that has
only an XLR cable coming out of female connector), to the on position (See diagram 2).
7.You can adjust the amount of sensitivity the fixture takes to react to the beat of music by turning the adjustment pot on the top of the unit in a clockwise or
8.Be sure the dip switches from all the other units in the chain (the slaves) are all set to the off position (See diagram 3).
9.The units will now run the built in programs in a synchronized light show.
![]() ON
ON
1 2 3 4 5 6 7 8 9 10
Diagram 1
Stand Alone Mode
![]() ON
ON
1 2 3 4 5 6 7 8 9 10
Diagram 2
Sound Active Mode
![]() ON
ON
1 2 3 4 5 6 7 8 9 10
Diagram 3 Slave Mode or
DMX Address Channel 1
(see DMX adressing page 8)
DMX Operation:
This operation is used to control one or more Mighty Scans™ with a standard DMX controller. Using a DMX controller will allow you to build and customize your own programs. Use this operation mode if you will only be using a DMX controller.
1.If you will be using your Mighty Scans™ with a DMX controller, use the dip switches on the top of the unit to set your DMX ADDRESS. (See the chart on page 8)
2.
3.
4.
Connect The MIGHTY SCAN™ fixture to a DMX controller. Each unit will use 6 DMX channels (See you controller instruction manual for more information on this subject).
Use XLR cable to link your fixtures together. These cables must be daisy chained and can not be “Y’ed” or split.
Remember that the Male XLR connection on the fixture is the input and the female is the output.
© American DJ® Los Angeles, CA 90058 USA The MIGHTY SCAN™ User Instructions page 4
