T4™ |
|
|
| Controls & Functions | ||||||||
|
|
|
|
|
|
|
|
|
|
|
|
|
|
| POWER INPUT |
| FUSE | POWER INPUT: AC 120V~60Hz, 6A | POWER |
|
| ||||
|
|
|
|
|
|
| OUTPUT: |
|
|
|
|
|
|
|
|
|
|
|
| MAX LOADING: 6A |
|
|
|
|
|
|
|
|
|
|
|
| FUSE: F6A 250V 5x20mm |
|
|
|
|
|
|
|
|
|
|
|
|
|
|
|
|
| |
|
|
| WARNING: THIS | APPARATUS MUST BE EARTHED. |
|
|
|
|
| |||
|
|
|
|
|
|
|
| |||||
|
|
|
|
|
|
|
| |||||
|
|
|
|
|
|
|
| |||||
|
|
|
| N OUVREZ PAS...RISQUE DE CHOCELECTRIQUE |
|
|
|
|
| |||
|
|
| CAUTION: RISK OF ELECTRIC SHOCK, DO NOT OPEN. |
|
|
|
|
| ||||
|
|
|
|
|
|
|
|
|
|
|
|
|
|
|
|
|
|
|
|
|
|
| |||
6 | 7 |
| 8 |
|
|
| ||||||
|
|
|
|
|
|
|
|
|
|
|
|
|
6.Power Cord - This cord provides the unit’s main power. Please follow the following power guide lines:
• Be sure that the local power outlet match that of the required volt- age of the unit.
• Do not attempt to operate this unit if the power cord has been frayed or damaged.
• Disconnect from main power before making any type of connection.
• Never plug this mixer in to a dimmer pack.
• Route your power cord out of the way of foot traffic.
• Power Cord Protection - Power supply cords should be routed so that they are not likely to be walked on or pinched by items placed upon or against them, paying particular attention to cords at plugs, convenience receptacles, and the point where they exit from the mixer.
• Disconnect main power during long periods of none use.
7.Fuse Holder & Fuse - This fuse holder holds a 6.3A GMA fuse. To replace the fuse; Insert a flat head screwdriver into the fuse holder slot and turn
Caution: Always replace with the exact same type fuse, unless otherwise specified by an authorized American DJ® service tech- nician. Replacing with a fuse other than specifi ed may damage your unit and will void your manufactures warranty
8.Power Switch - This is the main power ON/OFF button. Before main power is applied, be sure you have made all connections.
T4™ | Mounting Options |
|
|
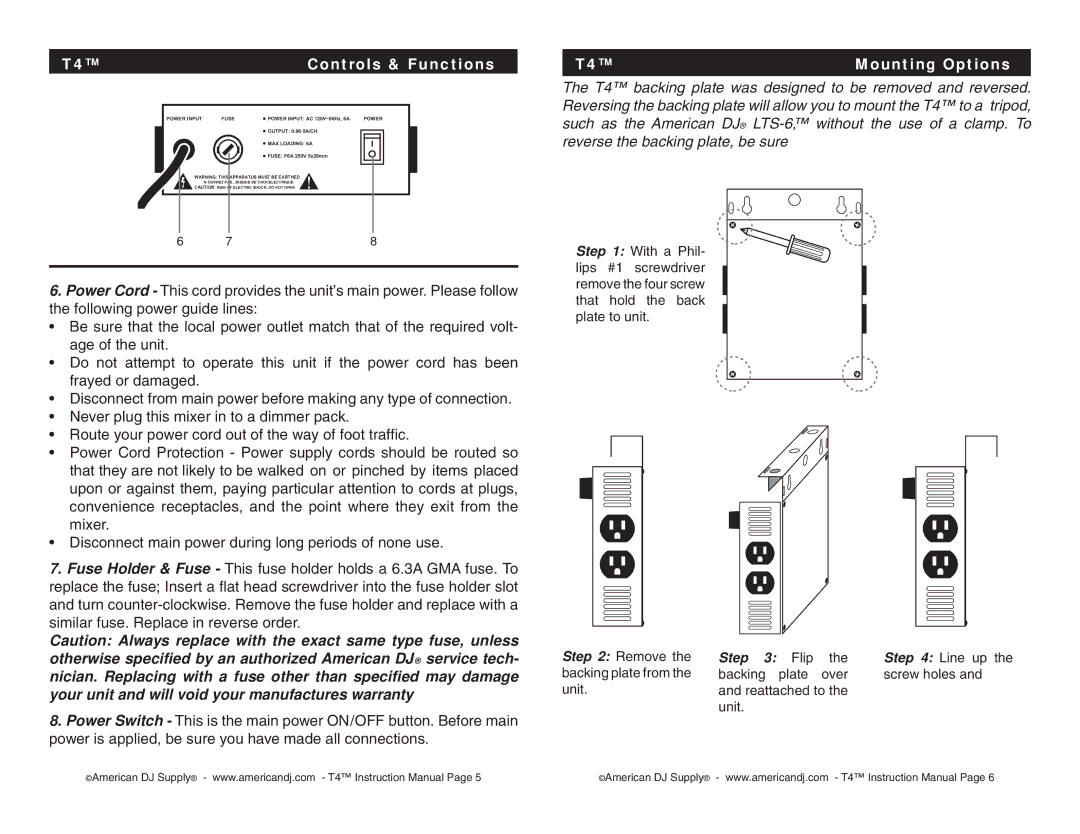
The T4™ backing plate was designed to be removed and reversed. Reversing the backing plate will allow you to mount the T4™ to a tripod, such as the American DJ®
Step 1: With a Phil- lips #1 screwdriver remove the four screw that hold the back plate to unit.
Step 2: Remove the | Step 3: | Flip | the | Step 4: Line up the |
backing plate from the | backing | plate | over | screw holes and |
unit. | and reattached to the |
| ||
| unit. |
|
|
|
©American DJ Supply® - www.americandj.com - T4™ Instruction Manual Page 5 | ©American DJ Supply® - www.americandj.com - T4™ Instruction Manual Page 6 |