3

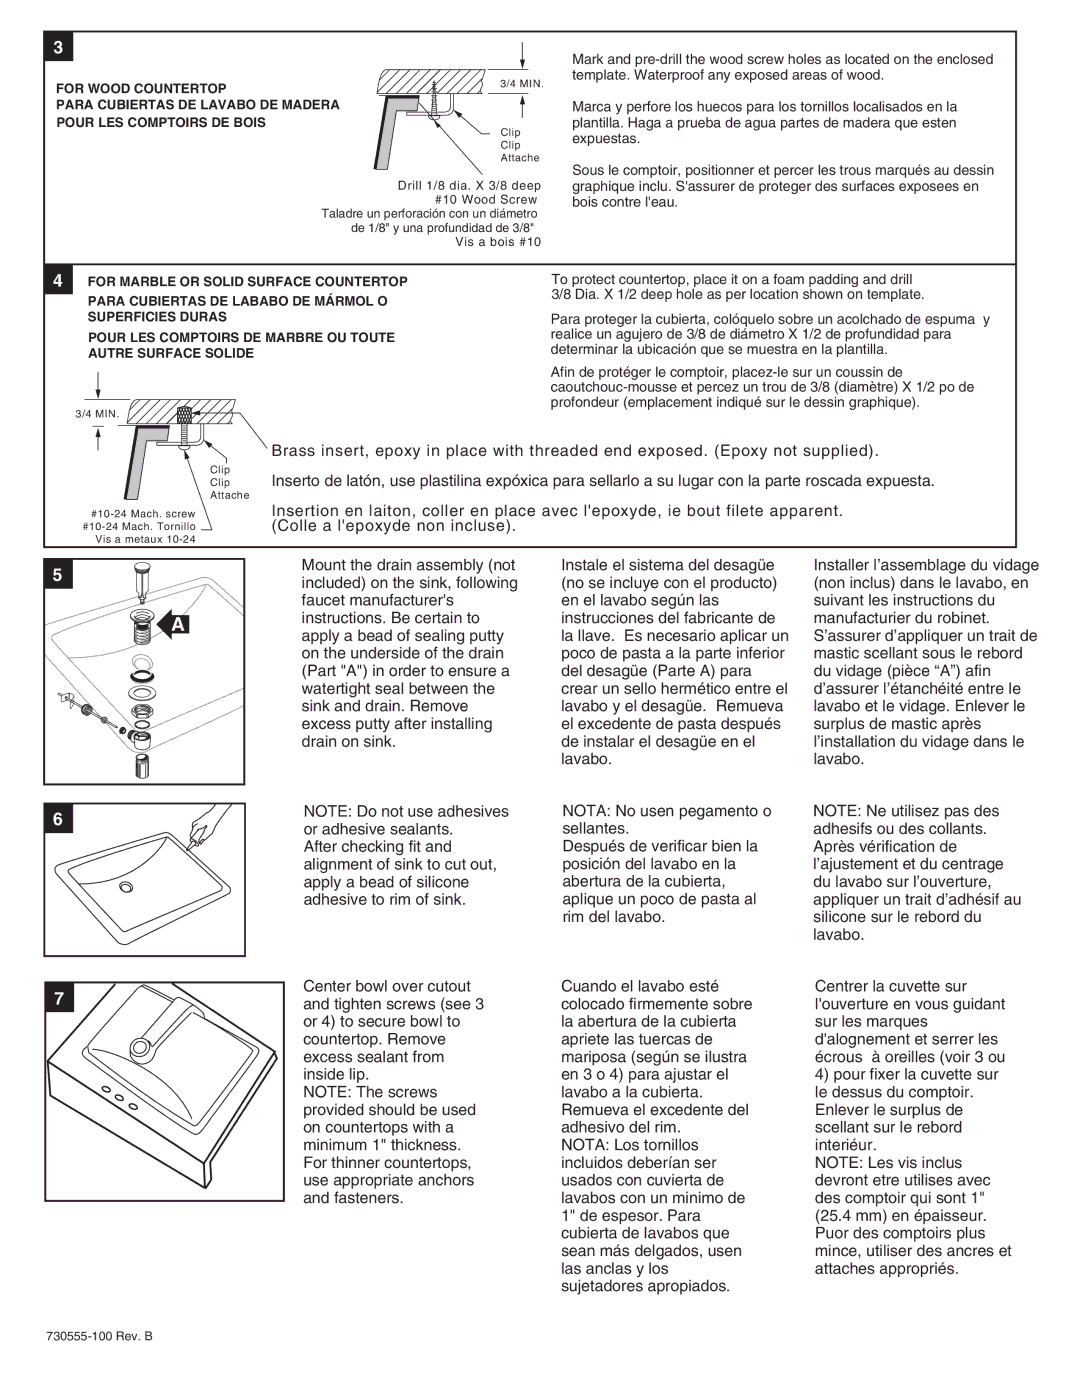
FOR WOOD COUNTERTOP


3/4 MIN.

PARA CUBIERTAS DE LAVABO DE MADERA


POUR LES COMPTOIRS DE BOIS


Clip


Clip


Attache


Drill 1/8 dia. X 3/8 deep


#10 Wood Screw


Taladre un perforación con un diámetro


de 1/8" y una profundidad de 3/8"


Vis a bois #10

Mark and pre-drill the wood screw holes as located on the enclosed template. Waterproof any exposed areas of wood.

Marca y perfore los huecos para los tornillos localisados en la plantilla. Haga a prueba de agua partes de madera que esten expuestas.

Sous le comptoir, positionner et percer les trous marqués au dessin graphique inclu. S'assurer de proteger des surfaces exposees en bois contre l'eau.

4FOR MARBLE OR SOLID SURFACE COUNTERTOP PARA CUBIERTAS DE LABABO DE MÁRMOL O SUPERFICIES DURAS

POUR LES COMPTOIRS DE MARBRE OU TOUTE AUTRE SURFACE SOLIDE

3/4 MIN.

To protect countertop, place it on a foam padding and drill 3/8 Dia. X 1/2 deep hole as per location shown on template.

Para proteger la cubierta, colóquelo sobre un acolchado de espuma y realice un agujero de 3/8 de diámetro X 1/2 de profundidad para determinar la ubicación que se muestra en la plantilla.

Afin de protéger le comptoir, placez-le sur un coussin de caoutchouc-mousse et percez un trou de 3/8 (diamètre) X 1/2 po de profondeur (emplacement indiqué sur le dessin graphique).

Clip

Clip

Attache

Brass insert, epoxy in place with threaded end exposed. (Epoxy not supplied).

Inserto de latón, use plastilina expóxica para sellarlo a su lugar con la parte roscada expuesta.

#10-24 Mach. screw #10-24 Mach. Tornillo Vis a metaux 10-24

Insertion en laiton, coller en place avec l'epoxyde, ie bout filete apparent. (Colle a l'epoxyde non incluse).

5

A

6

Mount the drain assembly (not included) on the sink, following faucet manufacturer's instructions. Be certain to apply a bead of sealing putty on the underside of the drain (Part "A") in order to ensure a watertight seal between the sink and drain. Remove excess putty after installing drain on sink.

NOTE: Do not use adhesives or adhesive sealants.

After checking fit and alignment of sink to cut out, apply a bead of silicone adhesive to rim of sink.

Instale el sistema del desagüe (no se incluye con el producto) en el lavabo según las instrucciones del fabricante de la llave. Es necesario aplicar un poco de pasta a la parte inferior del desagüe (Parte A) para crear un sello hermético entre el lavabo y el desagüe. Remueva el excedente de pasta después de instalar el desagüe en el lavabo.

NOTA: No usen pegamento o sellantes.

Después de verificar bien la posición del lavabo en la abertura de la cubierta, aplique un poco de pasta al rim del lavabo.

Installer l’assemblage du vidage (non inclus) dans le lavabo, en suivant les instructions du manufacturier du robinet. S’assurer d’appliquer un trait de mastic scellant sous le rebord du vidage (pièce “A”) afin d’assurer l’étanchéité entre le lavabo et le vidage. Enlever le surplus de mastic après l’installation du vidage dans le lavabo.

NOTE: Ne utilisez pas des adhesifs ou des collants. Après vérification de l’ajustement et du centrage du lavabo sur l’ouverture, appliquer un trait d’adhésif au silicone sur le rebord du lavabo.

7

Center bowl over cutout and tighten screws (see 3 or 4) to secure bowl to countertop. Remove excess sealant from inside lip.

NOTE: The screws provided should be used on countertops with a minimum 1" thickness. For thinner countertops, use appropriate anchors and fasteners.

Cuando el lavabo esté colocado firmemente sobre la abertura de la cubierta apriete las tuercas de mariposa (según se ilustra en 3 o 4) para ajustar el lavabo a la cubierta. Remueva el excedente del adhesivo del rim.

NOTA: Los tornillos incluidos deberían ser usados con cuvierta de lavabos con un minimo de 1" de espesor. Para cubierta de lavabos que sean más delgados, usen las anclas y los sujetadores apropiados.

Centrer la cuvette sur l'ouverture en vous guidant sur les marques d'alognement et serrer les écrous à oreilles (voir 3 ou

4)pour fixer la cuvette sur le dessus du comptoir. Enlever le surplus de scellant sur le rebord interiéur.

NOTE: Les vis inclus devront etre utilises avec des comptoir qui sont 1" (25.4 mm) en épaisseur. Puor des comptoirs plus mince, utiliser des ancres et attaches appropriés.

730555-100 Rev. B

Page 2
Image 2
American Standard 0634 installation instructions For Wood Countertop

0634 specifications

The American Standard 0634 is a highly regarded model in the realm of plumbing fixtures, particularly known for its advanced features, exceptional durability, and innovative technologies. As a prominent choice for both residential and commercial applications, it combines functionality with style, catering to a wide range of customer preferences.

One of the key features of the 0634 model is its efficient water usage. Designed to meet and exceed water conservation standards, it incorporates a low-flow mechanism that significantly reduces water consumption without compromising performance. This makes it an appealing option for environmentally conscious consumers looking to minimize their ecological footprint.

In terms of construction, the American Standard 0634 is built with high-quality materials that ensure longevity and reliability. The fixture is crafted from robust porcelain, which not only adds to its aesthetic appeal but also enhances its resistance to chipping and scratching. This durability ensures that it can withstand the rigors of daily use, making it an excellent investment for any bathroom or kitchen.

The 0634 also features advanced flushing technology. With its powerful flushing system, it provides a swift and efficient flush that minimizes clogs and reduces maintenance needs. This technology is further complemented by a specially designed bowl shape that optimizes waste reduction and improves cleanliness.

Aesthetically, the American Standard 0634 is available in various finishes, allowing consumers to choose a style that best matches their interior decor. Whether it's a classic white or a contemporary color, the 0634 can seamlessly integrate into any bathroom or kitchen setup.

In addition to its technical specifications, the model's ease of installation and maintenance is a major selling point. It comes with a straightforward installation process, often yielding time and labor savings for both homeowners and professionals. Moreover, the design simplifies cleaning, promoting hygiene and ease of maintenance.

Overall, the American Standard 0634 showcases a blend of efficiency, durability, and elegance. Its cutting-edge features and technologies make it a top choice for those prioritizing both performance and style in their plumbing fixtures. With its commitment to quality and innovation, American Standard continues to set industry standards, and the 0634 model is a testament to that legacy.