3

4

H

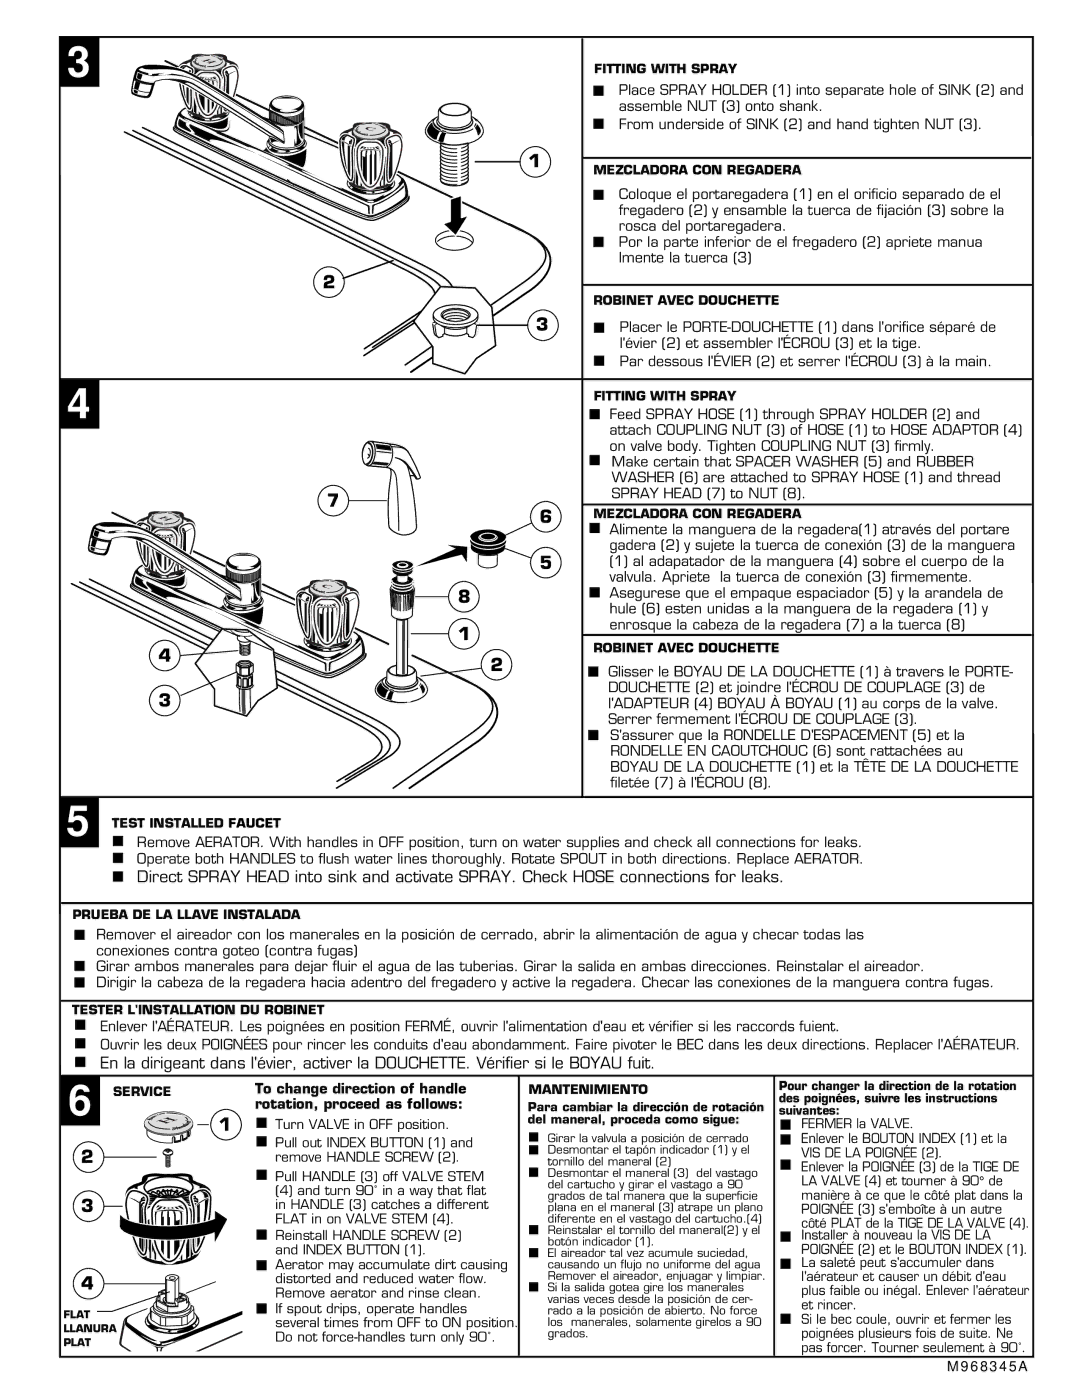
FITTING WITH SPRAY


Place SPRAY HOLDER (1) into separate hole of SINK (2) and


assemble NUT (3) onto shank.

C

From underside of SINK (2) and hand tighten NUT (3).

1

MEZCLADORA CON REGADERA


Coloque el portaregadera (1) en el orificio separado de el


fregadero (2) y ensamble la tuerca de fijación (3) sobre la


rosca del portaregadera.


Por la parte inferior de el fregadero (2) apriete manua


lmente la tuerca (3)

2

ROBINET AVEC DOUCHETTE


3

Placer le PORTE-DOUCHETTE (1) dans l'orifice séparé de


l'évier (2) et assembler l'ÉCROU (3) et la tige.


Par dessous l'ÉVIER (2) et serrer l'ÉCROU (3) à la main.


FITTING WITH SPRAY


Feed SPRAY HOSE (1) through SPRAY HOLDER (2) and


attach COUPLING NUT (3) of HOSE (1) to HOSE ADAPTOR (4)


on valve body. Tighten COUPLING NUT (3) firmly.


Make certain that SPACER WASHER (5) and RUBBER


WASHER (6) are attached to SPRAY HOSE (1) and thread

7

SPRAY HEAD (7) to NUT (8).


H

C

4

3

6

5

8

1

2

MEZCLADORA CON REGADERA

Alimente la manguera de la regadera(1) através del portare gadera (2) y sujete la tuerca de conexión (3) de la manguera

(1) al adapatador de la manguera (4) sobre el cuerpo de la valvula. Apriete la tuerca de conexión (3) firmemente. Asegurese que el empaque espaciador (5) y la arandela de hule (6) esten unidas a la manguera de la regadera (1) y enrosque la cabeza de la regadera (7) a la tuerca (8)

ROBINET AVEC DOUCHETTE

Glisser le BOYAU DE LA DOUCHETTE (1) à travers le PORTE- DOUCHETTE (2) et joindre l'ÉCROU DE COUPLAGE (3) de l'ADAPTEUR (4) BOYAU À BOYAU (1) au corps de la valve. Serrer fermement l'ÉCROU DE COUPLAGE (3).

S'assurer que la RONDELLE D'ESPACEMENT (5) et la RONDELLE EN CAOUTCHOUC (6) sont rattachées au BOYAU DE LA DOUCHETTE (1) et la TÊTE DE LA DOUCHETTE filetée (7) à l'ÉCROU (8).

5

TEST INSTALLED FAUCET

Remove AERATOR. With handles in OFF position, turn on water supplies and check all connections for leaks. Operate both HANDLES to flush water lines thoroughly. Rotate SPOUT in both directions. Replace AERATOR.

Direct SPRAY HEAD into sink and activate SPRAY. Check HOSE connections for leaks.

PRUEBA DE LA LLAVE INSTALADA

Remover el aireador con los manerales en la posición de cerrado, abrir la alimentación de agua y checar todas las conexiones contra goteo (contra fugas)

Girar ambos manerales para dejar fluir el agua de las tuberias. Girar la salida en ambas direcciones. Reinstalar el aireador.

Dirigir la cabeza de la regadera hacia adentro del fregadero y active la regadera. Checar las conexiones de la manguera contra fugas.

TESTER L'INSTALLATION DU ROBINET

Enlever l'AÉRATEUR. Les poignées en position FERMÉ, ouvrir l'alimentation d'eau et vérifier si les raccords fuient.

Ouvrir les deux POIGNÉES pour rincer les conduits d'eau abondamment. Faire pivoter le BEC dans les deux directions. Replacer l'AÉRATEUR.

En la dirigeant dans l'évier, activer la DOUCHETTE. Vérifier si le BOYAU fuit.

6 SERVICE

H

1


2

3

4

FLAT

LLANURA

PLAT

To change direction of handle rotation, proceed as follows:

Turn VALVE in OFF position.

Pull out INDEX BUTTON (1) and remove HANDLE SCREW (2).

Pull HANDLE (3) off VALVE STEM

(4)and turn 90˚ in a way that flat in HANDLE (3) catches a different FLAT in on VALVE STEM (4).

Reinstall HANDLE SCREW (2) and INDEX BUTTON (1).

Aerator may accumulate dirt causing distorted and reduced water flow. Remove aerator and rinse clean.

If spout drips, operate handles

several times from OFF to ON position. Do not force-handles turn only 90˚.

MANTENIMIENTO

Para cambiar la dirección de rotación del maneral, proceda como sigue:

Girar la valvula a posición de cerrado Desmontar el tapón indicador (1) y el tornillo del maneral (2)

Desmontar el maneral (3) del vastago del cartucho y girar el vastago a 90 grados de tal manera que la superficie plana en el maneral (3) atrape un plano diferente en el vastago del cartucho.(4) Reinstalar el tornillo del maneral(2) y el botón indicador (1).

El aireador tal vez acumule suciedad, causando un flujo no uniforme del agua Remover el aireador, enjuagar y limpiar. Si la salida gotea gire los manerales varias veces desde la posición de cer- rado a la posición de abierto. No force los manerales, solamente girelos a 90 grados.

Pour changer la direction de la rotation des poignées, suivre les instructions suivantes:

FERMER la VALVE.

Enlever le BOUTON INDEX (1) et la VIS DE LA POIGNÉE (2).

Enlever la POIGNÉE (3) de la TIGE DE LA VALVE (4) et tourner à 90° de manière à ce que le côté plat dans la POIGNÉE (3) s'emboîte à un autre

côté PLAT de la TIGE DE LA VALVE (4). Installer à nouveau la VIS DE LA

POIGNÉE (2) et le BOUTON INDEX (1). La saleté peut s'accumuler dans l'aérateur et causer un débit d'eau plus faible ou inégal. Enlever l'aérateur et rincer.

Si le bec coule, ouvrir et fermer les poignées plusieurs fois de suite. Ne pas forcer. Tourner seulement à 90˚.

M 9 6 8 3 4 5 A

Page 2
Image 2
American Standard 4275.201 Fitting with Spray, Mezcladora CON Regadera, Robinet Avec Douchette, Test Installed Faucet

4275.301, 4275.201, 4275.200, 4275.300 specifications

The American Standard 4275 series, which includes model numbers 4275.201, 4275.301, 4275.300, and 4275.200, is renowned for its blend of modern technology, sophisticated design, and practical functionality in bathroom fixtures. These toilets are designed to meet the needs of various consumers, highlighting both performance and aesthetics.

One of the standout features of the 4275 series is its high-efficiency design. With a flushing system that utilizes only 1.28 gallons per flush (GPF), these toilets comply with WaterSense regulations, promoting water conservation without sacrificing performance. This not only benefits the environment but also results in lower water bills, making it a smart investment for eco-conscious homeowners.

The 4275.201 model showcases a comfortable height that adheres to ADA (Americans with Disabilities Act) accessibility guidelines. This ensures that the toilet is easily usable for individuals of all ages and abilities. Its sleek elongated bowl design offers added comfort compared to standard round bowls, making it an ideal choice for families.

Another significant technological advancement in this series is the use of the EverClean surface, featured in the 4275.300 and 4275.301 models. This innovative coating inhibits the growth of stain and odor-causing bacteria, mold, and mildew, fostering a cleaner and healthier bathroom environment. The result is a toilet that stays fresher for longer, reducing the frequency of deep cleaning.

The unique Trapway design, present in these models, enhances waste removal efficiency. This design feature allows for a more direct waste path, significantly reducing the possibility of clogs and increasing overall flushing power. Coupled with a powerful siphoning flushing mechanism, it ensures even the most demanding toilet tasks are effortlessly managed.

Installation of the 4275 series is designed to be straightforward, thanks to the standard 12-inch rough-in, making it compatible with most existing plumbing setups. This ease of installation is complemented by the toilet’s classic styling and various finish options, ensuring it integrates seamlessly into any bathroom decor.

Moreover, the American Standard 4275 models come with a warranty, providing consumers with peace of mind regarding durability and quality. The combination of innovative features, advanced technology, and stylish design makes the American Standard 4275 series a top choice for those looking to upgrade their bathroom fixtures.