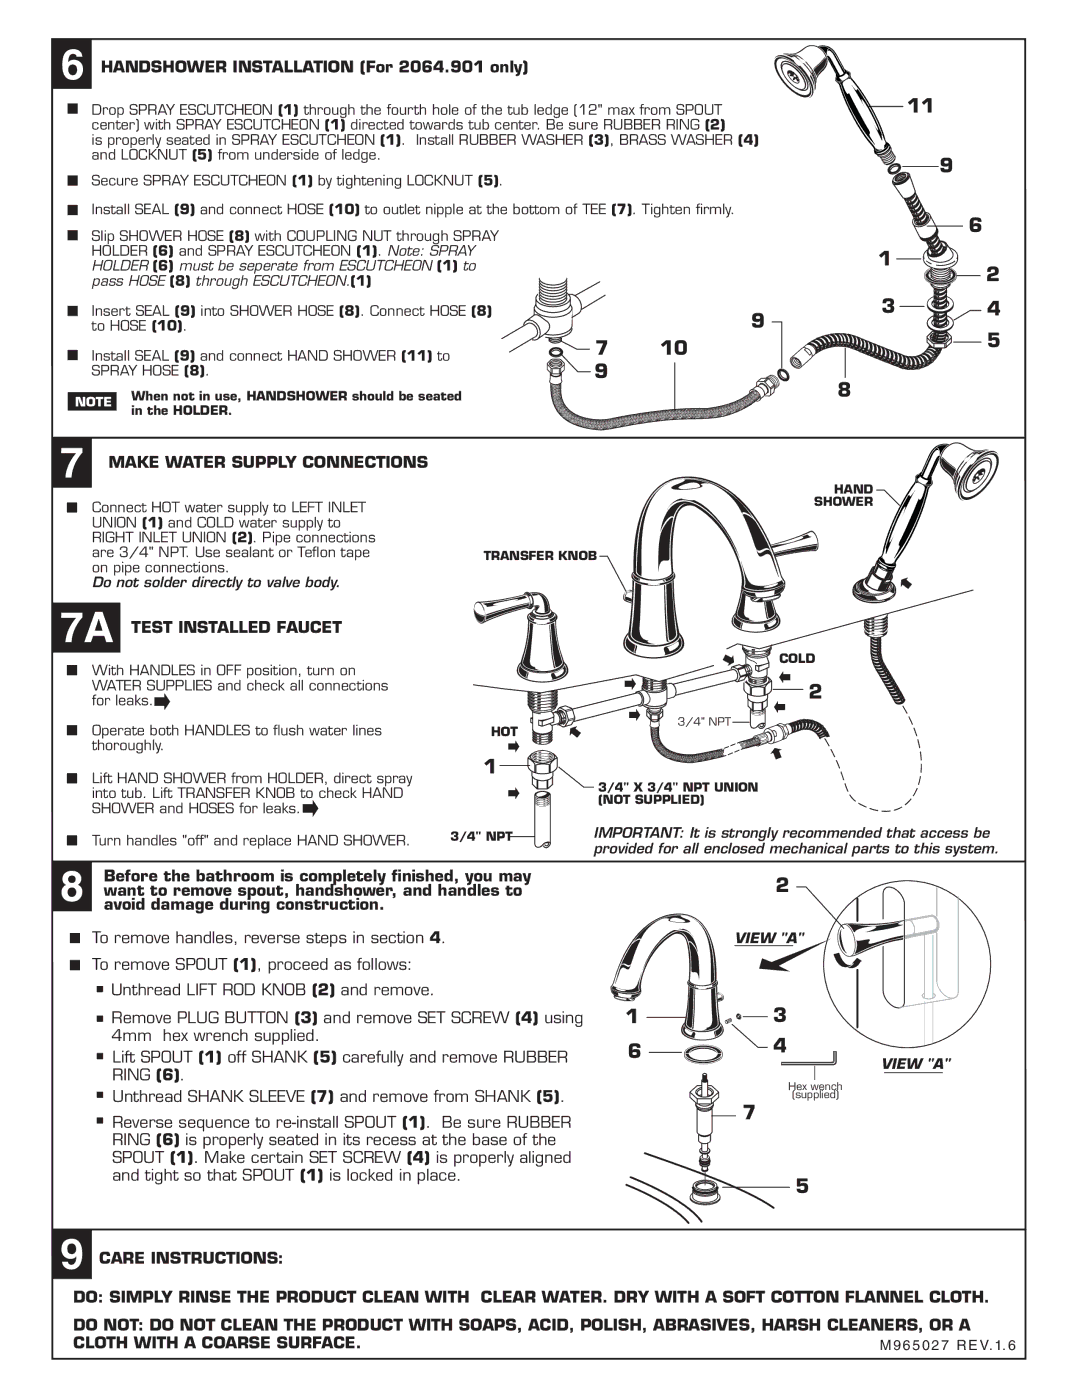
6 HANDSHOWER INSTALLATION (For 2064.901 only)

Drop SPRAY ESCUTCHEON (1) through the fourth hole of the tub ledge (12" max from SPOUT center) with SPRAY ESCUTCHEON (1) directed towards tub center. Be sure RUBBER RING (2)

is properly seated in SPRAY ESCUTCHEON (1). Install RUBBER WASHER (3), BRASS WASHER (4) and LOCKNUT (5) from underside of ledge.

Secure SPRAY ESCUTCHEON (1) by tightening LOCKNUT (5).

Install SEAL (9) and connect HOSE (10) to outlet nipple at the bottom of TEE (7). Tighten Þrmly.

Slip SHOWER HOSE (8) with COUPLING NUT through SPRAY HOLDER (6) and SPRAY ESCUTCHEON (1). Note: SPRAY HOLDER (6) must be seperate from ESCUTCHEON (1) to pass HOSE (8) through ESCUTCHEON.(1)

11


9


6

1

2


Insert SEAL (9) into SHOWER HOSE (8). Connect HOSE (8) to HOSE (10).

Install SEAL (9) and connect HAND SHOWER (11) to SPRAY HOSE (8).

NOTE

When not in use, HANDSHOWER should be seated

in the HOLDER.


9

3

4


5

7

10


9


8


7 MAKE WATER SUPPLY CONNECTIONS

Connect HOT water supply to LEFT INLET UNION (1) and COLD water supply to RIGHT INLET UNION (2). Pipe connections are 3/4" NPT. Use sealant or Teßon tape on pipe connections.

Do not solder directly to valve body.

7A TEST INSTALLED FAUCET

With HANDLES in OFF position, turn on WATER SUPPLIES and check all connections for leaks.

Operate both HANDLES to ßush water lines thoroughly.

Lift HAND SHOWER from HOLDER, direct spray into tub. Lift TRANSFER KNOB to check HAND SHOWER and HOSES for leaks.

HAND

SHOWER

TRANSFER KNOB

COLD

2

HOT

3/4" NPT


1

3/4" X 3/4" NPT UNION (NOT SUPPLIED)


Turn handles "off" and replace HAND SHOWER.

3/4" NPT

IMPORTANT: It is strongly recommended that access be


provided for all enclosed mechanical parts to this system.


8

Before the bathroom is completely finished, you may

2

want to remove spout, handshower, and handles to

avoid damage during construction.


To remove handles, reverse steps in section 4.


VIEW "A"

To remove SPOUT (1), proceed as follows:

Unthread LIFT ROD KNOB (2) and remove.


Remove PLUG BUTTON (3) and remove SET SCREW (4) using

1

3

4mm hex wrench supplied.

6

4

Lift SPOUT (1) off SHANK (5) carefully and remove RUBBER

RING (6).


VIEW "A"


Hex wench

Unthread SHANK SLEEVE (7) and remove from SHANK (5).


(supplied)

Reverse sequence to re-install SPOUT (1). Be sure RUBBER


7


RING (6) is properly seated in its recess at the base of the


SPOUT (1). Make certain SET SCREW (4) is properly aligned


and tight so that SPOUT (1) is locked in place.


5


9 CARE INSTRUCTIONS:

DO: SIMPLY RINSE THE PRODUCT CLEAN WITH CLEAR WATER. DRY WITH A SOFT COTTON FLANNEL CLOTH.

DO NOT: DO NOT CLEAN THE PRODUCT WITH SOAPS, ACID, POLISH, ABRASIVES, HARSH CLEANERS, OR A

CLOTH WITH A COARSE SURFACE.

M965027 REV. 1. 6

Page 3
Image 3
American Standard 7420.901, 7420.921 installation instructions Make Water Supply Connections, 7A Test Installed Faucet

7420.9, 7420.92, 7420.921, 7420.901 specifications

The American Standard 7420.901, 7420.9, 7420.92, and 7420.921 are a series of high-efficiency toilets designed to combine functionality with elegant design while prioritizing water conservation. These models reflect American Standard's commitment to innovation, ensuring that homeowners receive both reliable performance and modern aesthetics in their bathrooms.

One of the standout features of these models is the innovative VorMax flushing technology. VorMax provides a powerful and efficient flush that cleans the bowl more effectively than traditional toilets. The unique rim design and the specifically engineered flushing channel ensure that every part of the bowl is reached during flushing, reducing the need for multiple flushes and enhancing cleanliness.

Additionally, the 7420 series incorporates American Standard's special EverClean surface. This advanced coating inhibits the growth of stain and odor-causing bacteria, mold, and mildew. It not only keeps the toilet looking cleaner longer but also reduces the frequency of cleaning products needed, promoting a more environmentally friendly bathroom environment.

The design of the 7420 models is another highlight. With sleek lines and a modern aesthetic, these toilets easily fit into various bathroom styles. They are available in several colors, enabling homeowners to select a finish that complements their décor. Furthermore, the chair height of these models aims to provide increased comfort, making them accessible for users of all ages and abilities.

From a technological standpoint, the 7420 series is designed with efficiency in mind, achieving WaterSense certification. This means these toilets use 1.28 gallons per flush, which is significantly less than the conventional 1.6 gallons, leading to substantial water savings over time.

Another feature worth mentioning is the easy installation process. The toilets come with a simple installation guide, making it easier for homeowners to upgrade their bathrooms without requiring extensive plumbing knowledge.

Overall, the American Standard 7420.901, 7420.9, 7420.92, and 7420.921 models are a perfect blend of modern technology, innovative design, and user-friendly features. They represent a commitment to environmental responsibility while ensuring comfort and reliability in everyday use. Whether for a residential property or a commercial establishment, these toilets stand out as a leading choice for anyone seeking efficiency and style.