American Standard M968757D installation instructions T975.400/400BP, T975.500/500BP, Front

Models: M968757D

1 12
Download 12 pages 51.98 Kb
Page 1
Image 1
COLONY SOFT DECK MOUNT TRIM KIT

Installation Instructions

Instrucciones de Instalacion

Instructions d'installation

COLONY SOFT DECK MOUNT TRIM KIT

T975.400/400BP

JUEGO DECORATIVO PARA CUBIERTA COLONY

T975.500/500BP

TROUSSE DE GARNITURE POUR MONTAGE SUR

PLAGE D’ÉVIER COLONY


Thank you for selecting American-Standard...the benchmark of fine

quality for over 100 years. To ensure that your installation proceeds smoothly-- please read these instructions carefully before you begin.

Gracias por preferir American Standard…. El punto de referencia de la más fina calidad por más de

100 años. Para asegurar que su instalación se efectue de la mejor forma favor de leer estas instrucciones cuidadosamente antes de empezar.

Nous vous remercions d'avoir choisi American Standard... synonyme de qualité supérieure depuis plus de 100 ans. Pour s'assurer d'une installation sans inconvénients, veuillez lire attentivement ces instructions avant de commencer.

C

H

Certified to comply with ANSI A112.18.1 U.S. Patent No. D403,750

M 9 6 8 7 5 7 D

1


SPOUT INSTALLATION

CAUTION

Turn off hot and cold water


supplies before beginning.


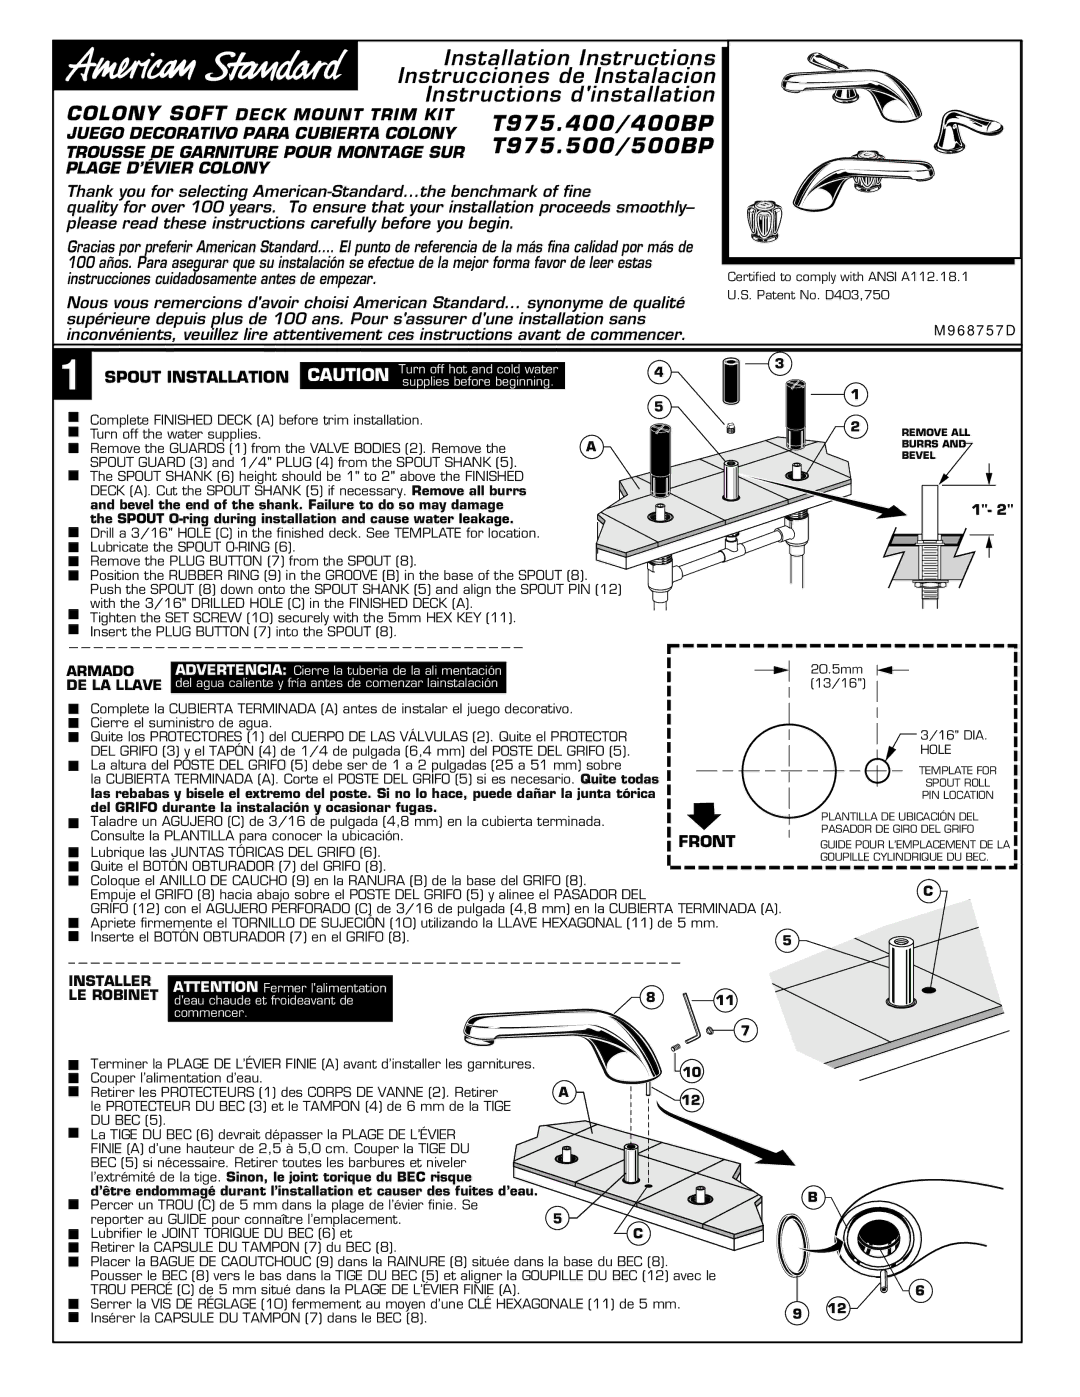
Complete FINISHED DECK (A) before trim installation.


Turn off the water supplies.


A


Remove the GUARDS (1) from the VALVE BODIES (2). Remove the


SPOUT GUARD (3) and 1/4" PLUG (4) from the SPOUT SHANK (5).


The SPOUT SHANK (6) height should be 1" to 2" above the FINISHED


DECK (A). Cut the SPOUT SHANK (5) if necessary. Remove all burrs


and bevel the end of the shank. Failure to do so may damage


the SPOUT O-ring during installation and cause water leakage.


Drill a 3/16" HOLE (C) in the finished deck. See TEMPLATE for location.


Lubricate the SPOUT O-RING (6).


Remove the PLUG BUTTON (7) from the SPOUT (8).


Position the RUBBER RING (9) in the GROOVE (B) in the base of the SPOUT (8).


Push the SPOUT (8) down onto the SPOUT SHANK (5) and align the SPOUT PIN (12)


with the 3/16" DRILLED HOLE (C) in the FINISHED DECK (A).


Tighten the SET SCREW (10) securely with the 5mm HEX KEY (11).


Insert the PLUG BUTTON (7) into the SPOUT (8).


4

5

3

1


2

REMOVE ALL


BURRS AND


BEVEL

1"- 2"

ARMADO

ADVERTENCIA: Cierre la tuberia de la ali mentación


20.5mm


DE LA LLAVE

del agua caliente y fría antes de comenzar lainstalación


(13/16")


Complete la CUBIERTA TERMINADA (A) antes de instalar el juego decorativo.


Cierre el suministro de agua.


3/16" DIA.


Quite los PROTECTORES (1) del CUERPO DE LAS VÁLVULAS (2). Quite el PROTECTOR


DEL GRIFO (3) y el TAPÓN (4) de 1/4 de pulgada (6,4 mm) del POSTE DEL GRIFO (5).


HOLE


La altura del POSTE DEL GRIFO (5) debe ser de 1 a 2 pulgadas (25 a 51 mm) sobre


TEMPLATE FOR


la CUBIERTA TERMINADA (A). Corte el POSTE DEL GRIFO (5) si es necesario. Quite todas


SPOUT ROLL


las rebabas y bisele el extremo del poste. Si no lo hace, puede dañar la junta tórica


PIN LOCATION


del GRIFO durante la instalación y ocasionar fugas.


PLANTILLA DE UBICACIÓN DEL


Taladre un AGUJERO (C) de 3/16 de pulgada (4,8 mm) en la cubierta terminada.


PASADOR DE GIRO DEL GRIFO


Consulte la PLANTILLA para conocer la ubicación.


FRONT


GUIDE POUR L’EMPLACEMENT DE LA


Lubrique las JUNTAS TÓRICAS DEL GRIFO (6).


GOUPILLE CYLINDRIQUE DU BEC.


Quite el BOTÓN OBTURADOR (7) del GRIFO (8).


Coloque el ANILLO DE CAUCHO (9) en la RANURA (B) de la base del GRIFO (8).


C


Empuje el GRIFO (8) hacia abajo sobre el POSTE DEL GRIFO (5) y alinee el PASADOR DEL


GRIFO (12) con el AGUJERO PERFORADO (C) de 3/16 de pulgada (4,8 mm) en la CUBIERTA TERMINADA (A).


Apriete firmemente el TORNILLO DE SUJECIÓN (10) utilizando la LLAVE HEXAGONAL (11) de 5 mm.


Inserte el BOTÓN OBTURADOR (7) en el GRIFO (8).


5


INSTALLER

ATTENTION Fermer l'alimentation


LE ROBINET

8


11


d'eau chaude et froideavant de


commencer.

7

Terminer la PLAGE DE L’ÉVIER FINIE (A) avant d’installer les garnitures.


10

Couper l’alimentation d’eau.


A


Retirer les PROTECTEURS (1) des CORPS DE VANNE (2). Retirer

12

le PROTECTEUR DU BEC (3) et le TAMPON (4) de 6 mm de la TIGE


DU BEC (5).


La TIGE DU BEC (6) devrait dépasser la PLAGE DE L’ÉVIER


FINIE (A) d’une hauteur de 2,5 à 5,0 cm. Couper la TIGE DU


BEC (5) si nécessaire. Retirer toutes les barbures et niveler


l’extrémité de la tige. Sinon, le joint torique du BEC risque


d’être endommagé durant l’installation et causer des fuites d’eau.


Percer un TROU (C) de 5 mm dans la plage de l’évier finie. Se

5


reporter au GUIDE pour connaître l’emplacement.

C

Lubrifier le JOINT TORIQUE DU BEC (6) et


Retirer la CAPSULE DU TAMPON (7) du BEC (8).


Placer la BAGUE DE CAOUTCHOUC (9) dans la RAINURE (8) située dans la base du BEC (8). Pousser le BEC (8) vers le bas dans la TIGE DU BEC (5) et aligner la GOUPILLE DU BEC (12) avec le TROU PERCÉ (C) de 5 mm situé dans la PLAGE DE L’ÉVIER FINIE (A).

Serrer la VIS DE RÉGLAGE (10) fermement au moyen d’une CLÉ HEXAGONALE (11) de 5 mm. Insérer la CAPSULE DU TAMPON (7) dans le BEC (8).

B

T975.400/400BPJUEGO DECORATIVO PARA CUBIERTA COLONY 6 9 12

Page 1
Image 1
American Standard M968757D installation instructions T975.400/400BP, T975.500/500BP, Colony Soft Deck Mount Trim Kit