Ampeg SVP-PRO manual Front Panel

Models: SVP-PRO

1 8
Download 8 pages 14.59 Kb
Page 4
Image 4

SVP-PRO Bass Preamp

The Front Panel:

1

2

3

4

5

6

7

8

9

10

11

12

1314

15

16 17

18

19

20

1.INPUT: Use this jack to connect your bass to the preamp by means of a shielded instrument cable.

2.MUTE: This switch, when depressed, mutes the signal at all output jacks except the Tuner Out jack (#27).

3.PAD: This switch, when depressed, attenuates the input signal by 15dB. If your bass has active pickups, depress this switch to better accommodate its output signal.

4.GAIN: Use this control to adjust the level of the input signal. When properly set, the Peak LED (#5) will flash on strong sig- nals. For the best signal to noise ratio set the Gain control to the highest useable set- ting and adjust the Drive and Master con- trols (#8, 18) to obtain the desired output level.

5.PEAK/MUTE LED: This LED illuminates when the preamp signal approaches clip- ping. When the Mute switch (#2) is engaged, this LED stays on as a visual indicator that the Mute function is active.

6.BRIGHT: This switch, when depressed, boosts the upper mid and high frequencies.

7.ULTRA LO: This switch, when de- pressed, provides emphasis to the low end by boosting the low frequencies and cutting the mid frequencies.

8.DRIVE: Use this control to adjust the level of the distortion. In the fully counter- clockwise position the preamp is in the cleanest, traditional SVT condition. As the control is rotated clockwise, the distortion level is increased. The tone of the signal is also changed to provide a smoother over- drive. The tone controls may have to be readjusted to obtain the desired tone. The Gain control (#4) and Pad (#3) interact with the Drive control. For greater overdrive, the Pad switch (#3) should be out and the Drive control should be rotated fully clock- wise. Use the Gain control (#4) to set the amount of overdrive desired. The Peak LED (#5) will remain illuminated when the amplifier is used in this manner.

9.BASS: Use this control to adjust the low frequency output level. This control pro- vides 12dB of cut or boost at 40Hz.

10.MIDRANGE: Use this control to adjust the mid frequency output level. This control provides 15dB of cut or 12dB of boost at the frequency selected by the Frequency control (#11).

11.FREQUENCY: Use this control to select the center frequency for the Midrange control (#10). The center fre- quencies are 220Hz, 450Hz, 800Hz, 1.6kHz, and 3kHz.

12.TREBLE: Use this control to adjust the high frequency output level. This control provides 12dB of cut or boost at 4kHz.

13.GRAPHIC EQ: This switch, when depressed, activates the Graphic EQ. (When using a footswitch, #23, to control the Graphic EQ, this switch must be depressed.)

14.ULTRA HI: This switch, when depressed, boosts the frequencies above those affected by the Bright switch (#6).

15.GRAPHIC EQ : Use these controls to adjust the amplitude of the signal at the fre- quency stated above each slider.

16.GRAPHIC EQ LEVEL: Use this control to adjust the overall output level of the Graphic EQ.

17.GRAPHIC EQ ACTIVE/PEAK LED: This LED illuminates yellow when the EQ section is active. This LED will flash when the amplitude of the Graphic EQ signal approaches clipping.

18.MASTER: Use this control to adjust the overall output signal level.

19.POWER INDICATOR LED: This LED illuminates green when the preamp is on.

20.POWER: Use this switch to turn the preamp on (side of switch with the dot depressed) and off (side of switch without the dot depressed).

4

Page 4
Image 4
Ampeg SVP-PRO manual Front Panel

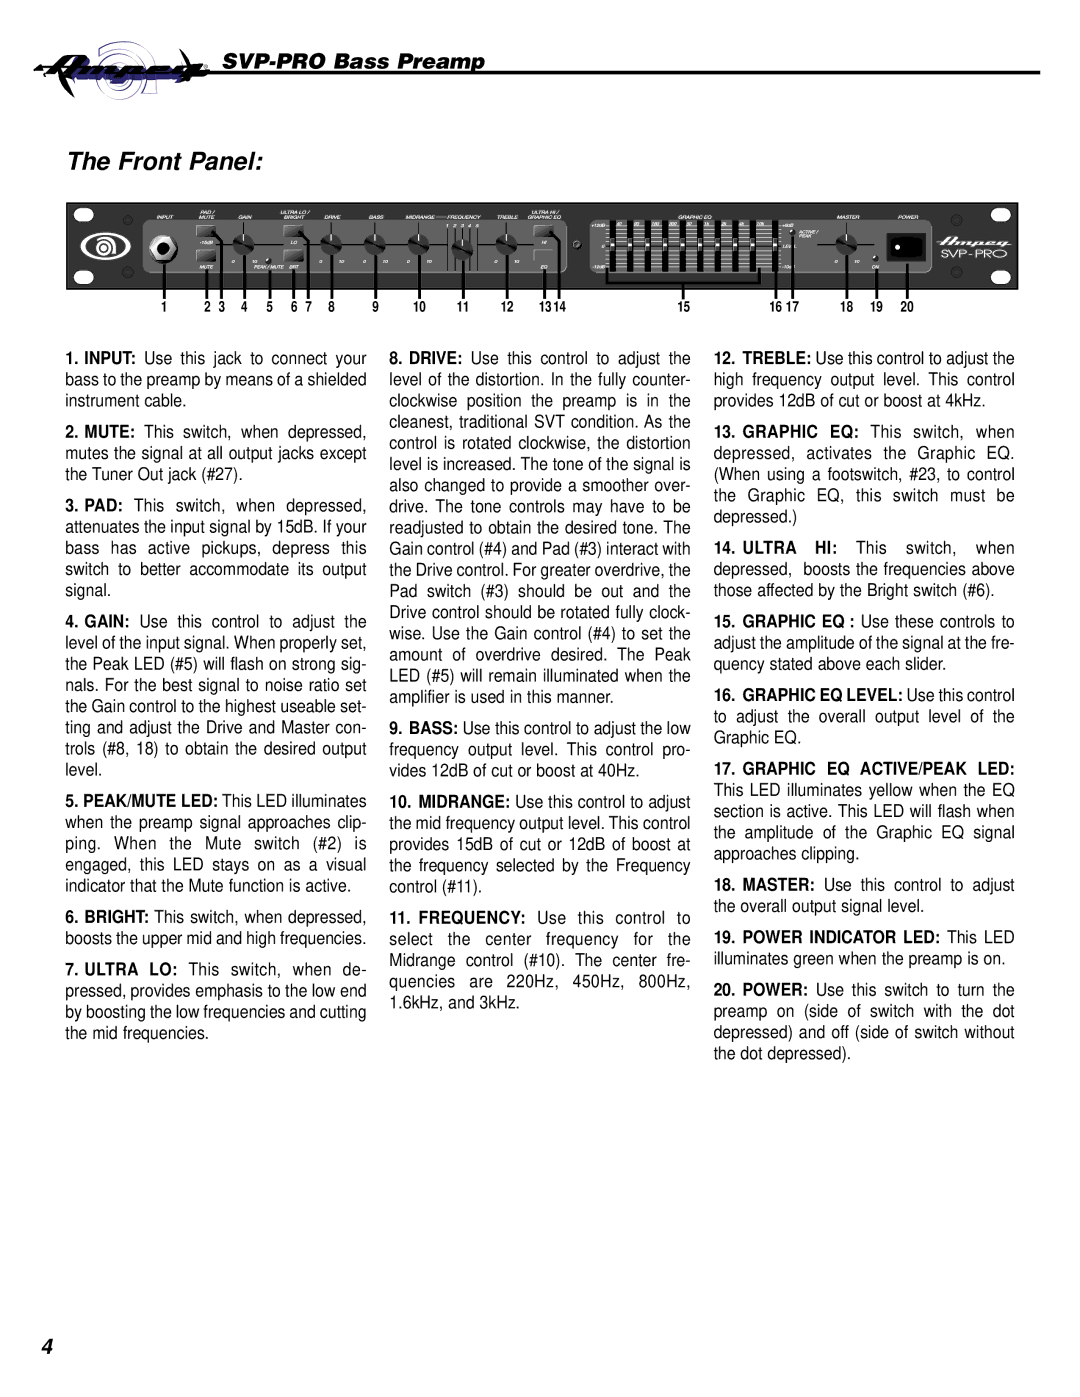
SVP-PRO specifications

The Ampeg SVP-PRO is a renowned preamplifier that stands out in the world of bass amplification. Designed with the professional bassist in mind, it exemplifies versatility and high performance, making it a favorite among musicians and audio engineers alike.

One of the main features of the SVP-PRO is its tube preamp design. Integrating a 12AX7 vacuum tube, this preamp provides a warm, rich tone that is highly sought after in live and studio environments. The tube can significantly enhance the harmonic characteristics of the sound, resulting in a vintage texture that many purists admire.

The SVP-PRO offers an extensive range of tone-shaping controls that allow for comprehensive sound customization. Featuring a 3-band EQ section, musicians can easily manipulate the low, mid, and high frequencies to suit their individual playing style. Furthermore, an Ultra Low and Ultra High switch enhances the low-end response and brightens the top end, providing flexibility for various musical genres, from jazz to rock.

Another notable feature is the onboard Compressor. This dynamic control helps to smooth out the dynamics of the performance, ensuring that both soft and loud notes maintain clarity without sacrificing sustain or punch. The compressor is easy to dial in, offering a gentle compression that can be adjusted from subtle to more pronounced effects.

Connectivity is another strong point of the SVP-PRO. The preamp is equipped with balanced XLR outputs, enabling seamless integration into professional recording and sound systems. It also features a 1/4” output for connecting to amplifiers or effects chains. The inclusion of an effects loop allows for the incorporation of external processors, further expanding its sonic capabilities.

Durability is essential for any professional gear, and the SVP-PRO is constructed with ruggedness in mind. The sturdy chassis is designed for both studio and stage use, ensuring that it can withstand the rigors of touring musicians while still delivering exceptional audio performance.

In summary, the Ampeg SVP-PRO is a versatile and powerful preamp that combines classic tube warmth with modern usability. Its extensive tone-shaping features, built-in compression, and robust construction make it an essential tool for bassists seeking a reliable and high-quality sound both on stage and in the studio. Whether you’re a seasoned professional or an aspiring player, the SVP-PRO provides the tools needed to shape your unique sound.