Preparing Captive Wires

You will need a wire stripper and a flat-blade screwdriver to prepare the captive wires:

1.Strip 0.25 inch (6.35 mm) of wire insulation off all wires.

2.Insert each wire into the appropriate opening on the connector according to the wiring diagrams in this section.

3.Turn the flat-head screws clockwise to secure the wire in the connector.

Note: Do not over-torque the screw. Doing so can bend the seating pin.

Wiring Guidelines

The AXD-IR+ requires 12 VDC power to operate properly. The power is supplied by the AMX system's AXlink cable. The maximum wiring distance between the Central Controller and the receiver is determined by power consumption, supplied voltage, and the wire gauge used for the cable. The following table lists wire sizes and the maximum lengths allowable between the receiver and the Central Controller. The maximum wiring lengths are based on a minimum of 13.5 volts available at the Central Controller's power supply.

Wiring Specifications @ 35 mA

Maximum Wiring Length

Wire Size

Distance


18 AWG

3000 feet (914.40 m)


20 AWG

2121.64 feet (646.68 m)


22 AWG

1,322.75 feet (403.17 m)


24 AWG

833.80 feet (254.14 m)


If you install the unit farther from the Central Controller than recommended in this table, connect an external 12 VDC power supply, as shown in the following wiring diagrams.

Connection and Wiring

Wiring the AXD-IR+ or the AXR-IRSM+ to AXlink

Install the AXlink data/power bus wiring as shown in FIG. 6.

Checking IR Data Status

Locate the red IR Data LED on the front of the unit. Point the system's AMX transmitter towards the sensor and press a button. The IR Data LED lights when the unit receives data.

If the IR Data LED on the unit does not light:

Verify that the transmit LED on the transmitter lights when you press a button.

Check the wiring to the unit.

Verify that the transmitter frequency is properly configured.

Checking AXlink Status

The AXlink LED lights to indicate AXlink power/data status as follows:

• 1 blink per second

Indicates power is active and AXlink communication is working.

• 2 blinks per second

Indicates the devices specified in the Master program do not match the


devices found.

• 3 blinks per second

Indicates AXlink communication error.

• Full On

Indicates the following conditions:


• There is no AXlink control or activity, but power is On.


• The Axcess program is not loaded.

If the LED is on and not flashing, disconnect the AXlink connector and recheck all AXlink connections. Then, reconnect the AXlink connector to the panel and verify the LED is flashing once per second.

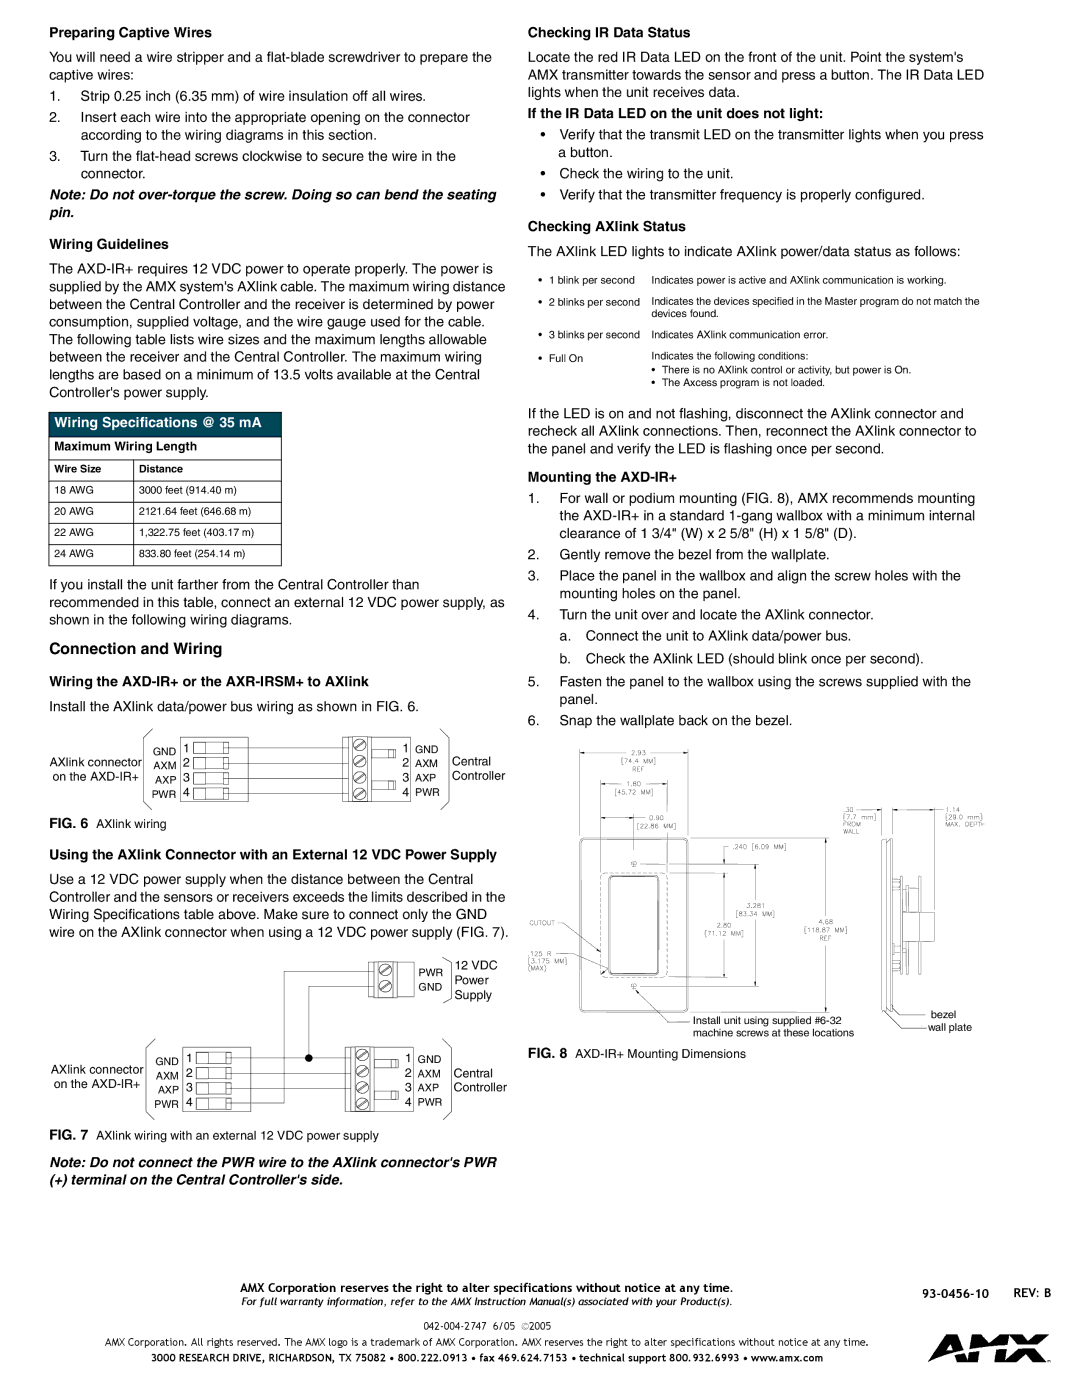
Mounting the AXD-IR+

1.For wall or podium mounting (FIG. 8), AMX recommends mounting the AXD-IR+ in a standard 1-gang wallbox with a minimum internal clearance of 1 3/4" (W) x 2 5/8" (H) x 1 5/8" (D).

2.Gently remove the bezel from the wallplate.

3.Place the panel in the wallbox and align the screw holes with the mounting holes on the panel.

4.Turn the unit over and locate the AXlink connector.

a.Connect the unit to AXlink data/power bus.

b.Check the AXlink LED (should blink once per second).

5.Fasten the panel to the wallbox using the screws supplied with the panel.

6.Snap the wallplate back on the bezel.

AXlink connector

GND 1

1

GND

Central

AXM 2

2

AXM

on the AXD-IR+

AXP 3

3

AXP

Controller


PWR 4

4

PWR


FIG. 6 AXlink wiring


Using the AXlink Connector with an External 12 VDC Power Supply

Use a 12 VDC power supply when the distance between the Central Controller and the sensors or receivers exceeds the limits described in the Wiring Specifications table above. Make sure to connect only the GND wire on the AXlink connector when using a 12 VDC power supply (FIG. 7).


AXlink connector

GND

1


AXM

2


on the AXD-IR+

AXP

3


PWR

4


FIG. 7 AXlink wiring with an external 12 VDC power supply


GNDPWR

12 VDC


Power


Supply


Install unit using supplied #6-32


machine screws at these locations

1

GND

FIG. 8 AXD-IR+ Mounting Dimensions


2

AXM

Central

3

AXP

Controller

4PWR

bezel wall plate

Note: Do not connect the PWR wire to the AXlink connector's PWR

(+) terminal on the Central Controller's side.

AMX Corporation reserves the right to alter specifications without notice at any time.

93-0456-10

REV: B

For full warranty information, refer to the AMX Instruction Manual(s) associated with your Product(s).


042-004-2747 6/05 ©2005


AMX Corporation. All rights reserved. The AMX logo is a trademark of AMX Corporation. AMX reserves the right to alter specifications without notice at any time.

3000 RESEARCH DRIVE, RICHARDSON, TX 75082 • 800.222.0913 • fax 469.624.7153 • technical support 800.932.6993 • www.amx.com

Page 2
Image 2
AMX AXD-IR+ quick start Connection and Wiring

AXD-IR+ specifications

The AMX AXD-IR+ is a revolutionary addition to the world of control systems, designed to enhance the efficiency and capabilities of AV installations. As an advanced infrared control system, the AXD-IR+ combines cutting-edge technology with outstanding features that significantly improve user experience in commercial and residential settings.

One of the main features of the AXD-IR+ is its ability to provide seamless integration with existing AV systems. The device supports a wide range of protocols, ensuring compatibility with various audio-visual equipment. This flexibility allows integrators to easily implement the AXD-IR+ into any existing infrastructure, streamlining the installation process and reducing overhead costs.

The AXD-IR+ comes equipped with an intuitive interface that simplifies control processes. Users can manage their AV devices with ease, thanks to a user-friendly touch screen and customizable button layouts. Furthermore, the versatility of the AXD-IR+ extends to its programmable functions, allowing users to create macros that execute multiple commands with a single button press. This feature enhances user productivity by minimizing the time needed to switch between different devices and operations.

In terms of technology, the AMX AXD-IR+ leverages advanced infrared transmission, ensuring reliable communication between the control system and various AV components. The device includes multiple IR output ports, enabling users to control several devices from a single unit. This multi-zone capability makes the AXD-IR+ ideal for larger installations where multiple devices need to be managed simultaneously.

Another key characteristic of the AXD-IR+ is its robust construction, designed to withstand the demands of both commercial and residential environments. The unit is built with high-quality materials, ensuring durability and longevity, which is essential for professional settings that require consistent performance over time.

Additionally, the AMX AXD-IR+ is equipped with a powerful firmware that allows for regular updates, ensuring that users benefit from the latest advancements in control technology. With ongoing support from AMX, users can feel confident that their systems will remain cutting-edge, adapting to future requirements and innovations.

In conclusion, the AMX AXD-IR+ represents a significant advancement in infrared control technology, offering features that cater to both integrators and end-users. With its compatibility, ease of use, and robust design, it stands out as an essential tool for anyone looking to streamline their AV control experience.