BASIC SYSTEM OPERATION
IMPORTANT: Batteries are shipped fully charged.
1.Install batteries - DO NOT mix alkaline & NiMH batteries!
2.Select a transmission channel on the belt pack (1 thru 16, 9 is reserved for All Call channel)
3.Plug headset connector into jack on belt pack
4.Turn on power & adjust volume w/ thumbwheel on side
Slow flashing light indicates power on / Listen Only Mode
5.Press PTT button once for Active Mode
6.Press & hold PTT button for Push To Talk Mode
4. Set each belt pack in a group to the same channel
NOTE: Repeat the steps above for each belt pack/user.
SYSTEM RANGE
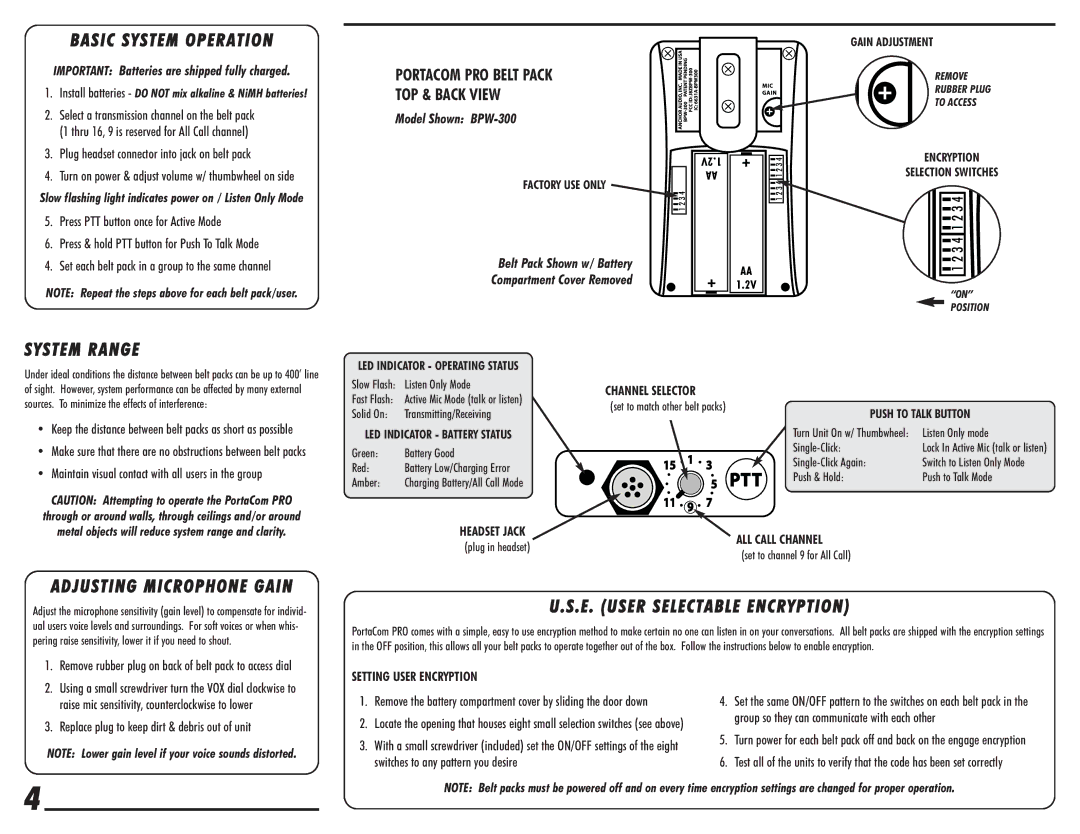
PORTACOM PRO BELT PACK
TOP & BACK VIEW
Model Shown:
FACTORY USE ONLY ![]()
Belt Pack Shown w/ Battery
Compartment Cover Removed
GAIN ADJUSTMENT
REMOVE
RUBBER PLUG
TO ACCESS
ENCRYPTION
SELECTION SWITCHES
“ON”
POSITION
Under ideal conditions the distance between belt packs can be up to 400’ line of sight. However, system performance can be affected by many external sources. To minimize the effects of interference:
• Keep the distance between belt packs as short as possible |
LED INDICATOR - OPERATING STATUS
Slow Flash: | Listen Only Mode |
Fast Flash: | Active Mic Mode (talk or listen) |
Solid On: | Transmitting/Receiving |
LED INDICATOR - BATTERY STATUS
CHANNEL SELECTOR
(set to match other belt packs)
PUSH TO TALK BUTTON | |
Turn Unit On w/ Thumbwheel: | Listen Only mode |
| Lock In Active Mic (talk or listen) |
• | Make sure that there are no obstructions between belt packs |
• | Maintain visual contact with all users in the group |
Green: | Battery Good |
Red: | Battery Low/Charging Error |
Amber: | Charging Battery/All Call Mode |
Switch to Listen Only Mode | |
Push & Hold: | Push to Talk Mode |
CAUTION: Attempting to operate the PortaCom PRO through or around walls, through ceilings and/or around metal objects will reduce system range and clarity.
ADJUSTING MICROPHONE GAIN
Adjust the microphone sensitivity (gain level) to compensate for individ- ual users voice levels and surroundings. For soft voices or when whis- pering raise sensitivity, lower it if you need to shout.
HEADSET JACK
ALL CALL CHANNEL
(plug in headset)
(set to channel 9 for All Call)
U.S.E. (USER SELECTABLE ENCRYPTION)
PortaCom PRO comes with a simple, easy to use encryption method to make certain no one can listen in on your conversations. All belt packs are shipped with the encryption settings in the OFF position, this allows all your belt packs to operate together out of the box. Follow the instructions below to enable encryption.
1.Remove rubber plug on back of belt pack to access dial
2.Using a small screwdriver turn the VOX dial clockwise to raise mic sensitivity, counterclockwise to lower
3.Replace plug to keep dirt & debris out of unit
NOTE: Lower gain level if your voice sounds distorted.
SETTING USER ENCRYPTION
1.Remove the battery compartment cover by sliding the door down
2.Locate the opening that houses eight small selection switches (see above)
3.With a small screwdriver (included) set the ON/OFF settings of the eight switches to any pattern you desire
4.Set the same ON/OFF pattern to the switches on each belt pack in the group so they can communicate with each other
5.Turn power for each belt pack off and back on the engage encryption
6.Test all of the units to verify that the code has been set correctly
4 |
| NOTE: Belt packs must be powered off and on every time encryption settings are changed for proper operation. |
|
|