World Leaders in Film and
Filmless Photography
Taking Pictures With Your Olympus D-360L
Thank you for choosing the Olympus®
To ensure you are completely satisfied with your Olympus
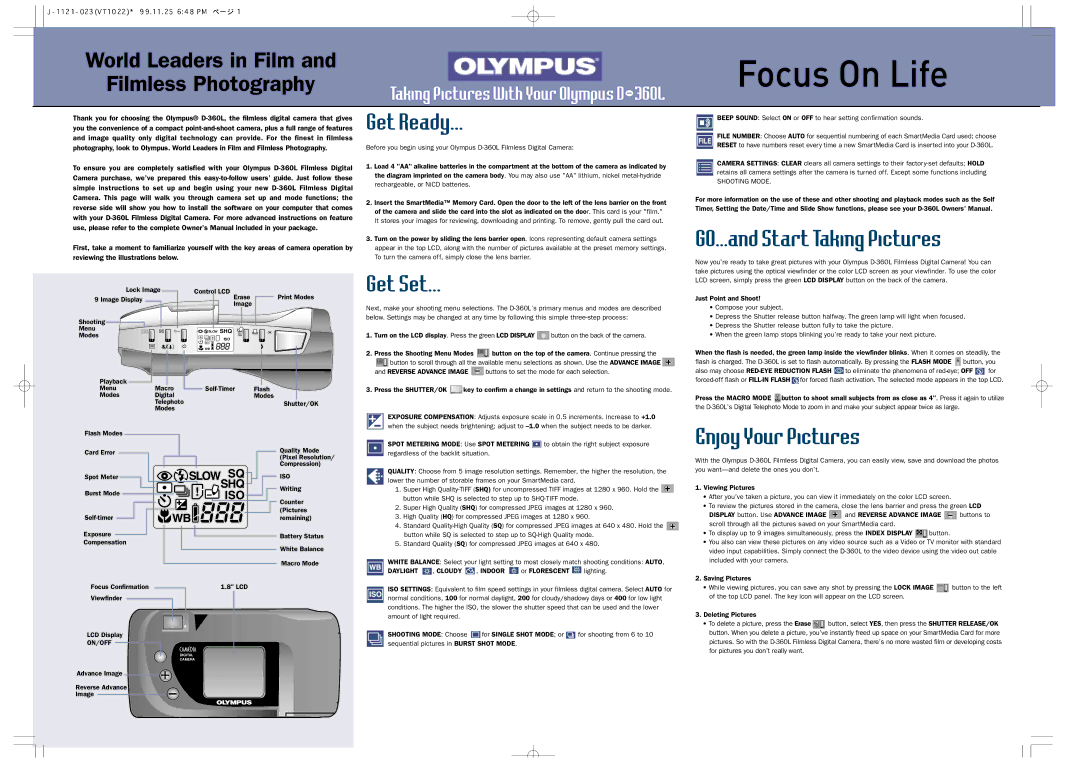
First, take a moment to familiarize yourself with the key areas of camera operation by reviewing the illustrations below.
Get Ready...
Before you begin using your Olympus
1.Load 4 "AA" alkaline batteries in the compartment at the bottom of the camera as indicated by the diagram imprinted on the camera body. You may also use "AA" lithium, nickel
2.Insert the SmartMedia™ Memory Card. Open the door to the left of the lens barrier on the front of the camera and slide the card into the slot as indicated on the door. This card is your "film." It stores your images for reviewing, downloading and printing. To remove, gently pull the card out.
3.Turn on the power by sliding the lens barrier open. Icons representing default camera settings appear in the top LCD, along with the number of pictures available at the preset memory settings. To turn the camera off, simply close the lens barrier.
BEEP SOUND: Select ON or OFF to hear setting confirmation sounds.
FILE NUMBER: Choose AUTO for sequential numbering of each SmartMedia Card used; choose RESET to have numbers reset every time a new SmartMedia Card is inserted into your
CAMERA SETTINGS: CLEAR clears all camera settings to their
SHOOTING MODE.
For more information on the use of these and other shooting and playback modes such as the Self Timer, Setting the Date/Time and Slide Show functions, please see your
GO...and Start Taking Pictures
Now you’re ready to take great pictures with your Olympus
Lock Image |
| Control LCD |
|
| |
|
|
| |||
9 Image Display |
|
| Erase |
| Print Modes |
|
|
| |||
|
| Image |
|
| |
|
|
|
|
| |
Shooting |
|
|
|
Menu | SLOW SHQ | OK | |
Modes | ! | ISO |
|
| +/- |
|
|
Get Set...
Next, make your shooting menu selections. The
1. Turn on the LCD display. Press the green LCD DISPLAY ![]() button on the back of the camera.
button on the back of the camera.
LCD screen, simply press the green LCD DISPLAY button on the back of the camera.
Just Point and Shoot!
•Compose your subject.
•Depress the Shutter release button halfway. The green lamp will light when focused.
•Depress the Shutter release button fully to take the picture.
•When the green lamp stops blinking you’re ready to take your next picture.
![]() WB
WB ![]()
![]()
![]()
Playback |
|
|
|
|
|
|
|
|
|
|
|
|
|
|
|
|
|
|
|
|
|
|
|
|
|
|
|
|
|
|
|
|
|
|
| |||||||
|
|
|
|
|
|
|
|
|
|
|
|
|
|
|
|
|
|
|
|
|
|
|
|
|
|
|
|
|
|
|
|
|
| |||||||||
Menu | Macro |
|
|
|
| Flash | ||||||||||||||||||||||||||||||||||||
|
|
|
| |||||||||||||||||||||||||||||||||||||||
Modes | Digital |
|
|
|
|
|
|
|
|
|
|
|
| Modes | ||||||||||||||||||||||||||||
|
|
|
|
|
|
|
|
|
|
|
|
|
| Telephoto |
|
|
|
|
|
|
|
|
|
|
|
|
|
|
|
|
|
|
| Shutter/OK | ||||||||
|
|
|
|
|
|
|
|
|
|
|
|
|
| Modes |
|
|
|
|
|
|
|
|
|
|
|
|
|
|
|
|
|
|
| |||||||||
|
|
|
|
|
|
|
|
|
|
|
|
|
|
|
|
|
|
|
|
|
|
|
|
|
|
|
|
|
|
|
|
|
| |||||||||
Flash Modes |
|
|
|
|
|
|
|
|
|
|
|
|
|
|
|
|
|
|
|
|
|
|
|
|
|
|
|
|
|
|
|
|
| Quality Mode | ||||||||
Card Error |
|
|
|
|
|
|
|
|
|
|
|
|
|
|
|
|
|
|
|
|
|
|
|
|
|
|
|
|
|
| ||||||||||||
|
|
|
|
|
|
|
|
|
|
|
|
|
|
|
|
|
|
|
|
|
|
|
|
|
|
|
|
|
|
|
|
|
|
|
|
|
|
|
|
|
| (Pixel Resolution/ |
|
|
|
|
|
|
|
|
|
|
|
|
|
|
|
|
|
|
|
|
|
|
|
|
|
|
|
|
|
|
|
|
|
|
|
|
|
|
|
|
|
| Compression) |
Spot Meter |
|
|
|
|
|
|
|
|
|
|
|
|
|
|
|
|
|
|
|
|
|
|
|
|
|
|
|
|
|
|
| ISO | ||||||||||
Burst Mode |
|
|
|
|
|
|
|
|
|
|
|
|
|
|
|
|
|
|
|
|
|
|
|
|
|
|
|
|
|
|
|
|
|
|
|
|
| Writing | ||||
|
|
|
|
|
|
|
|
|
|
|
|
|
|
|
|
|
|
|
|
|
|
|
|
|
|
|
|
|
|
| Counter | |||||||||||
|
|
|
|
|
|
|
|
|
|
|
|
|
|
|
|
|
|
|
|
|
|
|
|
|
|
|
|
|
|
|
|
|
|
|
|
|
|
|
|
|
| |
|
|
|
|
|
|
|
|
|
|
|
|
|
|
|
|
|
|
|
|
|
|
|
|
|
|
|
|
|
|
|
|
|
|
|
|
|
|
|
|
|
| |
|
|
|
|
|
|
|
|
|
|
|
|
|
|
|
|
|
|
|
|
|
|
|
|
|
|
|
|
|
|
|
|
|
|
|
|
|
|
|
|
|
| |
|
|
|
|
|
|
|
|
|
|
|
|
|
|
|
|
|
|
|
|
|
|
|
|
|
|
|
|
|
|
|
|
|
|
|
|
|
|
|
| (Pictures | ||
|
|
|
|
|
|
|
|
|
|
|
|
|
|
|
|
|
|
|
|
|
|
|
|
|
|
|
|
|
|
|
|
|
|
|
|
|
|
|
| remaining) | ||
|
|
|
|
|
|
|
|
|
|
|
|
|
|
|
|
|
|
|
|
|
|
|
|
|
|
|
|
|
|
|
|
|
| |||||||||
Exposure |
|
|
|
|
|
|
|
|
|
|
|
|
|
|
|
|
|
|
|
|
|
|
|
|
|
|
|
|
|
|
|
|
|
|
|
|
|
| Battery Status | |||
|
|
|
|
|
|
|
|
|
|
|
|
|
|
|
|
|
|
|
|
|
|
|
|
|
|
|
|
|
|
|
|
|
|
| ||||||||
|
|
|
|
|
|
|
|
|
|
|
|
|
|
|
|
|
|
|
|
|
|
|
|
|
|
|
|
|
|
|
|
|
|
| ||||||||
Compensation |
|
|
|
|
|
|
|
|
|
|
|
|
|
|
|
|
|
|
|
|
|
|
|
|
|
|
|
| ||||||||||||||
|
|
|
|
|
|
|
|
|
|
|
|
|
|
|
|
|
|
|
|
|
|
|
|
|
|
|
| White Balance | ||||||||||||||
|
|
|
|
|
|
|
|
|
|
|
|
|
|
|
|
|
|
|
|
|
|
|
|
|
|
|
|
|
|
|
|
|
|
|
|
|
|
|
|
|
| |
|
|
|
|
|
|
|
|
|
|
|
|
|
|
|
|
|
|
|
|
|
|
|
|
|
|
|
|
|
|
|
|
|
|
|
|
|
|
|
| |||
Focus Confirmation |
|
|
|
|
|
|
|
|
|
|
|
|
|
|
|
|
|
|
|
|
|
|
|
|
|
|
|
| Macro Mode | |||||||||||||
|
|
|
|
|
|
|
|
|
|
|
|
|
|
|
| 1.8" LCD |
|
|
|
|
|
|
| |||||||||||||||||||
|
|
|
|
|
|
|
|
|
|
|
|
|
|
|
|
|
|
|
|
|
|
|
| |||||||||||||||||||
Viewfinder |
|
|
|
|
|
|
|
|
|
|
|
|
|
|
|
|
|
|
|
|
|
|
|
|
|
|
|
|
|
|
|
|
|
|
|
| ||||||
|
|
|
|
|
|
|
|
|
|
|
|
|
|
|
|
|
|
|
|
|
|
|
|
|
|
|
|
|
|
|
|
|
|
|
|
|
|
|
|
|
|
|
|
|
|
|
|
|
|
|
|
|
|
|
|
|
|
|
|
|
|
|
|
|
|
|
|
|
|
|
|
|
|
|
|
|
|
|
|
|
|
|
|
|
|
|
|
|
|
|
|
|
|
|
|
|
|
|
|
|
|
|
|
|
|
|
|
|
|
|
|
|
|
|
|
|
|
|
|
|
|
|
|
|
|
|
|
|
|
|
|
|
|
|
|
|
|
|
|
|
|
|
|
|
|
|
|
|
|
|
|
|
|
|
|
|
|
|
|
|
|
|
|
|
|
|
|
|
|
|
|
LCD Display
ON/OFF
DIGITAL
CAMERA
2. Press the Shooting Menu Modes |
|
| button on the top of the camera. Continue pressing the | |||
|
| button to scroll through all the available menu selections as shown. Use the ADVANCE IMAGE | ||||
|
|
|
|
|
|
|
and REVERSE ADVANCE IMAGE |
|
| buttons to set the mode for each selection. | |||
3. Press the SHUTTER/OK ![]() key to confirm a change in settings and return to the shooting mode.
key to confirm a change in settings and return to the shooting mode.
EXPOSURE COMPENSATION: Adjusts exposure scale in 0.5 increments. Increase to +1.0 when the subject needs brightening; adjust to
SPOT METERING MODE: Use SPOT METERING ![]() to obtain the right subject exposure regardless of the backlit situation.
to obtain the right subject exposure regardless of the backlit situation.
QUALITY: Choose from 5 image resolution settings. Remember, the higher the resolution, the lower the number of storable frames on your SmartMedia card.
1.Super High ![]() button while SHQ is selected to step up to
button while SHQ is selected to step up to
2.Super High Quality (SHQ) for compressed JPEG images at 1280 x 960.
3.High Quality (HQ) for compressed JPEG images at 1280 x 960.
4.Standard ![]() button while SQ is selected to step up to
button while SQ is selected to step up to
5.Standard Quality (SQ) for compressed JPEG images at 640 x 480.
WHITE BALANCE: Select your light setting to most closely match shooting conditions: AUTO,
DAYLIGHT ![]() , CLOUDY
, CLOUDY ![]() , INDOOR
, INDOOR ![]() or FLORESCENT
or FLORESCENT ![]() lighting.
lighting.
ISO SETTINGS: Equivalent to film speed settings in your filmless digital camera. Select AUTO for normal conditions, 100 for normal daylight, 200 for cloudy/shadowy days or 400 for low light conditions. The higher the ISO, the slower the shutter speed that can be used and the lower amount of light required.
SHOOTING MODE: Choose ![]() for SINGLE SHOT MODE; or
for SINGLE SHOT MODE; or ![]() for shooting from 6 to 10 sequential pictures in BURST SHOT MODE.
for shooting from 6 to 10 sequential pictures in BURST SHOT MODE.
When the flash is needed, the green lamp inside the viewfinder blinks. When it comes on steadily, the flash is charged. The ![]() button, you
button, you
also may choose ![]() to eliminate the phenomena of
to eliminate the phenomena of ![]() for
for ![]() for forced flash activation. The selected mode appears in the top LCD.
for forced flash activation. The selected mode appears in the top LCD.
Press the MACRO MODE ![]() button to shoot small subjects from as close as 4". Press it again to utilize the
button to shoot small subjects from as close as 4". Press it again to utilize the
Enjoy Your Pictures
With the Olympus
1.Viewing Pictures
•After you’ve taken a picture, you can view it immediately on the color LCD screen.
•To review the pictures stored in the camera, close the lens barrier and press the green LCD
DISPLAY button. Use ADVANCE IMAGE ![]() and REVERSE ADVANCE IMAGE
and REVERSE ADVANCE IMAGE ![]() buttons to scroll through all the pictures saved on your SmartMedia card.
buttons to scroll through all the pictures saved on your SmartMedia card.
•To display up to 9 images simultaneously, press the INDEX DISPLAY ![]() button.
button.
•You also can view these pictures on any video source such as a Video or TV monitor with standard video input capabilities. Simply connect the
2.Saving Pictures
•While viewing pictures, you can save any shot by pressing the LOCK IMAGE ![]() button to the left of the top LCD panel. The key icon will appear on the LCD screen.
button to the left of the top LCD panel. The key icon will appear on the LCD screen.
3.Deleting Pictures
•To delete a picture, press the Erase ![]() button, select YES, then press the SHUTTER RELEASE/OK button. When you delete a picture, you’ve instantly freed up space on your SmartMedia Card for more
button, select YES, then press the SHUTTER RELEASE/OK button. When you delete a picture, you’ve instantly freed up space on your SmartMedia Card for more
pictures. So with the
Advance Image ![]()
![]()
Reverse Advance
Image