FIGURE 7 – Alternate Location for Outdoor

Temperature Sensor

FRESH AIR INTAKE

CENTER

LINE

36" MAX.

OUTSIDE WALL

90-896

STEP 8: WIRE THE CONTROL TO THE HUMIDIFIER

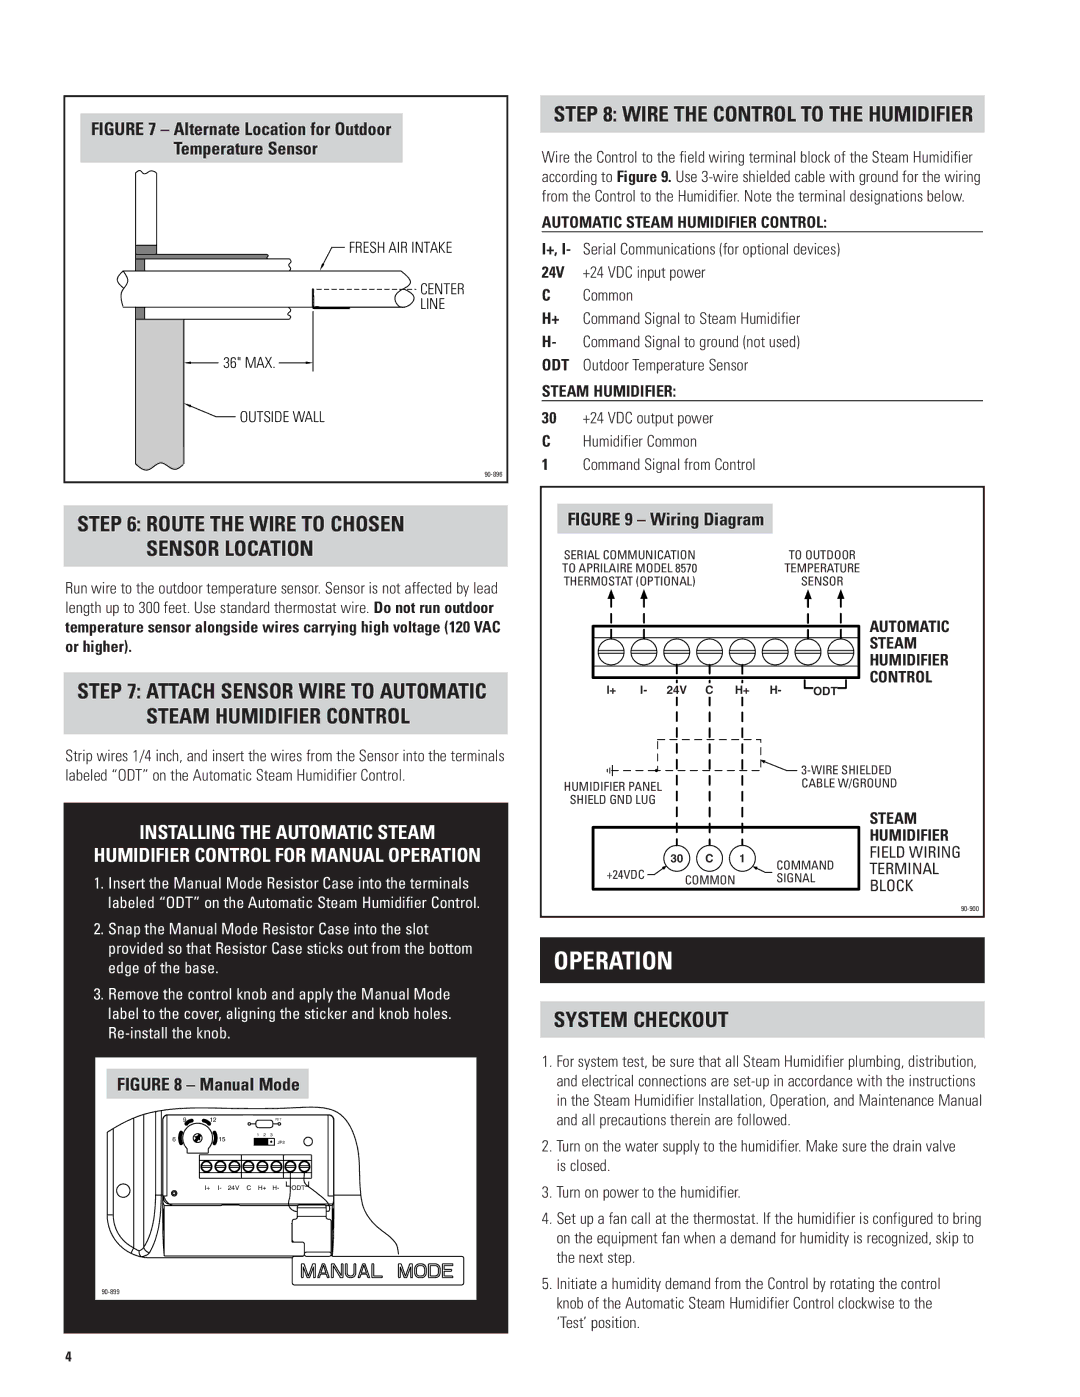
Wire the Control to the field wiring terminal block of the Steam Humidifier according to Figure 9. Use 3-wire shielded cable with ground for the wiring from the Control to the Humidifier. Note the terminal designations below.

AUTOMATIC STEAM HUMIDIFIER CONTROL:

I+, I- Serial Communications (for optional devices) 24V +24 VDC input power

CCommon

H+ Command Signal to Steam Humidifier

H- Command Signal to ground (not used)

ODT Outdoor Temperature Sensor

STEAM HUMIDIFIER:

30+24 VDC output power

CHumidifier Common

1Command Signal from Control

STEP 6: ROUTE THE WIRE TO CHOSEN

SENSOR LOCATION

Run wire to the outdoor temperature sensor. Sensor is not affected by lead length up to 300 feet. Use standard thermostat wire. Do not run outdoor

temperature sensor alongside wires carrying high voltage (120 VAC or higher).

STEP 7: ATTACH SENSOR WIRE TO AUTOMATIC

STEAM HUMIDIFIER CONTROL

Strip wires 1/4 inch, and insert the wires from the Sensor into the terminals labeled “ODT” on the Automatic Steam Humidifier Control.

INSTALLING THE AUTOMATIC STEAM

HUMIDIFIER CONTROL FOR MANUAL OPERATION

1.Insert the Manual Mode Resistor Case into the terminals labeled “ODT” on the Automatic Steam Humidifier Control.

2.Snap the Manual Mode Resistor Case into the slot provided so that Resistor Case sticks out from the bottom edge of the base.

3.Remove the control knob and apply the Manual Mode label to the cover, aligning the sticker and knob holes. Re-install the knob.

FIGURE 8 – Manual Mode

9

12


R17

6

1

2

3

15


JP2

I+ I- 24V C H+ H- ODT

90-899

FIGURE 9 – Wiring Diagram

SERIAL COMMUNICATION

TO OUTDOOR

TO APRILAIRE MODEL 8570

TEMPERATURE

THERMOSTAT (OPTIONAL)

SENSOR


AUTOMATIC


STEAM


HUMIDIFIER

I+ I-

24V

C

H+

H-

ODT

CONTROL


3-WIRE SHIELDED

HUMIDIFIER PANEL


CABLE W/GROUND

SHIELD GND LUG


STEAM


HUMIDIFIER


30

C

1

COMMAND

FIELD WIRING

+24VDC

COMMON

TERMINAL

SIGNAL

BLOCK


90-900

OPERATION

SYSTEM CHECKOUT

1.For system test, be sure that all Steam Humidifier plumbing, distribution, and electrical connections are set-up in accordance with the instructions in the Steam Humidifier Installation, Operation, and Maintenance Manual and all precautions therein are followed.

2.Turn on the water supply to the humidifier. Make sure the drain valve is closed.

3.Turn on power to the humidifier.

4.Set up a fan call at the thermostat. If the humidifier is configured to bring on the equipment fan when a demand for humidity is recognized, skip to the next step.

5.Initiate a humidity demand from the Control by rotating the control knob of the Automatic Steam Humidifier Control clockwise to the ‘Test’ position.

4

Page 4
Image 4
Aprilaire 1160 Operation, Wire the Control to the Humidifier, Route the Wire to Chosen Sensor Location, System Checkout

1180, 1150, 1160 specifications

Aprilaire 1160, 1150, and 1180 are three advanced whole-home humidifiers designed to enhance indoor air quality, maintain comfort levels, and promote a healthier living environment. These models are engineered to tackle the challenges of dry air, which can lead to various health issues such as dry skin, irritated sinuses, and increased allergens. Each model has unique features and technologies that cater to specific needs, making them suitable for a variety of households.

The Aprilaire 1160 is a high-capacity option capable of humidifying homes up to 3,600 square feet. One of its most notable features is the automatic humidistat, which continuously measures indoor humidity levels and adjusts the humidifier's operation accordingly. This ensures optimum comfort without unnecessary energy consumption. The 1160 also utilizes the evaporative technology, which draws in dry air and passes it through a moistened wick, allowing moisture to evaporate and be released into the home. Additionally, its self-regulating design prevents oversaturation and ensures consistent humidity levels year-round.

The Aprilaire 1150, designed for homes up to 3,000 square feet, offers similar benefits, spotlighting simplicity and efficiency. It features an easy-to-use manual humidistat that lets homeowners set their desired humidity levels. The 1150 also incorporates a robust water panel that collects moisture, meaning it can effectively combat dry air in even the most challenging conditions. Its compact design allows for flexible installation options, making it a suitable choice for both new constructions and existing homes.

For larger spaces, the Aprilaire 1180 is an excellent solution, effectively servicing areas up to 4,000 square feet. Like the 1160, it benefits from an automatic humidistat for seamless operation. One of the standout features of the 1180 is its high moisture output capability, ideal for households with higher humidity needs. Furthermore, the humidifier operates quietly, making it suitable for bedrooms and other quiet spaces. Its advanced water panel technology and simple maintenance requirements set it apart as a reliable choice for homeowners looking to improve their indoor air quality.

Overall, Aprilaire humidifiers 1160, 1150, and 1180 are equipped with cutting-edge technologies and user-friendly features that cater to different home sizes and needs. By maintaining optimal humidity levels, these devices not only enhance comfort but also create a healthier living environment.